The Beauty Of Having A Pi-hole
Table of Contents
So, check this little idea that I have - I want to browse the internet without all sorts of unscrupulous actors collecting every little bit of metadata on me and my family they can possibly get their hands on. Radical, I know. Who would’ve thought that I don’t wont every single website I visit syphon metadata about my computer, my browser, and other signals that can help them build a profile without my consent.
Unfortunately, the experience of browsing the web or using software in 2024 boils down to fielding a barrage of ads, malicious scripts, analytics widgets, chatbot widgets, massive “take over your page” banners asking you to consent to cookies, software that won’t shut up and just phones home with every click, and other things that you probably didn’t want to have to deal with. Not that any of these things didn’t exist in some capacity in 2004 (or even 1994), but the sheer amount of privacy-abusing techniques was much smaller.
The whole concept of “ad tech” became “figure out how to abuse the living hell out of every visitor” which is, let’s say, suboptimal. I even alluded to it in some of my previous writing.
Which brings me to my main point - you should absolutely use a Pi-hole in your home network. It’s not exactly news that this project exists - folks like Jeff Atwood, Troy Hunt, Scott Hanselman, and Scott Helme talked about it for years. I am just adding another datapoint to the camp of “Get this on your network ASAP.”
If you’ve never heard about it, Pi-hole is software that runs on a Raspberry Pi (can technically run even outside a Pi) that acts as the Domain Name Service (DNS) proxy within your own network. That is, if you go to https://example.com, it first hits the Pi-hole before going out and asking authoritative DNS servers for domain information. Its main purpose is blocking requests to domains that you don’t want to hit from your network. Those can be trackers, ad-serving content delivery networks (CDNs), or just any domain that you deem not worthy of receiving data from within your house or place of business.
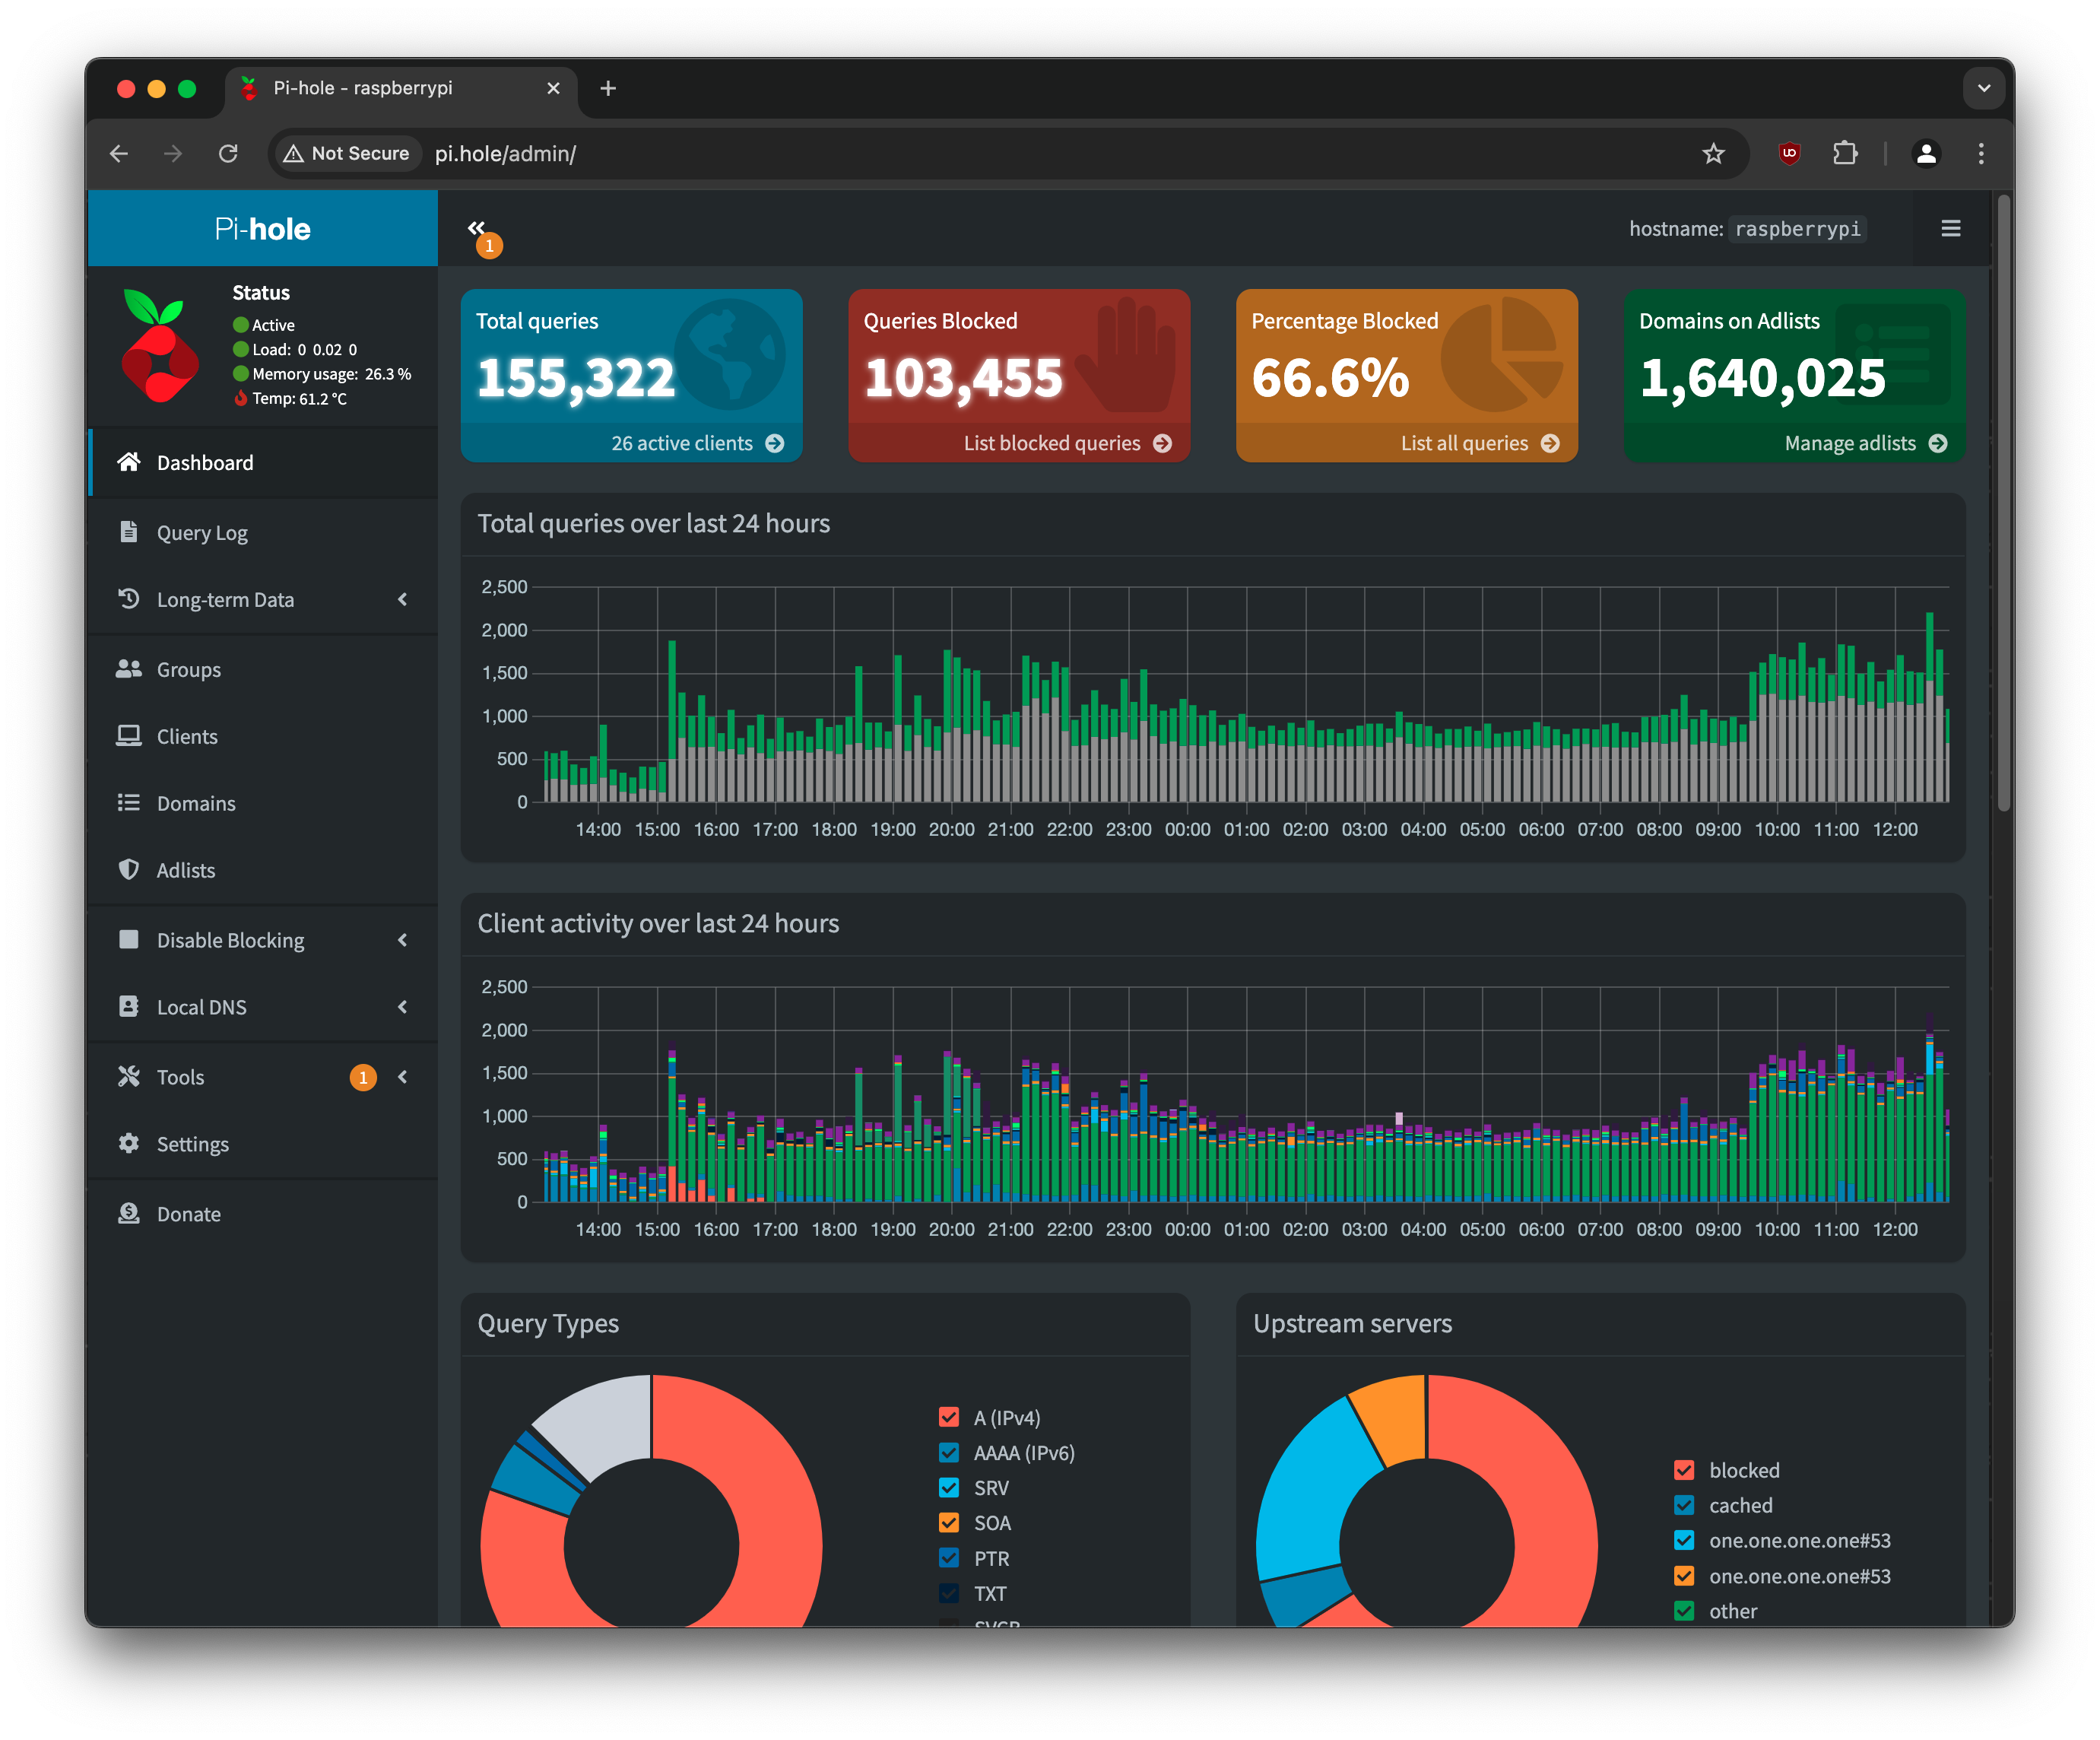
To give you an idea of how much completely unnecessary network traffic there is, on my own network a whopping 66.6% of all traffic is blocked with no functional impact on anything that I do. This tells you just how much various devices, sites, and apps like to either phone home or load things that I do not want.
The kit #
Setting Pi-hole up doesn’t take a significant investment. This is a list of recommendations, but of course you can fly solo and come up with your own configuration that suits your needs better. On the surface, you will need:
- A Raspberry Pi. If you’re in the US, you can get a CanaKit starter kit for roughly $155, which also includes a microSD card you will need for the setup.
- A monitor, mouse, and keyboard that you can plug into the Raspberry Pi as you set it up.
- Minimal time to follow instructions on Pi-hole setup.
- Some time to make sure that you set up your network to route DNS requests through the Pi-hole.
And that’s about it. Frankly, the biggest investment here is time - getting everything set up and validated. Worry not, though - the Pi-hole team have done a marvelous job in making sure that the installation process is as simple as possible.
Domain lists #
Once you set up the Pi-hole hardware and software, as well as configure your router to point to the Pi-hole device as the target for DNS requests, you will also need to configure which domains to block. You can do that yourself, for example by seeing what flows through your network and then deciding whether you want it or not, or you can use community blocklists. I highly recommend looking at Firebog as the starting point for your explorations as the community has done extensive research and collected a myriad of domains that you likely haven’t heard about.

Oooofff... There are quite a few lists there. Do I need to use every single one when I configure my own Pi-hole instance?
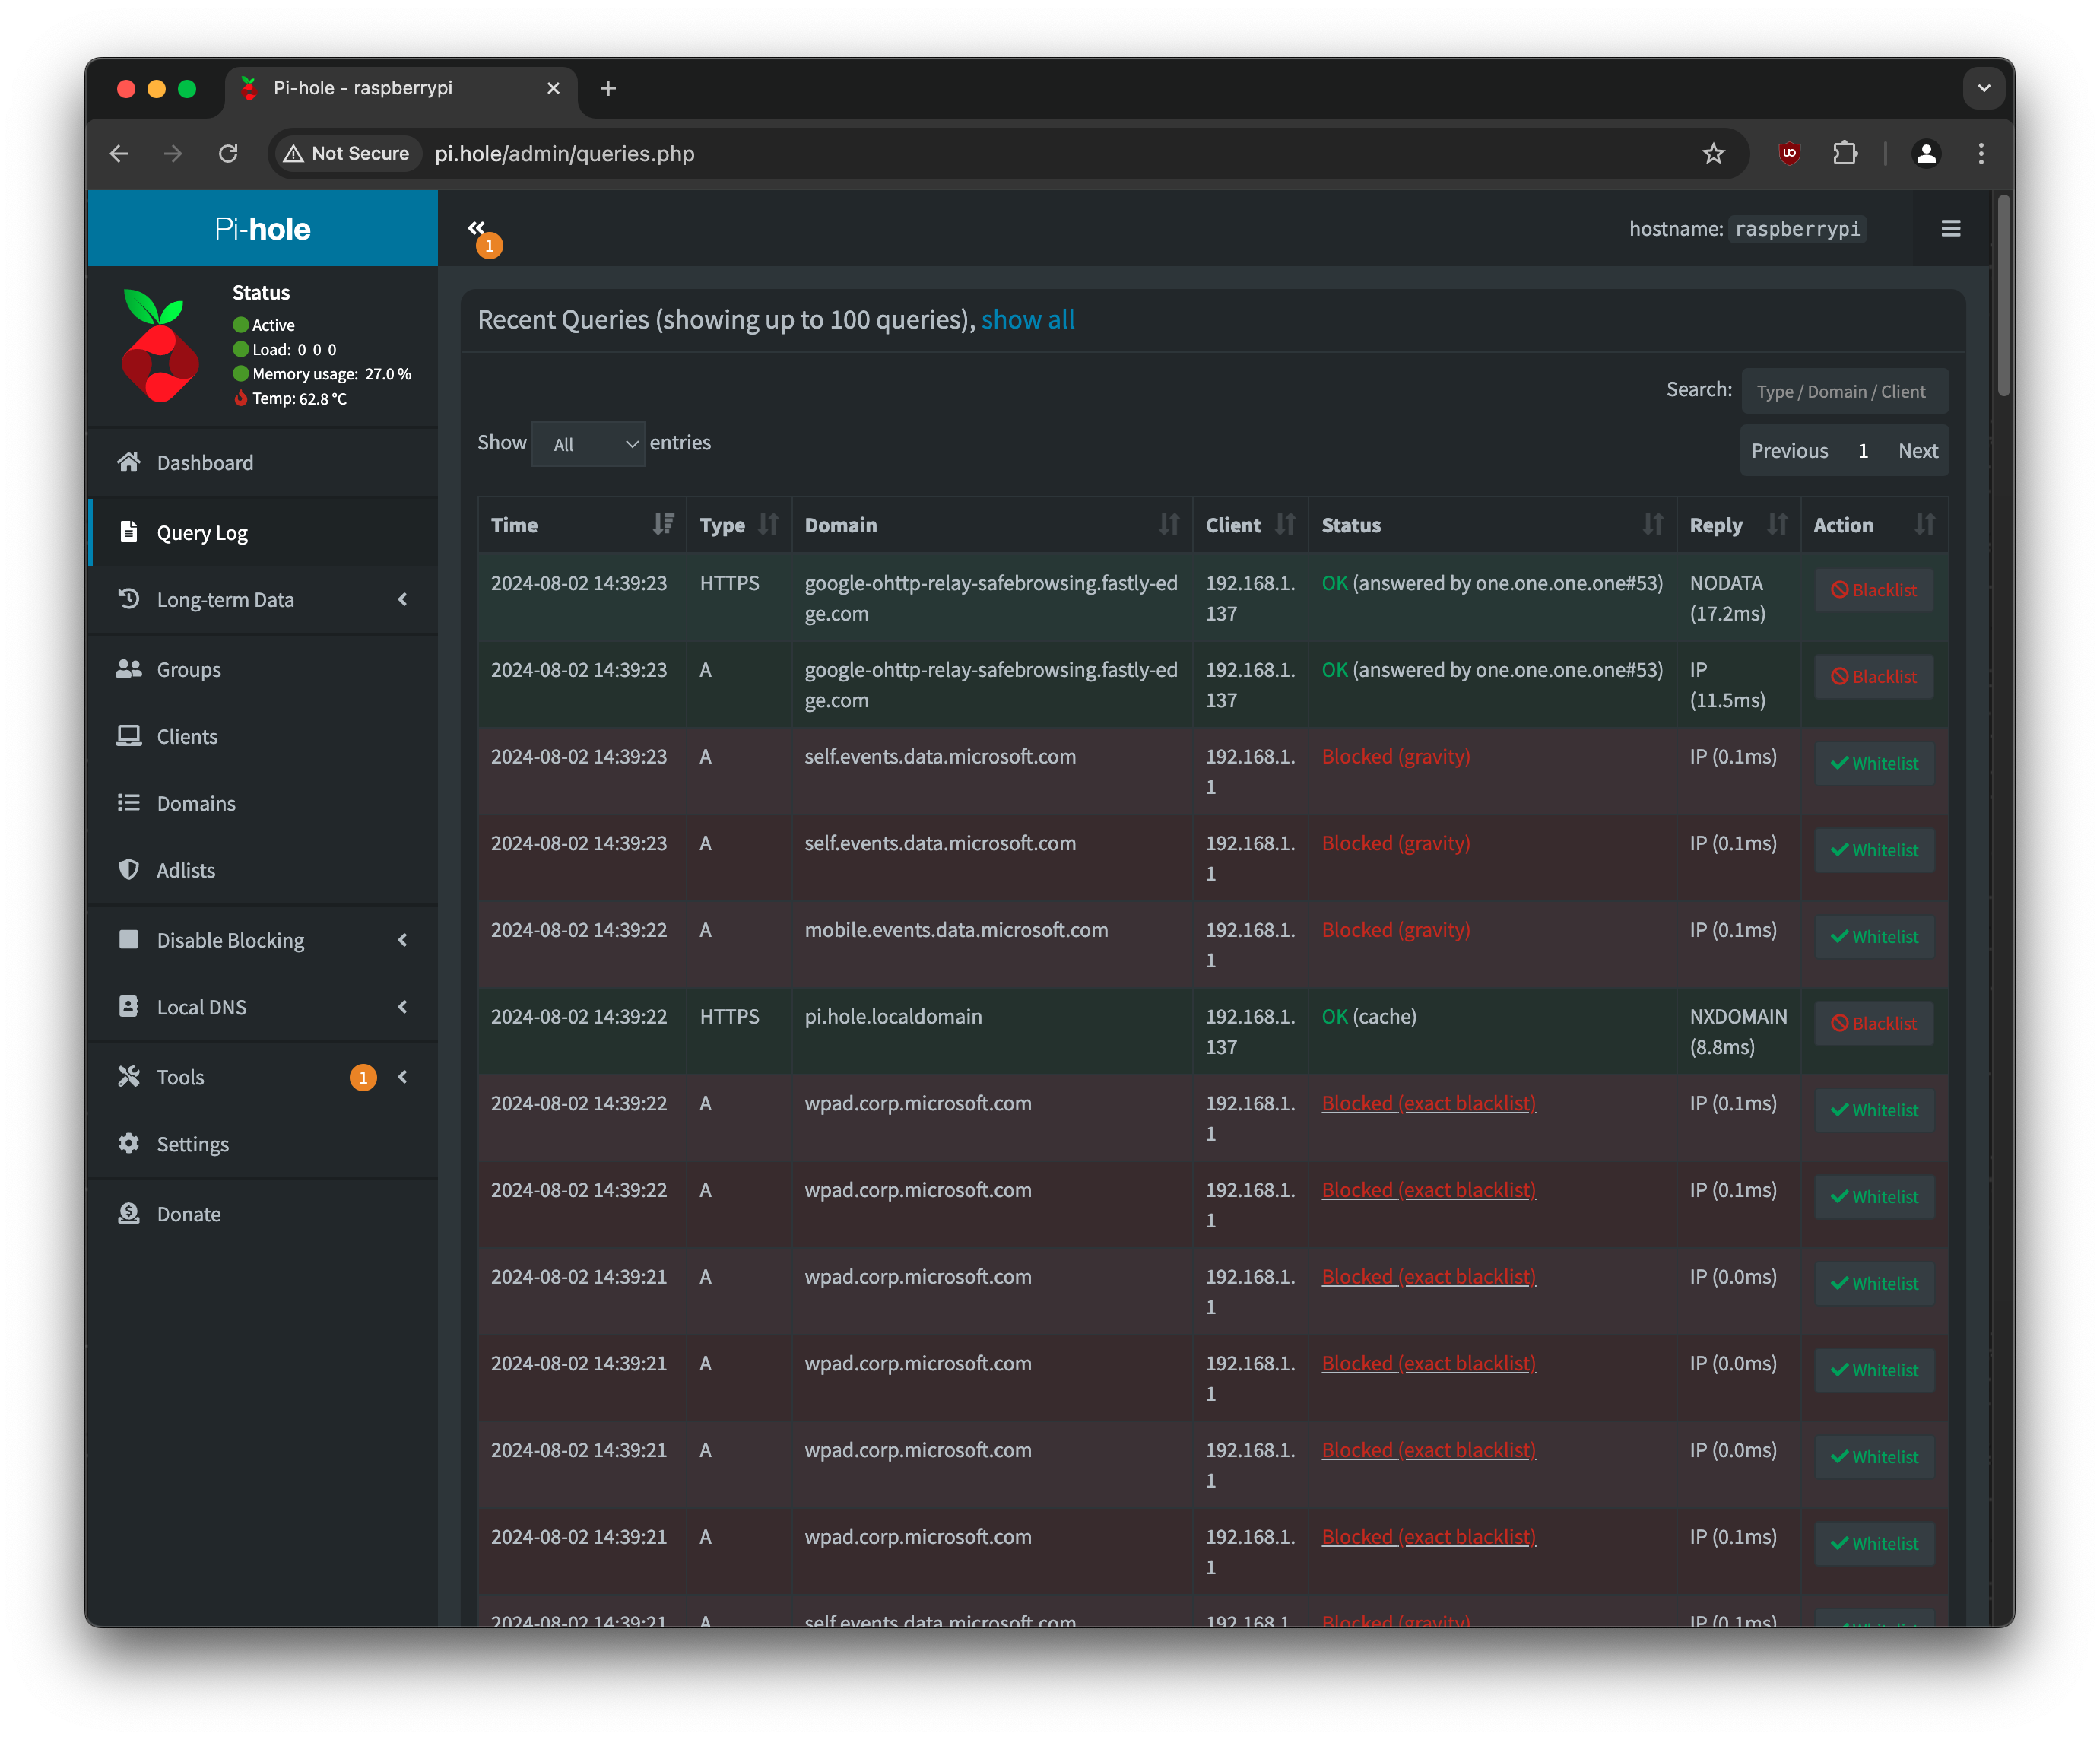
Absolutely not, but it’s a great reference point. What I found is that as you start setting things up you will notice that certain things will break or not work. Conveniently, you can look at the live query log that I mentioned earlier, that will tell you what clients are trying to access specific domains. You can use that view to dynamically block or unblock domains as you see fit.
Not only that, but you can also set up rules to block domains that fit a certain criteria via regular expressions. For example, and because I see a lot of malicious traffic sourced from Russia, China, and Hong Kong, I can easily block those TLDs:
(^|\.)(cn|ru|hk)$
Now, anything that tries to talk to any server with those TLDs will not escape your network if the requests are routed through the Pi-hole. Now, of course, a country TLD is not necessarily the only attack vector for malware, but blocking them is another small step in terms of improving the overall network security posture.
Preventing devices bypassing DNS settings #
As you set things up and configure the network-wide DNS provider to be your Pi-hole, you might also not realize that quite a few devices bypass your DNS settings to make sure that they can still serve you ads or collect analytics. To solve this you need to use a trick that is dependent on what hardware you’re using for your router. In my case, because I am within the UniFi ecosystem and using a UDM Pro, I can run the following set of commands when I SSH into the UDM itself:
iptables -t nat -A PREROUTING ! -s YOUR_PI_HOLE_IP -p tcp --dport 53 -j DNAT --to YOUR_PI_HOLE_IP
iptables -t nat -A PREROUTING ! -s YOUR_PI_HOLE_IP -p udp --dport 53 -j DNAT --to YOUR_PI_HOLE_IP

# Make sure that we skip 192.168.1.1 since that seems to break UniFi Protect
iptables -t nat -A POSTROUTING -m iprange --src-range 192.168.1.2-192.168.254.254 -j MASQUERADE
The Bash script above configures the iptables rules to redirect all DNS traffic (port 53) to my Pi-hole and applies Network Address Translation (NAT) rules to allow for network address masquerading, which is a technique that allows to abstract away the internal network from the public internet by replacing the source IP address with the address of the gateway (your router).
Let’s dissect these commands a bit more in-depth:
iptables -t nat -A PREROUTING ! -s YOUR_PI_HOLE_IP -p tcp --dport 53 -j DNAT --to YOUR_PI_HOLE_IP
Here is what each argument does:
| Argument | Description |
|---|---|
-t nat |
Specifies that the rule is for the NAT table. |
-A PREROUTING |
Adds a rule to the PREROUTING chain, which processes inbound packets before routing. |
! -s YOUR_PIHOLE_IP |
Excludes packets that are originating from the Pi-hole itself. |
-p tcp |
Specifies that the rule applies to TCP packets. |
--dport 53 |
Matches packets destined for port 53 (DNS). |
-j DNAT |
Jumps to the destination NAT (DNAT) target, modifying the destination IP address. |
--to YOUR_PIHOLE_IP |
Finally, redirects the packets to the Pi-hole IP address. |
The second line does the exact same thing but for UDP packets:
iptables -t nat -A PREROUTING ! -s YOUR_PI_HOLE_IP -p udp --dport 53 -j DNAT --to YOUR_PI_HOLE_IP
For the third command, we do the following:
iptables -t nat -A POSTROUTING -m iprange --src-range 192.168.1.2-192.168.254.254 -j MASQUERADE
The arguments are somewhat similar to what we saw above, but let’s break them down too:
| Argument | Description |
|---|---|
-t nat |
Specifies that the rule is for the NAT table. |
-A POSTROUTING |
Adds a rule to the POSTROUTING chain, which processes inbound packets after routing. |
-m iprange --src-range 192.168.1.2-192.168.254.254 |
Matches packets with source IP addresses in the range 192.168.1.2 to 192.168.254.254. You can adjust the ranges fro your own network. |
-j MASQUERADE |
Jumps to the MASQUERADE target, which replaces the source IP address with the router’s IP address for outgoing packets. |
Long story longer - the script ensures that all DNS requests (both TCP and UDP) from devices on the network are redirected to the Pi-hole, except for requests originating from the Pi-hole itself.
The MASQUERADE rule ensures that the source IP addresses in the specified range are masked with the router’s IP address, ensuring proper routing and response handling. In my special case, the IP range excludes 192.168.1.1 to avoid breaking UniFi Protect.
Combo with ad-blockers #
Despite having Pi-hole sitting between all the devices on my network and the rest of the internet, there is still a lot of value in having a trusted ad-blocker like uBlock Origin. That’s mainly because you will still run into domains that you can’t block (e.g., for YouTube) but still want to use the service ad-free (e.g., again - YouTube). I treat the Pi-hole as another layer in blocking unwanted content and requests in addition to an ad-blocker in the browser, which can also helpfully block specific UI elements, such as passive ads or sponsored content that loads from the primary website domain.
Conclusion #
Once I set up the Pi-hole on my network, there is no going back. I did the same thing for my parents and in-laws, and will continue advocating it to everyone that wants to hear about it. It makes that big of a difference in the online quality of life.