Reverse Engineering The Stream Deck
Table of Contents
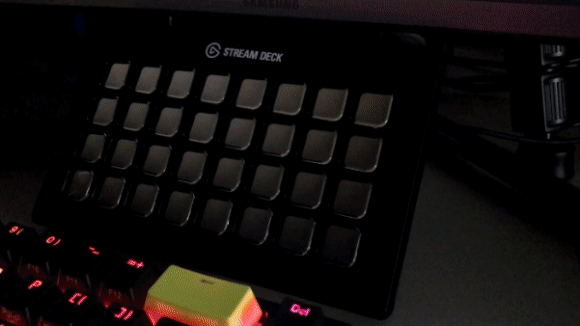
I’ve had a Stream Deck for a while. It’s basically keyboard shortcuts, mapped to an individual button, with a visual set up for that button. It’s convenient, it’s easy to use, and it looks really good on the desk among the multitude of other RGB lights that are embedded in modern computing technology. Then, some time ago, I thought to myself - the out-of-the-box software and SDK are quite limiting, and require me to run the Stream Deck software all the time. What can I do to make this better for my own workflow? That’s where the idea of reverse engineering the device came up.
🌱 Fundamentals #
Stream Deck itself is a mini-computer. If you watch any of the teardown videos, you’ll learn (just like I did) that it sports an ARM CPU and a large TFT display. That’s right, the Stream Deck is not a collection of small screens, but rather one large display that is split into square subsections by a capacitive panel that sits between the plastic buttons and the screen. Its capabilities are fairly limited - the device itself is not the one that is responsible for launching software or switching scenes in OBS. It’s the Stream Deck software that does the heavy lifting. The Stream Deck is merely acting like a screen with a short-term memory.
Knowing that, I knew that my job would be somewhat easier - I don’t need to try and understand how to write code for the device, but rather figure out its USB protocol. The device I am experimenting with is a Stream Deck XL, so as you read through this article, keep in mind that the experience or nuances of the USB protocol might be different for other variants.
As I started my detective work, my running assumption was that the Stream Deck is a Human Interface Device (HID). Wikipedia put it best, describing HID as “…takes input from humans and gives output to humans.” Sounds like the Stream Deck? Sure does.
Knowing this, I could now verify my assumptions by inspecting the USB traffic that goes between the device and my computer. If I connect it as-is, it does nothing. The Stream Deck software was needed to understand how I can talk to it, so I spun up a virtual machine and installed the default tools to manage the device.
The next ingredient required for my inspection recipe was Wireshark - this is a wonderful that allows hooking into the “wire” (whether it’s network or USB) and listening to what all the chatter is about. Along with Wireshark, I also used USBPcap (stands for “USB Packet Capture”), which is specifically designed to inspect USB traffic, and it plugs in nicely with Wireshark, so that I can see everything in one view.
On Windows, the setup of this traffic analysis toolchain was relatively simple - I basically installed the tools and ran them. I’ve previously done something similar on a Mac device, and there I needed to jump through a few hoops to get it running (like disabling System Integrity Protection) - if you are following this article and want to experiment on the macOS, refer to the Wireshark USB capture setup guide.
To make sure that I am looking for the right things, I first fired up the Windows Device manager to see how it identifies the Stream Deck.
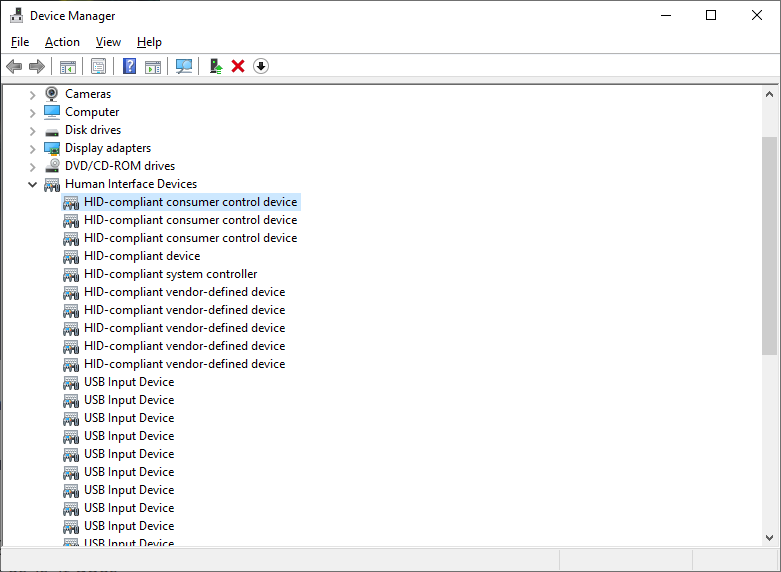
Well that’s an awful lot of connected HIDs, with zero identifiers that allow me to actually find which is the Stream Deck, and I don’t want to go through trial and error to figure out what to listen to. Luckily, there is another way to find out - through vendor and product IDs that are set for every USB device. These are formal identifiers that are static - they don’t change on your machine. To find what we need, we can refer to public databases, such as the USB ID Repository. I know that the Stream Deck is made by Elgato, so that’s what I am going to search for.
A quick scan of the page shows that Elgato’s vendor ID (VID) is 0fd9. Going to their repository page also lists all their products, showing Stream Deck XL having the 006c product ID (PID). These are good clues, but where in Device Manager will I find these values? I didn’t have to go far - it’s all in the Hardware Ids property.
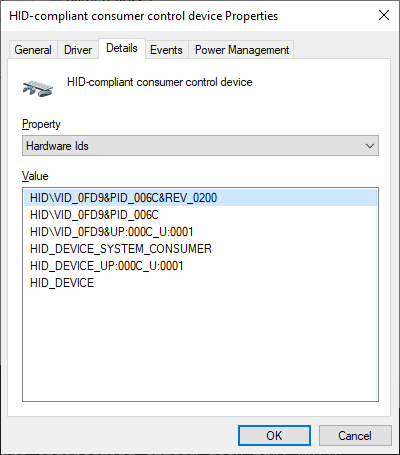
Among all the text, I can clearly see that there is a familiar VID and PID values. This is it! Now it’s time to inspect the traffic. I fired up Wireshark and the Stream Deck software and was instantly overwhelmed by all the packets that were going around. Clearly, Wireshark was capturing every USB device on the machine which is not what I want. I want surgical precision when it comes to my packets, which meant that I need to figure out how to find the Stream Deck device in the sea of USB data.
🕵️♀️ Finding the right USB traffic #
Wireshark has multiple ways to filter that out, and I could see that there are columns such as Source and Destination that are uniquely associated with each USB device (where host is my machine).
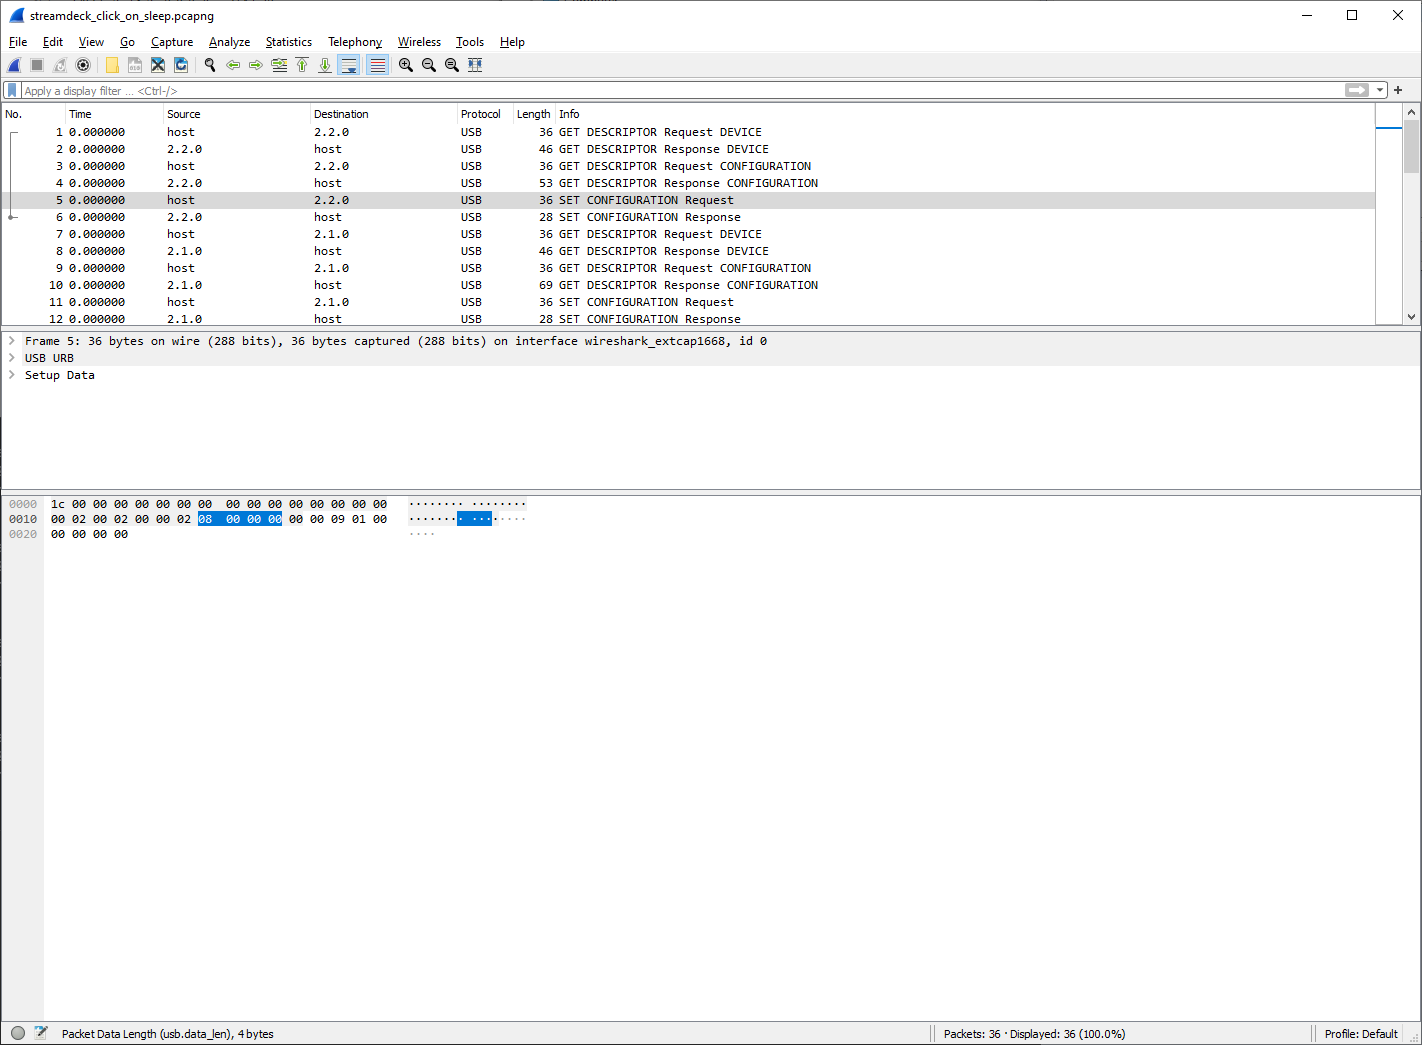
Another clue - I need to know what the “address” for the USB device is. I could see labels like 2.2.0 which associate every device with a given USB hub, and then nest within those. Most packets did not have VID or PID data, so I couldn’t easily filter on those. But hold on a second - there is a GET DESCRIPTOR request! This is a standard request that gets, well, the descriptor of the device. The host requested one with bDescriptorType equal to DEVICE (0x01). This will result in the device reporting back its basic information. Every USB device can only have one device descriptor, so this should be great. Maybe the response will contain the VID and PID? Let’s filter Wireshark by PID with the help of usb.idProduct == 0x006c (recall that 0x006c is the PID for Stream Deck XL).
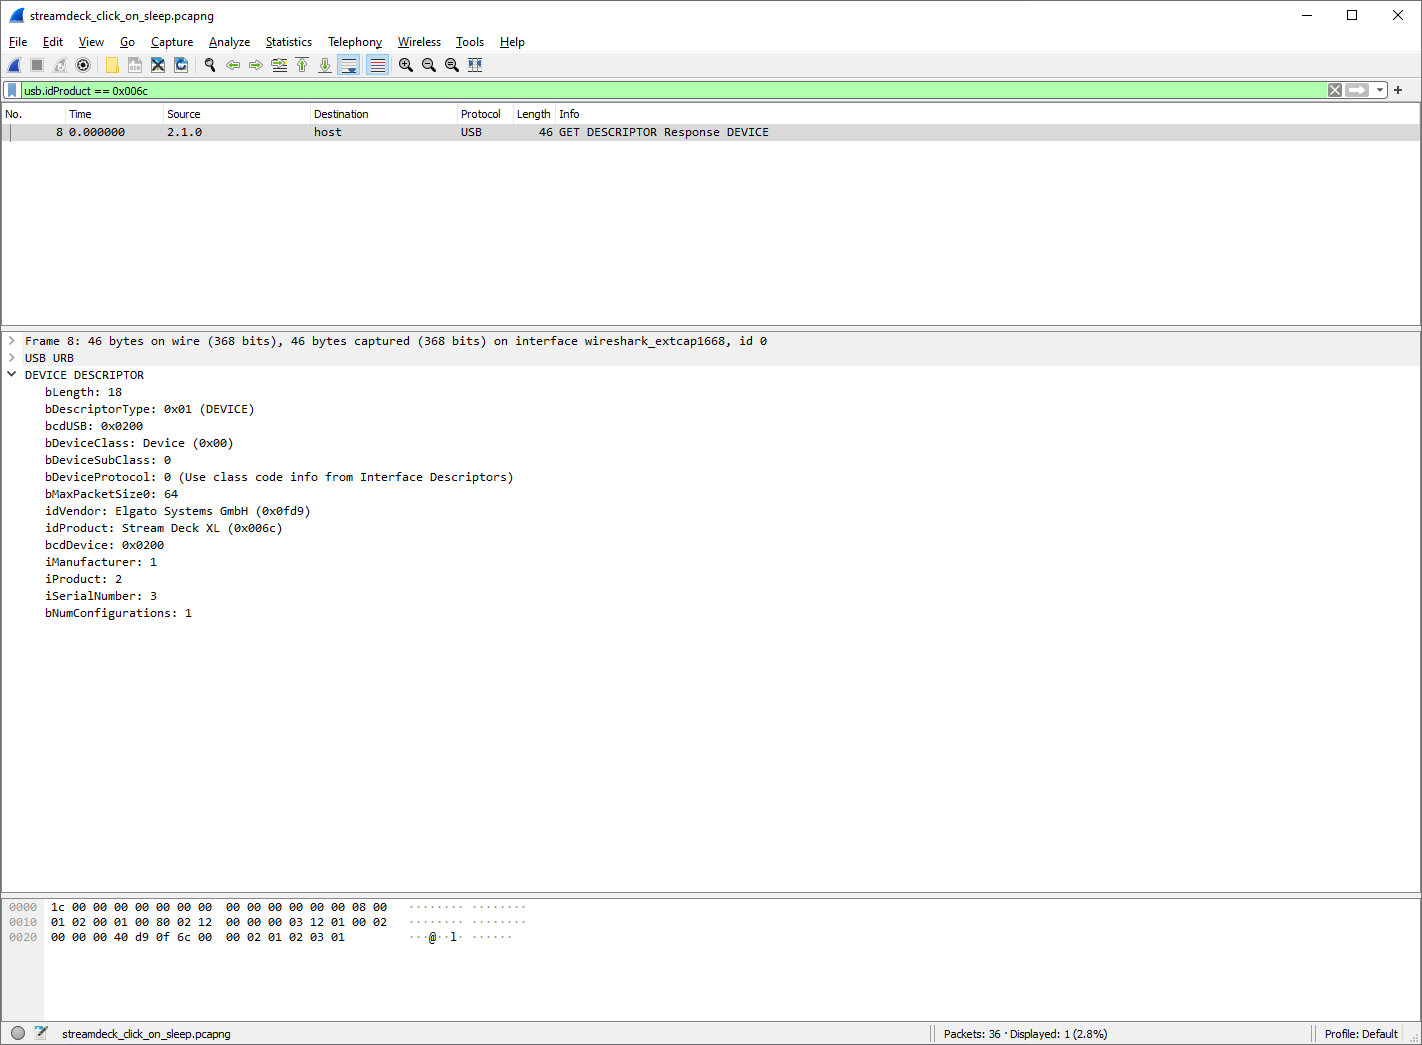
What do you know - this is exactly who I am looking for, and I can see that the address for this device is 2.1.0. What this means is that now I can filter Wireshark to the traffic to and from this device by using usb.dst == "2.1.0" || usb.src == "2.1.0". This is good, but we also would be missing something important here - 2.1.0 specifies the concrete USB endpoint (.0), which a device can have many of. What we need is to filter by bus ID, device ID, and any endpoint. Regular expressions to the rescue, with a short filter string: usb.dst matches "2\.1\.+" || usb.src matches "2\.1\.+"
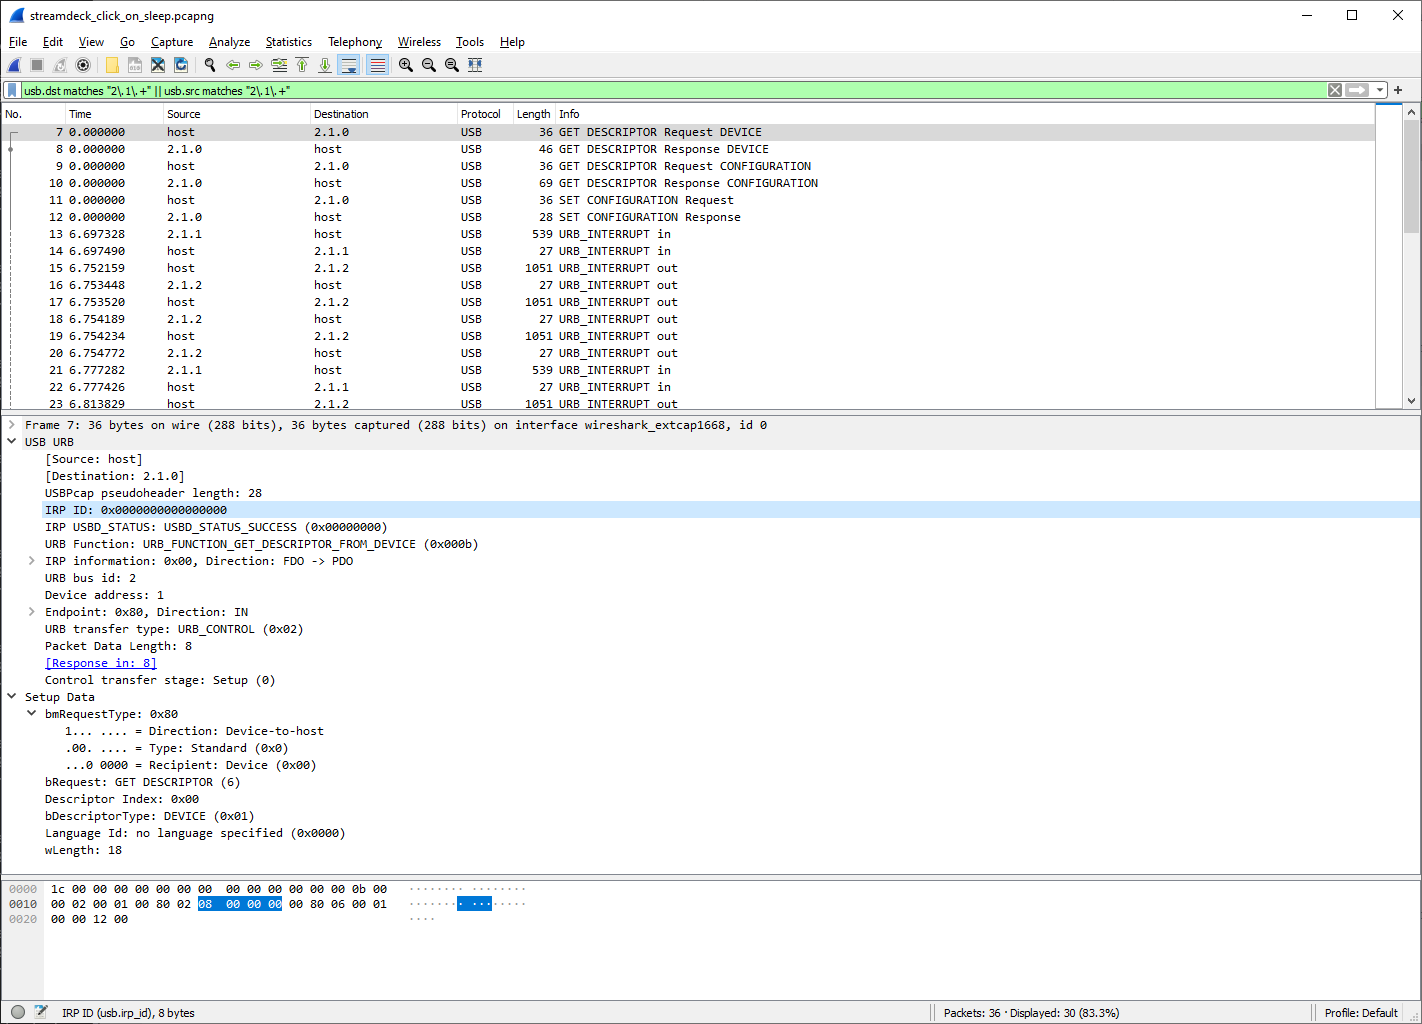
Excellent - now I can actually start mapping actions to packets. To experiment, I started performing random button assignments in the Stream Deck software and see what data I can generate. The first thing that I wanted to find out is how to set an image for a button, so I did a bunch of those.
👩💻 Decoding the packets #
Looking at the Wireshark view, I noticed something peculiar - there are packets going out with JFIF in the packet content.
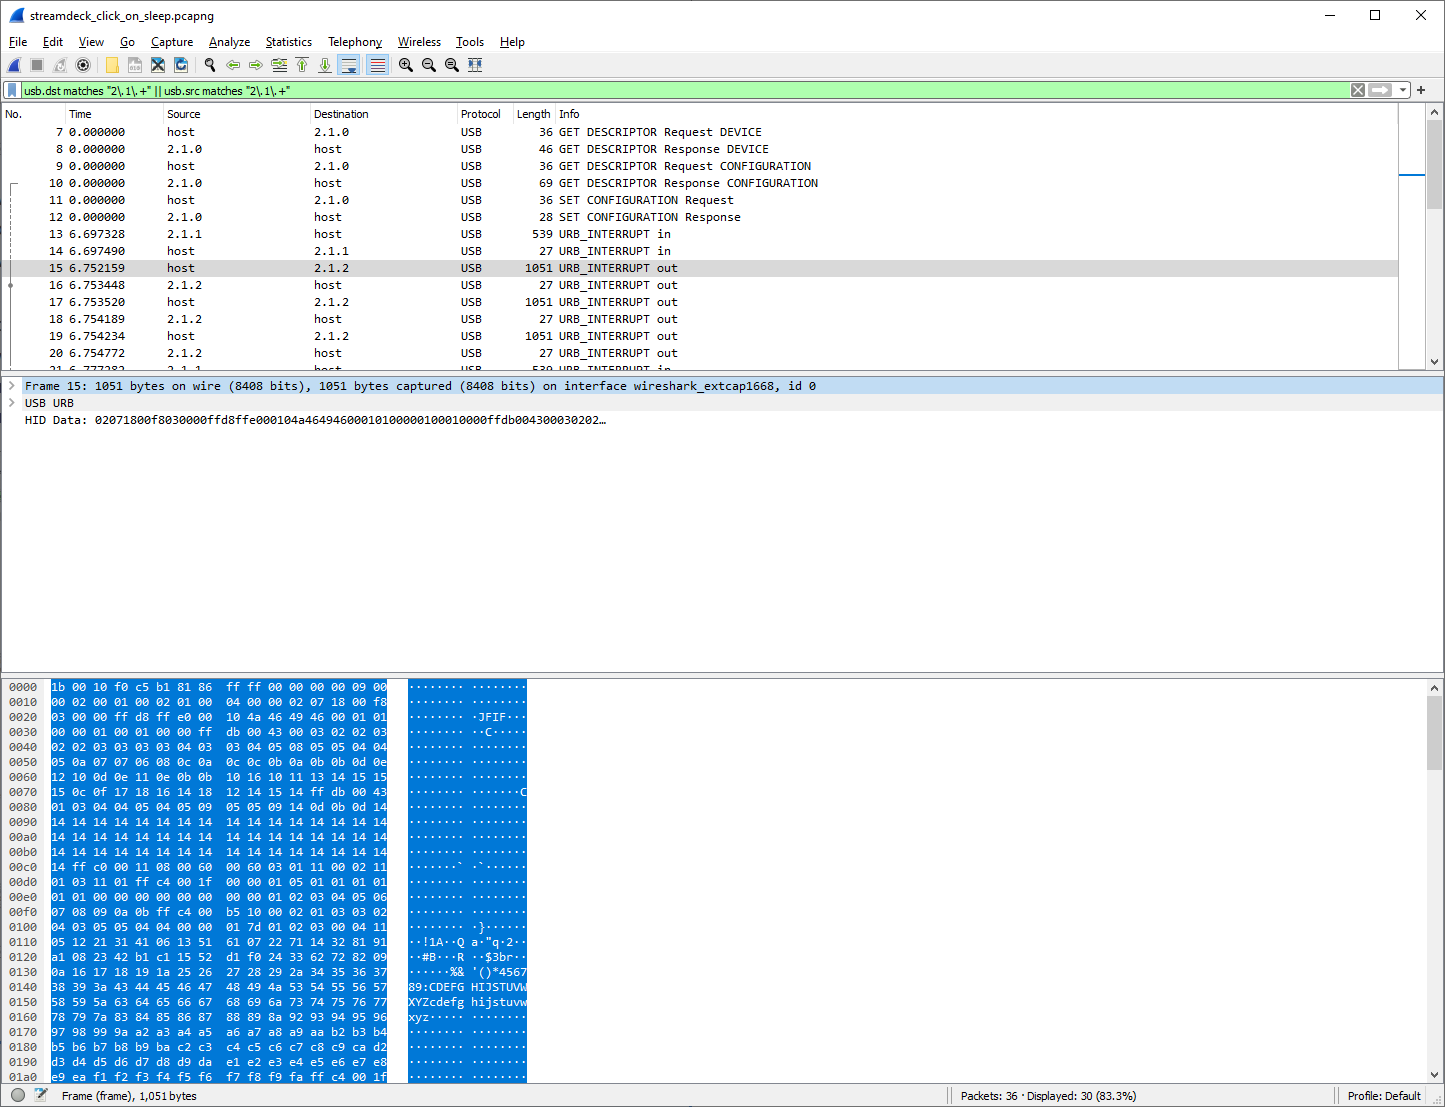
That’s another great clue - Stream Deck software sends JPEG files over the wire, so there is no “magic sauce” that sets images to something funky. I just need to pass the right content to the buttons. But what is the structure of the packet? To do that, I started ignoring all the frame data, and instead focus on the HID Data field, that represents the actual packet contents that the software generates. It looks like this:
0000   02 07 18 00 f8 03 00 00 ff d8 ff e0 00 10 4a 46   ..............JF
0010   49 46 00 01 01 00 00 01 00 01 00 00 ff db 00 43   IF.............C
0020   00 03 02 02 03 02 02 03 03 03 03 04 03 03 04 05   ................
0030   08 05 05 04 04 05 0a 07 07 06 08 0c 0a 0c 0c 0b   ................
0040   0a 0b 0b 0d 0e 12 10 0d 0e 11 0e 0b 0b 10 16 10   ................
0050   11 13 14 15 15 15 0c 0f 17 18 16 14 18 12 14 15   ................
0060   14 ff db 00 43 01 03 04 04 05 04 05 09 05 05 09   ....C...........
0070   14 0d 0b 0d 14 14 14 14 14 14 14 14 14 14 14 14   ................
0080   14 14 14 14 14 14 14 14 14 14 14 14 14 14 14 14   ................
...
On the surface this looks like a bunch of garbage that would be hard to parse. Unless I start looking for more clues, and the first being the fact that there is a JFIF component in all of this. I started looking at file signatures. It turns out that JPEG has a very distinct FF D8 FF E0 00 10 4A 46 “starter” - and that’s what we see in chunk above! So, it looks like, indeed, Stream Deck is sending over JPEG data. The challenge remains two-fold:
- Taking the existing JPEG content from a packet does not produce a valid image. It seems that the image is transmitted in chunks.
- There is a header, that is added as a prefix to the JPEG payload, that I have no idea about.
Let’s start with (1) - this problem is easily resolved by looking at other packets that are being transmitted in sequence. It turns out that my hypothesis was right. A data packet to set the image is limited to 1024 bytes, as seen from the Packet Data Length property, so if the image is more than 1024 bytes (not the full size - we’ll find out why shortly), then it’s being split in multiple packets that are transmitted to the device.
Upon closer inspection (and many packets later), I realized that the first 8 bytes are always the header. That is, the payload is actually 1016 bytes, with 8 preceding bytes that describe the packet. What do they mean? Let’s start by looking at the chunk above, and specifically the first 8 bytes:
| 1 | 2 | 3 | 4 | 5 | 6 | 7 | 8 |
|---|---|---|---|---|---|---|---|
02 |
07 |
18 |
00 |
f8 |
03 |
00 |
00 |
Looking at many packets sent from the Stream Deck software to the device when setting a button image, I noticed the following pattern:
- The first byte is always
02. This identifies the only output report that the Stream Deck has (since first byte is always the report identifier). - The second byte is always
0x07. Assuming that it represents the command to set the image. - The third byte is the ID of the button that needs to be set. Keep in mind that this is the hexadecimal value of the button, not integer. So, 18 above would actually be the 24th button.
- The fourth byte tells whether the current packet is the final packet in a sequence to set the image (it’s either
0x00or0x01).
The 5th to 8th bytes were puzzling. I couldn’t quite put my finger to what they represent, but setting them to 0x00 produced unexpected results, so clearly they did something, but what? After spending a day going back and forth between packets, I noticed a curious consistency. Whenever images were split in more than one packet, the first packet always has the 5th and 6th bytes as 0xf8 and 0x03. In the second iteration (in the case of split images), the 7th and 8th bytes all of a sudden took the form of 0x01 and 0x00 respectively. This was easily reproducible. But what does that mean? In isolation, these numbers felt oddly out of place.
If we convert them to an integer, we get 248 for f8 and 3 for 0x03 respectively. OK, I clearly had more than 248 of anything in this packet, so this seems like garbage once again. 3 didn’t ring a bell either. What if I combined the two? f803 is 63491 in decimal. Yikes - once again a dead end. Until I remembered something from back in my socket coding days. In a lot of cases, I’d use the little-endian 16-bit integer representation of the packet length when embedding it in any kinds of headers. Could that be the case here?
Well, what is f803 if we assume it represents a little-endian 16-bit integer, in a more human-readable form? 1016! Why am I excited about this magic number? Because it’s the length of the image payload in the packet!
To take a short detour, let me explain how the conversion here works. First, we need to convert hexadecimal to an integer. So, we have f803
With the above, the actual integer value, if we dissect the hexadecimal number, is equal to 15*16^3 + 8*16^2 + 0*16^1 + 3*16^0. Which is 63491. OK, but that’s not what we’re looking for. Because the value is little-ending, we need to reverse the bytes. So, same technique, but we need to start with 03f8, which would follow the formula: 0*16^3 + 3*16^2 + 15*16^1 + 8*16^0. This gives us 1016. A similar approach can be applied to the 7th and 8th bytes, which leads to the conclusion that:
- The fifth and sixth bytes are the 16-bit little-endian representation of the image payload length.
- The seventh and eight bytes are the 16-bit little-endian representation of the zero-based iteration, if the image is split.
Now this makes a lot of sense! That’s what I did with the SetKey function in my DeckSurf SDK wrapper for Stream Deck.
 public static bool SetKey(ConnectedDevice device, int keyId, byte[] image)
{
    var content = image ?? DeviceConstants.XLDefaultBlackButton;

    if (device != null)
    {
        var iteration = 0;
        var remainingBytes = content.Length;

        using (var stream = device.Open())
        {
            while (remainingBytes > 0)
            {
                var sliceLength = Math.Min(remainingBytes, ImageReportPayloadLength);
                var bytesSent = iteration * ImageReportPayloadLength;

                byte finalizer = sliceLength == remainingBytes ? (byte)1 : (byte)0;
                var bitmaskedLength = (byte)(sliceLength & 0xFF);
                var shiftedLength = (byte)(sliceLength >> ImageReportHeaderLength);
                var bitmaskedIteration = (byte)(iteration & 0xFF);
                var shiftedIteration = (byte)(iteration >> ImageReportHeaderLength);

                // TODO: This is different for different device classes, so I will need
                // to make sure that I adjust the header format.
                byte[] header = new byte[] { 0x02, 0x07, (byte)keyId, finalizer, bitmaskedLength, shiftedLength, bitmaskedIteration, shiftedIteration };
                var payload = header.Concat(new ArraySegment<byte>(content, bytesSent, sliceLength)).ToArray();
                var padding = new byte[ImageReportLength - payload.Length];

                var finalPayload = payload.Concat(padding).ToArray();
                stream.Write(finalPayload);

                remainingBytes -= sliceLength;
                iteration++;
            }
        }

        return true;
    }
    else
    {
        return false;
    }
}
There is a bit of “magic” here when it comes to getting the little-endian length and iteration. To craft the length and iteration, first the length of the slice (image payload) is masking all buy the lowest 8 bits of the number. Here is a breakdown, if I use the aforementioned length of 1016.
In binary, 1016 would look like this:
1111111000
0xFF is 255 (remember the formula - 15*16^1 + 15*16^0), and represented in binary as:
11111111
Applying the bitwise AND operation, we would be looking at:
1111111000 &
0011111111
-—————-
0011111000
Which results in F8. We now need to find the highest 8 bits of the number, and do that we right-shift the length of the slice by the length of the header, which is 8:
1016 >> 8
When doing an arithmetic right shift, the least-significant bit is lost, and the most-significant bit is copied. So, back to binary, 1016 looks like this:
1111111000
Doing a right-shift by 8 means that it will become:
0000000011
With all the 1s truncated (in the case of right shifting they become the remainder), the result is 3, or 0x03 in hexadecimal. Just what I needed.
So, whenever the image needs to be sent in more than one chunk, the header format remains the same - it’s still the good ol’ 8 bytes, followed by the image payload. And, in cases where the image payload is less than 1016, padding is added in the form of 0x00 to match the expected length of the packet.
Oh, and since I haven’t mentioned it earlier - I am using HIDSharp in C# to send packets to the USB device, since it abstracts out all the complexity of HID management and lets me focus on the value of my reverse engineering process.
So all of this is great, I can now set custom images for any of the buttons. You can watch a video on this very topic.
🔮 Listening to key presses #
I talked about setting the image, which pretty much unlocks the device for anything. How does one react to button presses, though? As it turns out, easier than setting the buttons! Whenever a user presses a button, the Stream Deck responds by sending an input packet with the entire button map, as such:
0000   01 00 20 00 00 00 00 00 00 00 00 00 00 00 00 00   .. .............
0010   00 00 00 00 00 00 00 00 00 00 00 00 01 00 00 00   ................
0020   00 00 00 00 00 00 00 00 00 00 00 00 00 00 00 00   ................
0030   00 00 00 00 00 00 00 00 00 00 00 00 00 00 00 00   ................
0040   00 00 00 00 00 00 00 00 00 00 00 00 00 00 00 00   ................
0050   00 00 00 00 00 00 00 00 00 00 00 00 00 00 00 00   ................
0060   00 00 00 00 00 00 00 00 00 00 00 00 00 00 00 00   ................
0070   00 00 00 00 00 00 00 00 00 00 00 00 00 00 00 00   ................
0080   00 00 00 00 00 00 00 00 00 00 00 00 00 00 00 00   ................
0090   00 00 00 00 00 00 00 00 00 00 00 00 00 00 00 00   ................
00a0   00 00 00 00 00 00 00 00 00 00 00 00 00 00 00 00   ................
00b0   00 00 00 00 00 00 00 00 00 00 00 00 00 00 00 00   ................
00c0   00 00 00 00 00 00 00 00 00 00 00 00 00 00 00 00   ................
00d0   00 00 00 00 00 00 00 00 00 00 00 00 00 00 00 00   ................
00e0   00 00 00 00 00 00 00 00 00 00 00 00 00 00 00 00   ................
00f0   00 00 00 00 00 00 00 00 00 00 00 00 00 00 00 00   ................
0100   00 00 00 00 00 00 00 00 00 00 00 00 00 00 00 00   ................
0110   00 00 00 00 00 00 00 00 00 00 00 00 00 00 00 00   ................
0120   00 00 00 00 00 00 00 00 00 00 00 00 00 00 00 00   ................
0130   00 00 00 00 00 00 00 00 00 00 00 00 00 00 00 00   ................
0140   00 00 00 00 00 00 00 00 00 00 00 00 00 00 00 00   ................
0150   00 00 00 00 00 00 00 00 00 00 00 00 00 00 00 00   ................
0160   00 00 00 00 00 00 00 00 00 00 00 00 00 00 00 00   ................
0170   00 00 00 00 00 00 00 00 00 00 00 00 00 00 00 00   ................
0180   00 00 00 00 00 00 00 00 00 00 00 00 00 00 00 00   ................
0190   00 00 00 00 00 00 00 00 00 00 00 00 00 00 00 00   ................
01a0   00 00 00 00 00 00 00 00 00 00 00 00 00 00 00 00   ................
01b0   00 00 00 00 00 00 00 00 00 00 00 00 00 00 00 00   ................
01c0   00 00 00 00 00 00 00 00 00 00 00 00 00 00 00 00   ................
01d0   00 00 00 00 00 00 00 00 00 00 00 00 00 00 00 00   ................
01e0   00 00 00 00 00 00 00 00 00 00 00 00 00 00 00 00   ................
01f0   00 00 00 00 00 00 00 00 00 00 00 00 00 00 00 00   ................
The packet length is 512 bytes, but most of them are padding. The header is 4 bytes, so skipping those, the next 32 bytes are representative of the collection of buttons I have on my Stream Deck XL. The ones that are marked with 0x01 are the ones that are being pressed, and in the example above, the 24th button was pressed! When the matrix is zero-filled, that means that no buttons are pressed (usually sent as a response after a button press).
In my C# code, all I am doing is opening the input stream and constantly reading its contents:
public void InitializeDevice()
{
    this.UnderlyingInputStream = this.UnderlyingDevice.Open();
    this.UnderlyingInputStream.ReadTimeout = Timeout.Infinite;
    this.UnderlyingInputStream.BeginRead(this.keyPressBuffer, 0, this.keyPressBuffer.Length, this.KeyPressCallback, null);
}
And the callback in this case parses the matrix above and makes it easy to understand which button is pressed, based on the logic I described:
private void KeyPressCallback(IAsyncResult result)
{
    int bytesRead = this.UnderlyingInputStream.EndRead(result);

    // TODO: Make sure that I am checking what device type is introduced here, because not every device is a StreamDeck XL.
    var buttonData = new ArraySegment<byte>(this.keyPressBuffer, ButtonPressHeaderOffset, DeviceConstants.XLButtonCount).ToArray();
    var pressedButton = Array.IndexOf(buttonData, (byte)1);
    var buttonKind = pressedButton != -1 ? ButtonEventKind.DOWN : ButtonEventKind.UP;

    if (this.OnButtonPress != null)
    {
        this.OnButtonPress(this.UnderlyingDevice, new ButtonPressEventArgs(pressedButton, buttonKind));
    }

    Array.Clear(this.keyPressBuffer, 0, this.keyPressBuffer.Length);

    this.UnderlyingInputStream.BeginRead(this.keyPressBuffer, 0, this.keyPressBuffer.Length, this.KeyPressCallback, null);
}
So now I can build even richer applications for the Stream Deck!
✨ One more thing #
There is one more thing that I wanted to mention that I was fiddling with the other day, and that is setting device configuration. If you’ve been using the Stream Deck software, you know that they have two settings - one for brightness, and another for putting the Stream Deck to sleep. How does one replicate that same experience if they have control of the device through USB?
To Wireshark I go! I used the Stream Deck software to set up the buttons that adjust the brightness, and then just started pressing them multiple times (because what’s the worst that can happen). Unlike the previous command to set the image, this was a bit of a different beast. Not because it’s harder to do, but because it uses a different channel.
For setting the image and getting the button map on press, we were using the input and output reports. For setting the brightness of the device, we need to use feature reports. These kinds of reports are unique because, unlike input and output reports, they can travel in either direction (to or from the host).
This is visible in Wireshark if you look for SET_REPORT with a filter like this: (usb.dst matches "2\.1\.+" || usb.src matches "2\.1\.+") && usb.setup.bRequest == 0x09 (where 0x09 is just a cryptic way of identifying SET_REPORT).
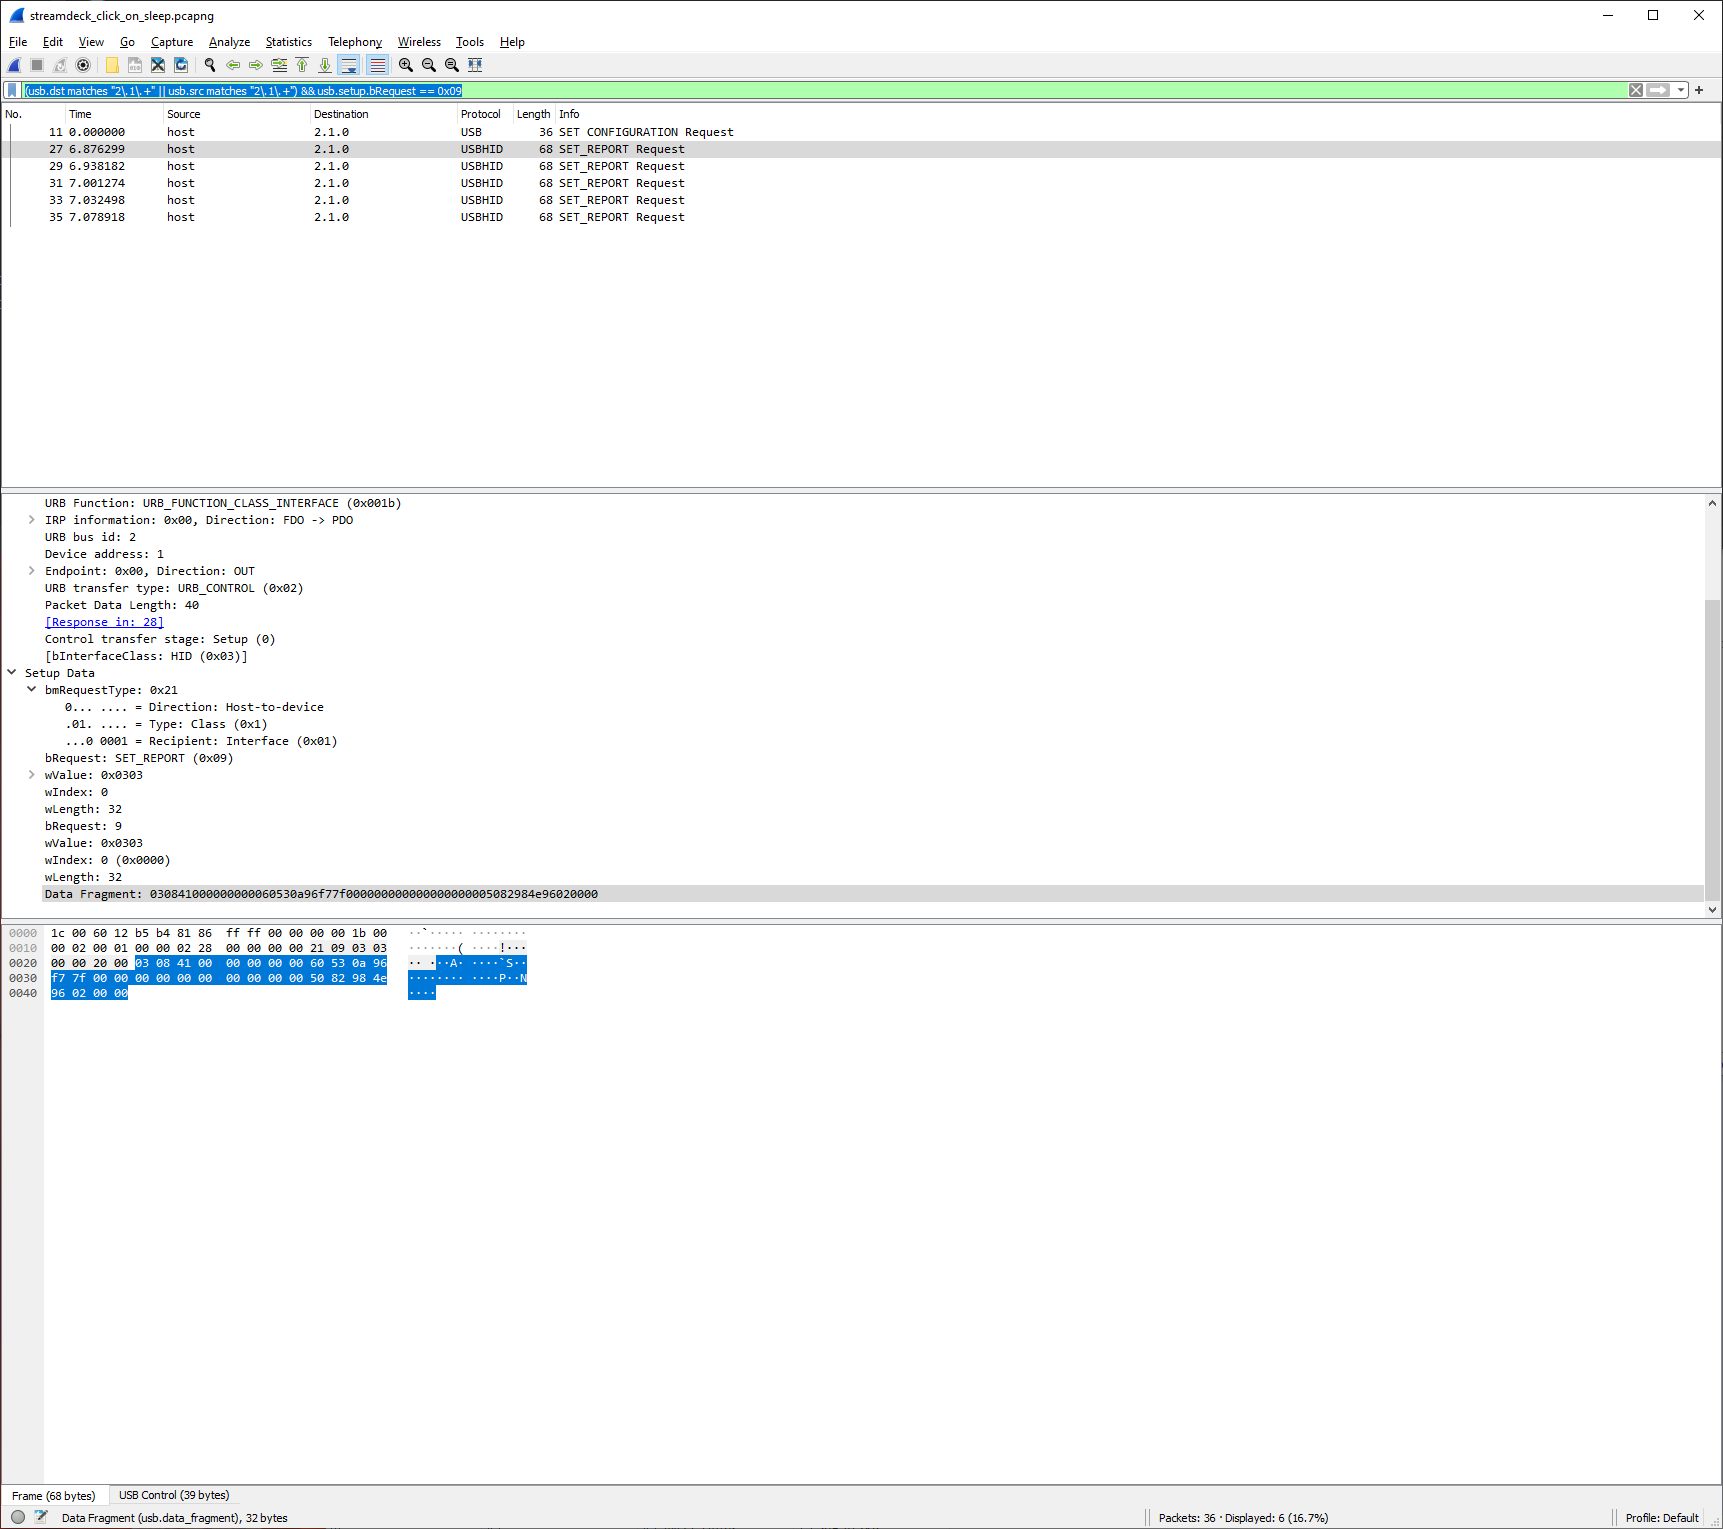
The data for this, from host to device, is limited to 32 bytes, starts with 0x03 (that is the report ID, which should always be the first byte), and is followed by two bytes - 0x08 and the hexadecimal value for the brightness percentage.
The data will look like this:
0000   03 08 41 00 00 00 00 00 60 53 0a 96 f7 7f 00 00   ..A.....`S......
0010   00 00 00 00 00 00 00 00 50 82 98 4e 96 02 00 00   ........P..N....
In this case, the third byte - 0x41, is equal to 65% brightness. The rest of the values seem to be irrelevant. I didn’t figure out yet what they are doing, but setting them all to 0x00 seem to still have the desired effect on the connected Stream Deck device.
And remember how I mentioned that there is exposed functionality in the Stream Deck to set the device to sleep? That’s nothing other than setting the screen brightness to 0 (or, 0x00, if you aren’t tired of hexadecimals yet).
In C#, with the help of HIDSharp, I can just make this call to set the feature report:
var brightnessRequest = new byte[]
{
    0x03, 0x08, 0x00, 0x00, 0x00, 0x00, 0x00, 0x00, 0x00, 0x00, 0x00, 0x00, 0x00, 0x00, 0x00, 0x00,
    0x00, 0x00, 0x00, 0x00, 0x00, 0x00, 0x00, 0x00, 0x00, 0x00, 0x00, 0x00, 0x00, 0x00, 0x00, 0x00,
};

using var stream = this.Open();
stream.SetFeature(brightnessRequest);
Remember that this is written through a different pipe than the regular outputs, so you need to explicitly rely on SetFeature rather than writing to the output stream.
👋 Conclusion #
This was an impromptu project that led to me deciding to formalize all the findings in the shape of a managed library for developers to use. Am I the first one to reverse engineer a Stream Deck? Definitely not. Did I do this to challenge myself and learn more about the USB protocol? Absolutely.
Besides, I can now play Snake on the Stream Deck, and I count that as a win:
🎀 Resources #
If you are curious, there’s more reading on random related topics that I would recommend: