Ubiquiti EdgeRouter As Level 2 Switch
I recently overhauled my network setup to get better WiFi coverage as well as get more data as to what traffic actually happens through my local network. After some relatively short conversations with my colleagues, I landed on Ubnt gear.
My set-up consisted of several components, laid out as such:
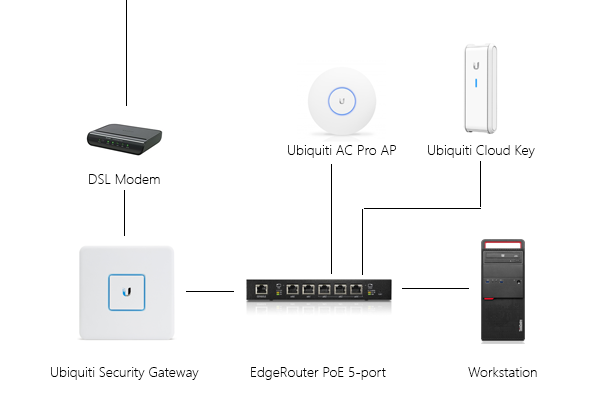
Now you might be asking - why do I have two routers in the pipeline? Originally, I thought of setting up two separate local sub-nets, however due to some consolidation, I ended up having a bunch of devices connect to the network through the WiFi (since it was actually decent this time around).
Which brings me to the next part of the question - how do I set up the router to act as a switch? Because, as you can see, the AP and the CloudKey are connected to the router directly, and so is the workstation. That in itself is not problematic, since I can easily set up Internet access across the pipeline.
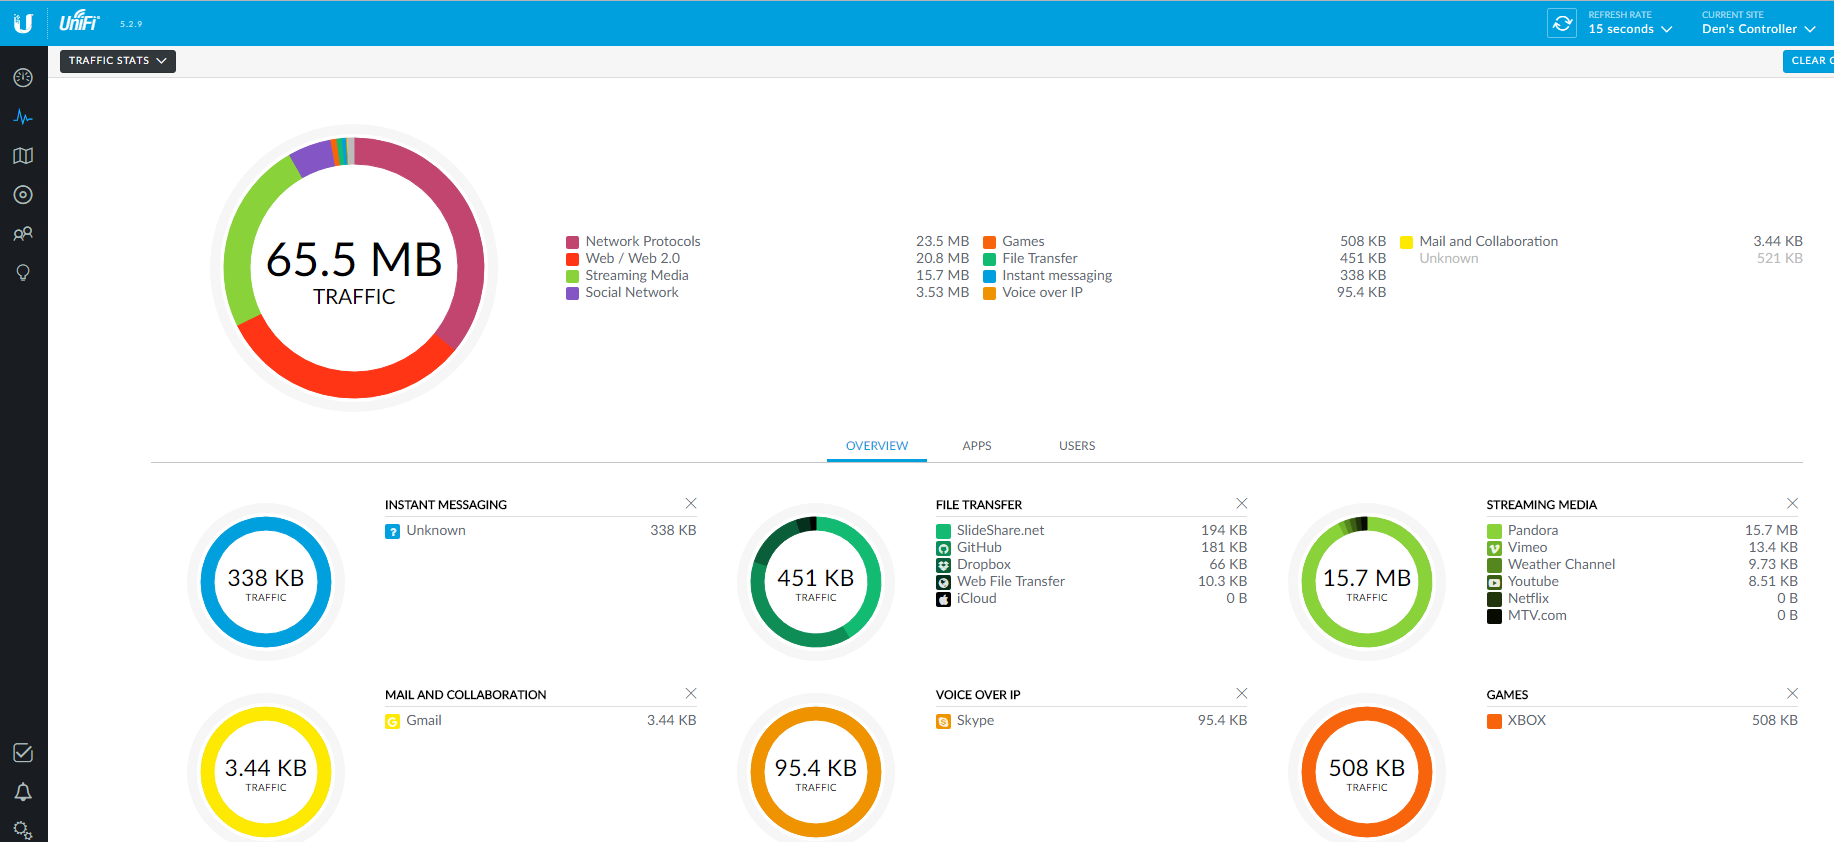
The problem, however, comes down to the fact that you can’t manage the security gateway (I will refer to it as the USG, which seems to be the common convention anyway) through the current setup simply because it’s on a different subnet. And given that problem, you can’t get all the fancy dashboarding:
First, take a look at the EdgeRouter PoE front:
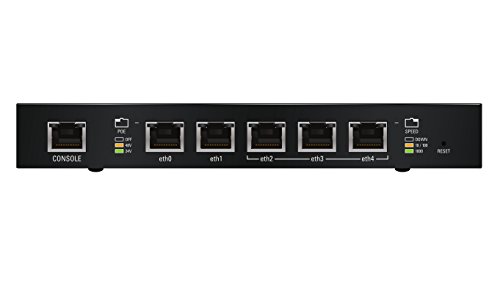
Notice that eth2, eth3 and eth4 are all part of the same switch chip. That means that I can easily plug in the AP, CloudKey and the security gateway in those and make them part of the same subnet. But remember that I also have a workstation?
I could add it to the eth1 port, but that would mean that now I will put the machine on a different subnet and I won’t get any Internet access to it, since the USG will be plugged into one of the switch ports. To avoid this problem, we’ll need to make eth1 part of the switch port set. Because those are on different chips with no hardware offloading, we’ll have to rely on a software bridge.
It’s worth mentioning that there might be a perf hit on software bridges, but in a home setup this is almost negligible.
Given the background, here are the steps taken to make it happen:
- Reset the EdgeRouter to factory settings. That way you can get a clean configuration slate. You can do so by unplugging the power cord, holding the reset button and plugging the power cord back. Wait until the rightmost ethernet port LED blinks (orange color) and then stops blinking.
- Set your machine IP to 192.168.1.x (where x is any number bigger than 1).
- Set the machine gateway to 192.168.1.1.
- Download and install a SSH client (e.g. Putty on Windows).
- Plug in your ethernet cable from the machine to eth0 and SSH into 192.168.1.1 (default credentials: ubnt/ubnt).
Now you should be ready to perform configuration steps on the router. Type in the command that will trigger the configuration mode:
configure
Now, we need to make sure that as we tweak all switch configuration settings, we have a way to access the router consistently through the process. For that, use the following commands:
set interfaces ethernet eth0 address 192.168.0.1/24
commit
save
This will update the configuration and add an extra address to the router that you can access it through. At this time, log in to the router administrator interface (it is 192.168.1.1 still, since you have two addresses for it) - once there, remove the 192.168.1.1 address from eth0:
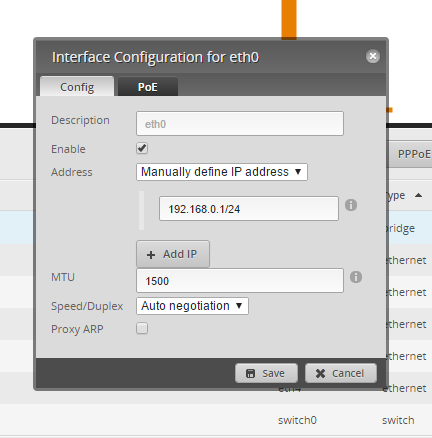
Save the setting, and update your local machine configuration to have an IP in the 192.168.0.x range (just don’t use x as 1) and set the gateway to 192.168.0.1.
You can use the following command to access the networking control panel applet quickly:
ncpa.cpl
Now you can actually bridge the ports. For that, you need to execute the following commands to add the range of ports on the switch chip to the switch collection:
configure
set interfaces switch switch0 switch-port interface eth2
set interfaces switch switch0 switch-port interface eth3
set interfaces switch switch0 switch-port interface eth4
commit
Let’s also create the bridge and bind all ports to it:
set interfaces bridge br0
set interfaces bridge br0 address 192.168.1.2/24
set interfaces switch switch0 bridge-group bridge br0
set interfaces ethernet eth1 bridge-group bridge br0
commit
save
Notice that because we are putting the router on the same subnet as the USG, we need to make sure that the IPs are in the 192.168.1.x range. Because the USG will use 192.168.1.1, it’s logical to set the router address to the next sequence.
And finally, at this point it’s possible to plug in all four aforementioned endpoints directly in any eth1-eth4 ports to have a single-subnet network - just set the machine configuration to DHCP since you no longer need a static address.
Make sure to not plug in the cable from USG to eth0 - it’s no longer representative of the WAN setup and you can simply rely on the switch configuration.