Convert Gamertag To XUID
Table of Contents
As part of the work on OpenSpartan Workshop I needed the capability to convert a Xbox gamertag into its immutable identifier - the Xbox user ID, also commonly known as the XUID. My plan was to add the option for someone to find all the matches where they played with a specific player. Having a casual gamer run around chasing XUIDs is not reasonable, so I needed to find an API where, given a text value for the gamertag, I can look up the XUID value.
You can watch this video if you’d like a live overview:
Finding the API #
A brief detour - something worth noting here is what I mentioned in the first paragraph, and that a XUID is immutable. It doesn’t change through the lifetime of a player. A gamertag, on the other hand, is very much mutable - a player might change it at any point, so relying on those as persistent identifiers doesn’t make much sense. That’s why when you look at Halo match stats through the API lens, you will notice that players are registered as XUIDs and not their respective gamertags.
So, where do we start? We need to find the API that does what we need. The initial research point for me is the Xbox Game Development Kit Universal Resource Identifier (URI) reference. Unfortunately, there was nothing there that immediately stood out, so it was time to fire up Fiddler and see what happens when I search for a gamertag inside the official Xbox application.
With a bit of fiddling (pun intended) I quickly spotted the relevant call:
https://peoplehub.xboxlive.com
  /users
  /me
  /people
  /search
  /decoration
  /detail,preferredColor?q={SOME_GAMERTAG}&maxItems=25
Bingo - seems like exactly what we need here! I can pass the gamertag into the GET request query parameters and in return get a detailed informational blob, like this:
{
    "people":
    [
        {
            "xuid": "EDITED_OUT",
            "isFavorite": false,
            "isFollowingCaller": false,
            "isFollowedByCaller": false,
            "isIdentityShared": false,
            "addedDateTimeUtc": null,
            "displayName": null,
            "realName": "",
            "displayPicRaw": "EDITED_OUT",
            "showUserAsAvatar": "0",
            "gamertag": "EDITED_OUT",
            "gamerScore": "0",
            "modernGamertag": "EDITED_OUT",
            "modernGamertagSuffix": "",
            "uniqueModernGamertag": "EDITED_OUT",
            "xboxOneRep": "GoodPlayer",
            "presenceState": null,
            "presenceText": null,
            "presenceDevices": null,
            "isBroadcasting": false,
            "isCloaked": null,
            "isQuarantined": false,
            "isXbox360Gamerpic": false,
            "lastSeenDateTimeUtc": null,
            "suggestion": null,
            "recommendation": null,
            "search":
            {
                "Type": "None",
                "Reasons":
                []
            },
            "titleHistory": null,
            "multiplayerSummary": null,
            "recentPlayer": null,
            "follower": null,
            "preferredColor":
            {
                "primaryColor": "1081ca",
                "secondaryColor": "10314f",
                "tertiaryColor": "105080"
            },
            "presenceDetails": null,
            "titlePresence": null,
            "titleSummaries": null,
            "presenceTitleIds": null,
            "detail":
            {
                "accountTier": "Gold",
                "bio": null,
                "isVerified": false,
                "location": null,
                "tenure": null,
                "watermarks":
                [],
                "blocked": false,
                "mute": false,
                "followerCount": 0,
                "followingCount": 0,
                "hasGamePass": false
            },
            "communityManagerTitles": null,
            "socialManager": null,
            "broadcast": null,
            "avatar": null,
            "linkedAccounts": null,
            "colorTheme": "unity",
            "preferredFlag": "",
            "preferredPlatforms":
            []
        }
    ],
    "recommendationSummary": null,
    "friendFinderState": null,
    "accountLinkDetails": null
}
Because this is a search endpoint it may return more than one result, but that’s good enough for what I am trying to do.
There are a few additional data points worth jotting down:
- There is a
x-xbl-contract-versionattached to the request. We’ll need to make sure that we use the right version to successfully get the data. - The response is in JSON, so it will be relatively easy to parse it.
- There is an
Accept-Languageheader that, as it turns out, is required for the request to succeed. We can useen-usfor English (United States). - The endpoint is protected and requires an XBL3.0 token, that I’ve already documented when I was exploring the Halo Infinite API and briefly mentioned when I was writing about the Xbox media capture API.
Authentication #
The authentication flow is effectively the same as the second leg of the Spartan token acquisition in my Halo authentication write-up. There are four steps in total:
- Get the Microsoft Entra ID access token.
- Exchange the access token for a user token.
- Exchange the user token for a proper Xbox Secure Token Service (XSTS) token.
- Call the search endpoint with the attached XSTS token.
Or, to put it in a visualization:
The boxes in green are talking exclusively to the Xbox authentication service.

You mention Microsoft Entra ID access token - I am assuming this can only be done for Microsoft accounts, and I will need to register an application in the Azure Portal?
That’s right! For you to be able to authenticate against Microsoft’s services, you will need to create a new Microsoft Entra ID application registration. Once you have that, you will be able to talk to protected APIs on behalf of the user that authenticates through the OAuth flow. And because here we’re talking about Xbox accounts, you will only be able to use Microsoft accounts (i.e., your Outlook.com or Hotmail accounts).
For the first step, we can use a pre-built package, like the Microsoft Authentication Library (MSAL), which both saves a lot of time and offers some nice value-adds, like the ability to proactively refresh Microsoft Entra ID tokens. It’s also available for many platforms, like .NET, Java, Python, Go, and Node.js, although for this article I am going to be using the Python version. Full disclosure - I am on the team that writes and maintains this library, so of course I will advocate for its use. However, bias aside, this really is the best way to complete the first step. If you look at my previous write-up, I was fiddling with client secrets, which is a bit of a “no-no” in desktop applications.
With MSAL, you can configure your application as a public client and don’t need to store any client-side secrets, significantly simplifying (and securing) the auth flow.
Writing Python code #
Let’s take a look at what all of this looks like in practice. As I mentioned above, I will be using Python for this sample, making it extremely versatile and out-of-the-box compatible with multiple platforms. If you don’t want to follow along, you can download the tool I built for this, called xuid-resolver, directly from GitHub.
First, we need to define our imports - there are a couple of modules that we will need, including (most importantly) msal. msal is Microsoft Authentication Library for Python (open-source on GitHub), and will be responsible for getting us through the first leg of the process - getting the access token from Microsoft Entra ID.
The declaration for imports in my script looks like this:
from msal import PublicClientApplication, SerializableTokenCache
import os
import atexit
import requests
import json
import sys

Wait, so if you're adding a reference to msal, don't you need to install it first, or somehow bring it into your application?
Good catch. We can install it in by running the following command in your environment, whether that’s a Python virtual environment or your global OS environment (although the former is preferred):
pip install msal
Next, we define a set of constants that will be useful down the line:
# Constants
CLIENT_ID = os.getenv('OPSP_XR_CLIENT_ID')
SCOPES = ["Xboxlive.signin", "Xboxlive.offline_access"]
XBL_VERSION = "3.0"
TOKEN_CACHE_PATH = "cache.bin"
The client ID is the application that you registered in Microsoft Entra. Instead of me embedding the ID directly into code, I read it from an environment variable, which would be the same regardless of where you run the code.
For example, on Windows (with PowerShell) you can set the environment variable like this:
Set-Item -Path Env:OPSP_XR_CLIENT_ID -Value 'YOUR_CLIENT_ID'
On macOS and Linux, you can do this by running:
export OPSP_XR_CLIENT_ID="YOUR_CLIENT_ID"
The SCOPES constant tells us that we need permissions to sign a user in with their Xbox profile and we also need to maintain offline access to user data.
XBL_VERSION is the version prefix that we will use for XSTS tokens.
Lastly, TOKEN_CACHE_PATH is the name of the file that we will use to store tokens locally.

Given that you mentioned the token cache, do I need to do anything special to make sure that the token cache is not exposed to, say, malicious actors?
In my sample implementation, the token cache is not encrypted, so if someone has access to your computer, they might be able to grab it alongside the tokens in it. One could argue that if someone has access to your computer, you already have bigger problems. However, the issue can be mitigated by setting appropriate file permissions (so that users that are not you can’t read it) or by using another package, called msal-extensions (see on PyPI) that will allow you to encrypt the data.
But, back to code. Let’s define some scaffolding logic:
# Token cache setup
cache = SerializableTokenCache()

target_gamertag = sys.argv[1] if len(sys.argv) > 1 else "BreadKrtek"

# Saves the token cache to disk to make sure that we're not authenticating
# from scratch every single time the script runs.
def save_cache():
    if cache.has_state_changed:
        with open(TOKEN_CACHE_PATH, "w") as token_cache_file:
            token_cache_file.write(cache.serialize())
We use SerializableTokenCache (see documentation) to create a local instance of a token cache that will be used to store the access and refresh tokens. This is needed to make sure that we don’t need to re-authenticate every time we run the script.
target_gamertag represents the gamertag we want to search for, and we’re reading it from the arguments that are passed to our Python script. If there is no gamertag provided, I am defaulting to a sample gamertag for one of my dummy accounts.
And of course, the save_cache function saves the cache on disk when the cache has changed (we’ll define that a bit later).
Let’s now take a look at how to request a user token. We skip right to the step after the access token acquisition because that logic will be handled on script initialization with the help of MSAL Python. The function I put together is this:
# Request the Xbox user token.
def request_user_token(access_token):
    ticket_data = {
        "RelyingParty": "http://auth.xboxlive.com",
        "TokenType": "JWT",
        "Properties": {
            "AuthMethod": "RPS",
            "SiteName": "user.auth.xboxlive.com",
            "RpsTicket": f"d={access_token}"
        }
    }

    headers = {
        "x-xbl-contract-version": "1",
        "Content-Type": "application/json"
    }

    response = requests.post(
        url="https://user.auth.xboxlive.com/user/authenticate",
        json=ticket_data,
        headers=headers
    )

    if response.status_code == 200:
        return response.json()
    else:
        return None
Nothing too out-of-the-ordinary here. We’re creating a payload JSON blob that contains the access token attached to the RpsTicket property (the same way official apps request it), along with other related token request metadata. We then configure the required request headers and send the POST request to:
https://user.auth.xboxlive.com/user/authenticate
To request the XSTS token, we do something very similar:
# Request XSTS token from Xbox.
def request_xsts_token(user_token):
    ticket_data = {
        "RelyingParty": "http://xboxlive.com",
        "TokenType": "JWT",
        "Properties": {
            "UserTokens": [user_token],
            "SandboxId": "RETAIL"
        }
    }

    headers = {
        "x-xbl-contract-version": "1",
        "Content-Type": "application/json"
    }

    url = "https://xsts.auth.xboxlive.com/xsts/authorize"
    response = requests.post(url, json=ticket_data, headers=headers)

    if response.status_code == 200:
        return response.json()
    else:
        return None
This time, we’re passing in the acquired user token in the UserTokens array, and POST-ing the data to:
https://xsts.auth.xboxlive.com/xsts/authorize
And once the tokens are acquired, we can GET the data from the aforementioned Xbox API:
# Search for users on Xbox based on a gamertag.
def search_for_user(gamertag, token):
    headers = {
        "x-xbl-contract-version": "3",
        "Content-Type": "application/json",
        "Authorization": token,
        "Accept-Language": "en-us"
    }

    url = f"https://peoplehub.xboxlive.com/users/me/people/search/decoration/detail,preferredColor?q={gamertag}&maxItems=25"
    response = requests.get(url, headers=headers)

    if response.status_code == 200:
        return response.json()
    else:
        return None
But hold on - Authorization in the example above is not the vanilla XSTS token, as you will see shortly. It’s a combination of the user hash and the XSTS token in the format of XBL{XBL_VERSION} x={USER_HASH};{XSTS_TOKEN}
Before we jump to the main application code, we need one more helper function, that will parse the gamertags out of the API output and pretty-print those for us in a readable table in the terminal:
# Extract and print gamertags and the associated XUIDs.
def get_gamertags(data):
  if 'people' in data:
    print("{:<20} {}".format("Gamertag", "XUID"))
    print("-" * 30)
    for person in data['people']:
      gamertag = person.get('gamertag', 'Unknown Gamertag')
      xuid = person.get('xuid', 'Unknown XUID')
      print("{:<20} {}".format(gamertag, xuid))
OK, now we can head on over to the main code. Let’s start by loading the token cache file and registering an exit event - when the script exits, dump the cache to file once more (in case it changed):
# Load token cache if exists
if os.path.exists(TOKEN_CACHE_PATH):
    print("Loading token cache from disk")
    with open(TOKEN_CACHE_PATH, "r") as token_cache_file:
        cache.deserialize(token_cache_file.read())
    print("Loaded token cache from disk")

atexit.register(save_cache)
Next, let’s scaffold the public client application in MSAL Python - this is what’s going to help us acquire the access token for the first step of the authentication process:
# Initialize MSAL to get the user token for their application
app = PublicClientApplication(
    CLIENT_ID,
    authority="https://login.microsoftonline.com/consumers",
    token_cache=cache
)

accounts = app.get_accounts()
result = None
Notice that I am passing the CLIENT_ID that I read earlier from the OPSP_XR_CLIENT_ID environment variable, along with the cache object that contains the token cache that we just loaded.
accounts represents the list of accounts that we got from the cache - it will be empty the first time we launch.
result will be used to store the authentication result.
Let’s now try and acquire the access token that we need first:
# Acquire token.
if accounts:
    print("Account exists in the cache.")
    result = app.acquire_token_silent(SCOPES, account=accounts[0])
else:
    print("No accounts in the cache")
    result = app.acquire_token_interactive(SCOPES)
We first attempt to acquire the token silently - that is, use what’s in the cache, and MSAL Python can also refresh the access token based on an existing unexpired refresh token, if needed. Because this is a silly simple script, I am using the first account from the cache, but if you are logging in with more than one, you might want to add some additional logic here to figure out which account to use.
If silent acquisition fails, go into the interactive flow - this requires the user to enter their credentials in a browser or authentication broker. In my example, I am just using the system browser.
And last but not least, we can now acquire the proper Xbox tokens:
# Proceed if token is obtained.
if result and 'access_token' in result:
    ticket = request_user_token(result['access_token'])

    if ticket:
        user_token = ticket.get('Token')
        user_hash = ticket.get('DisplayClaims', {}).get('xui', [{}])[0].get('uhs')

        xsts_ticket = request_xsts_token(user_token)

        if xsts_ticket:
            xsts_token = xsts_ticket.get('Token')
            xbl_token = f'XBL{XBL_VERSION} x={user_hash};{xsts_token}'

            user_data = search_for_user(target_gamertag, xbl_token)

            if user_data:
                get_gamertags(user_data)
If there is a valid access token, we request a user token. If a user token is obtained, we extract the user hash from the DisplayClaims property and store it in user_hash.
We then attempt to acquire a XSTS token with the user token. If, in turn, we got a proper response, we use it to get the response from the user search API (notice that the xbl_token is formatted as I described above).
If there are results, we display that data with get_gamertags. And that’s it!
That’s all it takes for someone to take a gamertag and find the XUID that is associated with it.
When you run the Python script for the first time (don’t forget to set the client ID environment variable), you will get directed to your default web browser and shown a consent prompt:
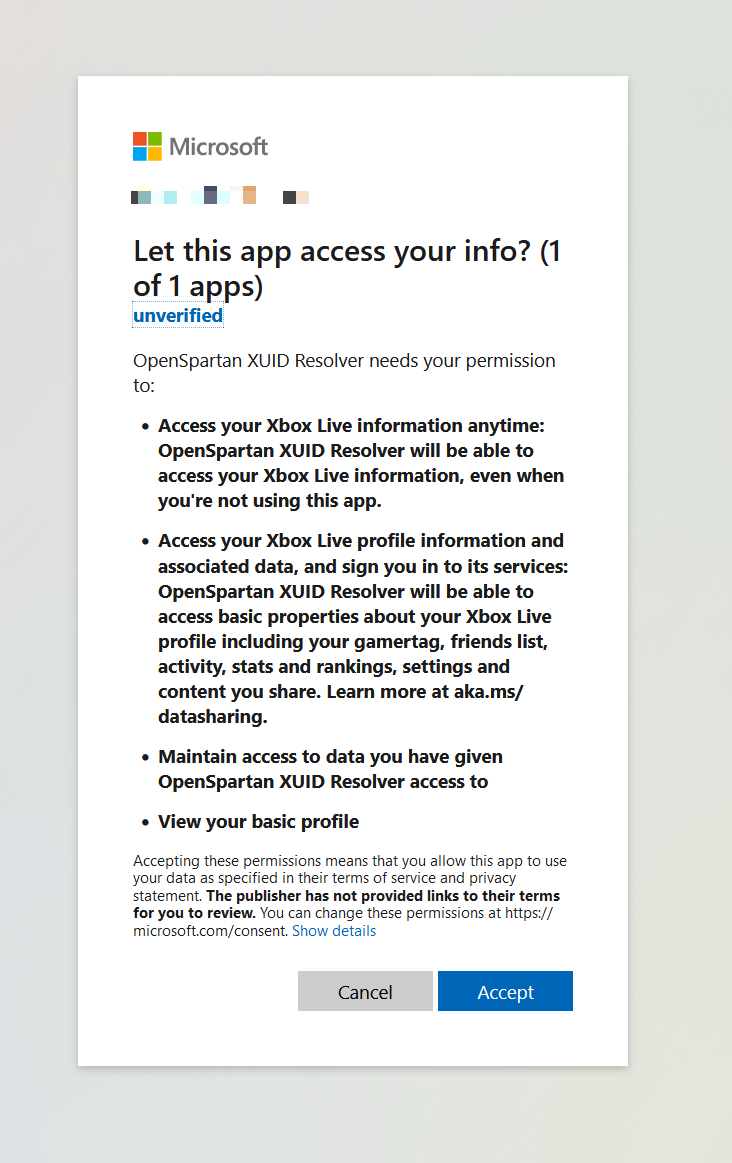
This is standard procedure for OAuth applications - you, the user, are giving the permission for a registered application to access specific data (that we declared as SCOPES above).
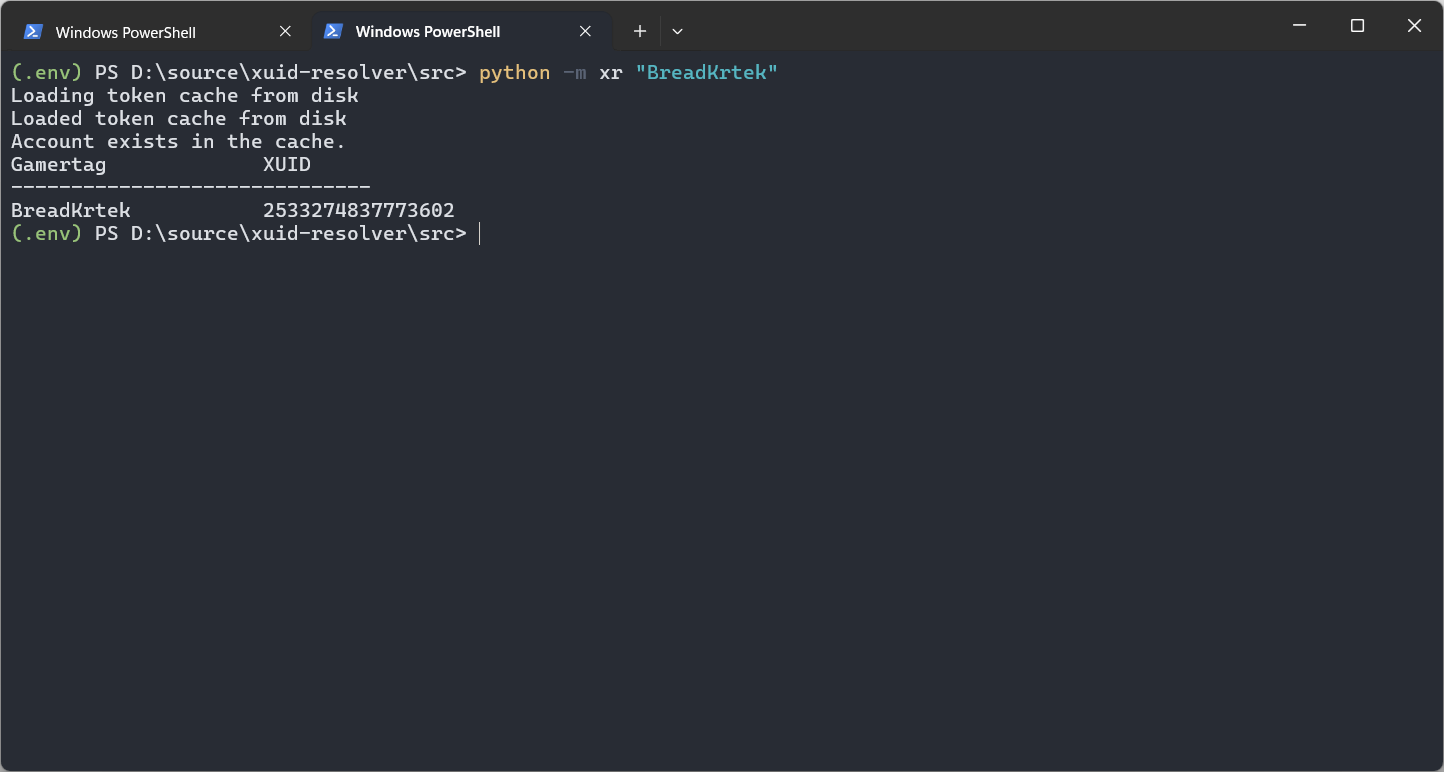
Once you grant consent, MSAL for Python will pick up the rest of the flow and give you an access token that can be used to continue the authentication flow discussed above. If all went well, you should see the desired gamertag (or several of them, depending on the search term) along with the player XUIDs.
Conclusion #
This was a fun little detour into public but undocumented APIs in service of a feature in a future OpenSpartan Workshop release. I actually didn’t intend to stumble across the endpoint that returns many users - I just wanted to resolve one gamertag to its XUID value, but having many suggested gamertags based on a term is much better. This was a pleasant surprise that I turned into an improved search feature in my own application.
What’s great about the logic above is that it can easily work for any other programming language - I used Python, but OpenSpartan Workshop is written in C#. Once I tested my approach in a Python script, I quickly whipped up a .NET implementation that just worked. I hope you will find the outline above as useful as I did!