Halo Infinite Web API Authentication
Table of Contents
Table of Contents #
Overview #
A week ago I was finally able to figure out what endpoints the Halo Infinite Web API uses. Now, the challenge became figuring out how to properly request the data from those, as there were two component pieces to every request - a Spartan token, and a clearance. After fiddling with the API a bit, and looking at the endpoint that aggregates all other endpoints, I was able to learn that there is a straightforward way to get all the right tokens through a number of chained requests, that are documented in this blog post.
Authentication Flow Assessment #
You can clearly see the requirement to provide token and clearance information if you look at the data returned through the settings endpoint I called out in my previous blog post:
https://settings.svc.halowaypoint.com/settings/hipc/e2a0a7c6-6efe-42af-9283-c2ab73250c48
Making a GET request and looking at a potential endpoint, you see the following:
"Academy_GetStarDefinitions": {
    "AuthorityId": "gamecms",
    "Path": "/hi/multiplayer/file/Academy/AcademyStarGUIDDefinitions.json",
    "QueryString": "",
    "RetryPolicyId": "longerdelayedexponentialretry",
    "TopicName": "",
    "AcknowledgementTypeId": 0,
    "AuthenticationLifetimeExtensionSupported": false,
    "ClearanceAware": true
},
Notice the ClearanceAware property - this tells us that a clearance header is required for the request. Based on inspection of other outbound requests that use it, the value of this is passed through 343-clearance, and is oddly resembling a GUID (because it is).
Additionally, if we look up the authority in the results of the same request, we’ll notice an interesting piece of information as well:
"gamecms": {
    "AuthorityId": "gamecms",
    "Scheme": 9,
    "Hostname": "gamecms",
    "Port": null,
    "AuthenticationMethods": [
        15
    ]
}
The AuthenticationMethods array contains a single identifier - 15. That doesn’t mean anything, but that’s because when I requested the information through the endpoint above, I specified the Accept header as application/json. The 343 developers also support returning the data in XML, that can be done either by omitting the Accept header altogether, or by setting it application/xml - neat!
Doing this little trick yields this:
<d2p1:KeyValueOfstringAuthority0gY6X42G>
    <d2p1:Key>gamecms</d2p1:Key>
    <d2p1:Value xmlns:d4p1="http://schemas.datacontract.org/2004/07/Microsoft.Halo.NetProtocol.
Corinth.OnlineUri">
        <d4p1:AuthenticationMethods>
            <d4p1:AuthenticationMethod>SpartanTokenV4</d4p1:AuthenticationMethod>
        </d4p1:AuthenticationMethods>
        <d4p1:AuthorityId>gamecms</d4p1:AuthorityId>
        <d4p1:Hostname>gamecms</d4p1:Hostname>
        <d4p1:Port i:nil="true" />
        <d4p1:Scheme>GameCms</d4p1:Scheme>
    </d2p1:Value>
</d2p1:KeyValueOfstringAuthority0gY6X42G>
Judging by the same AuthenticationMethods array, what we are looking for is SpartanTokenV4. This value is passed to requests (again, from just observing traffic) with the help of the x-343-authorization-spartan header. You might be wondering - are there other authentication methods for these API calls? Looking at the breakdown of authorities, it seems that we also have:
XSTSv3HaloAudience- this is what’s known as an XToken that is scoped to Halo as a relying party.ClientCertificate- somewhat self-explanatory, but this authentication method requires the user to provide a certificate to the service. Azure Active Directory implements this capability really well, and it wouldn’t surprise me if that’s what’s used behind the scenes here.None- no authentication is required for the request on this authority.SpartanToken- classic Spartan token.XSTSv3XboxAudience- the same XToken as above, with Xbox as the relying party.
For the purposes of this blog post, I am going to focus on SpartanTokenV4, XSTSv3HaloAudience, and XSTSv3XboxAudience as they are the most relevant to my API explorations. Let’s start with a rough breakdown of the process that is needed to get the token after logging in:

Seems convoluted, but it really isn’t terribly bad. I’ve outlined all the steps in detail below.
Authenticating #
To get the right tokens and be able to end up authenticate with the Halo Infinite service API you’ll need some basic knowledge of how to issue web requests, set headers, and parse responses. Thankfully, most of this functionality is already wrapped for us in neat libraries that you can use in any language. The samples that I am using in this blog post are oriented towards C# and .NET, but can be just as easily re-written in any language for any platform. There is absolutely nothing Windows-specific here.
Step 1: Registering an Azure Active Directory Application #
To get started, you will need to have an application registered in Azure Active Directory (AAD). It’s free and doesn’t take a lot of time - it will represent the client that you will use to log in to Xbox Live, and by proxy, the Halo services. This also means that you will need to have a Microsoft account, but if you’re playing Halo and exploring it’s API, that should already be the case.
Go to the [Azure Portal] and log in with your Microsoft account. Find Azure Active Directory and open the App Registrations blade, where you can select New registration.
When you create an AAD application, you are effectively creating an OAuth client through which someone can authenticate to Microsoft services with a Microsoft account. With the application ready, you now need to create a client secret, that you can do by navigating to the Certificates & secrets blade, where you can click on New client secret, give your secret a name and duration, and then add it to the application.
Take note of the client secret you just generated (not the client secret ID), as well as of the application (client) ID that you can get from the overview page - you’ll need them in the next step.
Step 2: Generate Authentication URL #
To be able to authenticate with the service, we first need to generate an authentication URL that can be used to log in to a Microsoft account. In C#, I wrote this helper function:
public string GenerateAuthUrl(string clientId, string redirectUrl, string[] scopes = null, string state = "")
{
    NameValueCollection queryString = System.Web.HttpUtility.ParseQueryString(string.Empty);

    queryString.Add("client_id", clientId);
    queryString.Add("response_type", "code");
    queryString.Add("approval_prompt", "auto");

    if (scopes != null && scopes.Length > 0)
    {
        queryString.Add("scope", string.Join(" ", scopes));
    }
    else
    {
        queryString.Add("scope", string.Join(" ", GlobalConstants.DEFAULT_AUTH_SCOPES));
    }

    queryString.Add("redirect_uri", redirectUrl);

    if (!string.IsNullOrEmpty(state))
    {
        queryString.Add("state", state);
    }

    return XboxEndpoints.XboxLiveAuthorize + "?" + queryString.ToString();
}
All it does is use the following URL as a base:
https://login.live.com/oauth20_authorize.srf
The URL is then combined with query parameters:
client_idfollowed by the Azure Active Directory client ID generated for the application from the first step.response_typefollowed bycode, meaning that we’ll get an authorization code if things go well and the credentials check out.approval_promptfollowed byauto- we’ll just default to whatever approval flow is used by the account.scopeset toXboxlive.signinandXboxlive.offline_access. The documentation on these scopes is sparse, butXboxlive.signinrepresents access to Xbox Live sign in functionality for games that leverage Xbox Live and are not part of the Creators program, andXboxlive.offline_accessallows consistent access by enabling the production of a refresh token (someone from the Xbox Live/Microsoft Identity teams - please correct my assumptions here).redirect_uriset to the URL to which the user should be redirected once the flow completes, successful or not. This value should match what you set in the AAD application registered earlier. Usinghttps://localhostfor local testing is perfectly acceptable.statefollowed by a random value representing the state of a given request. It’s an optional parameter that allows verifying that the code received in the flow matches the authorization request it sent.
The end-product URL should be similar to:
https://login.live.com/oauth20_authorize.srf?
  client_id=CLIENT_ID&
  response_type=code&
  approval_prompt=auto&
  scope=Xboxlive.signin+Xboxlive.offline_access&
  redirect_uri=https%3a%2f%2flocalhost
Step 3: Getting the Authorization Code #
To get the code, navigate to the URL you’ve generated above and log in with your Microsoft account. You’ll get a prompt to give the app the set of permissions that allow interacting with the Xbox Live services, that map to the scopes declared earlier:

If things go well, the code will be attached as a query parameter to the URL:
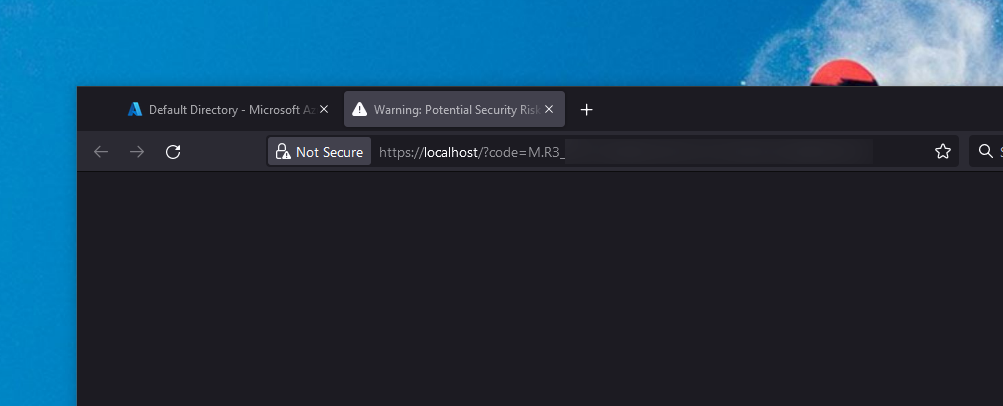
Congratulations! You now have a code that you can exchange for a user token.
Step 4: Requesting OAuth Token #
With the code in hand, you can now request the OAuth token by exchanging the authorization code you got earlier for the new asset. Here is the helper C# method that I wrote for this task:
public async Task<OAuthToken> RequestOAuthToken(string clientId, string authorizationCode, string redirectUrl, string clientSecret = "", string[] scopes = null)
{
    Dictionary<string,string> tokenRequestContent = new();

    tokenRequestContent.Add("grant_type", "authorization_code");
    tokenRequestContent.Add("code", authorizationCode);
    tokenRequestContent.Add("approval_prompt", "auto");

    if (scopes != null && scopes.Length > 0)
    {
        tokenRequestContent.Add("scope", String.Join(" ", scopes));
    }
    else
    {
        tokenRequestContent.Add("scope", String.Join(" ", GlobalConstants.DEFAULT_AUTH_SCOPES));
    }

    tokenRequestContent.Add("redirect_uri", redirectUrl);
    tokenRequestContent.Add("client_id", clientId);
    if (!string.IsNullOrEmpty(clientSecret))
    {
        tokenRequestContent.Add("client_secret", clientSecret);
    }

    var client = new HttpClient();
    var response = await client.PostAsync(XboxEndpoints.XboxLiveToken, new FormUrlEncodedContent(tokenRequestContent));

    if (response.IsSuccessStatusCode)
    {
        return JsonConvert.DeserializeObject<OAuthToken>(response.Content.ReadAsStringAsync().Result);
    }
    else
    {
        return null;
    }
}
The request will be sent as a POST to the following endpoint:
https://login.live.com/oauth20_token.srf
The content that is passed here is in URL-encoded form format, and contains:
grant_typeset toauthorization_code, because that’s what we are using to get the token.codefollowed by the value of the authorization code obtained earlier.approval_promptset toauto, just like in the previous request.scopematching the scopes that we’ve used for the authorization code.redirect_urimatching the redirect URL set in the AAD application settings.client_idset to the client ID for the application registered in AAD.client_secretset to the secret generated earlier when registering the application.
The content should resemble this snippet:
grant_type=authorization_code&
code=YOUR_AUTHORIZATION_CODE&
approval_prompt=auto&
scope=Xboxlive.signin+Xboxlive.offline_access&
redirect_uri=https%3A%2F%2Flocalhost&
client_id=YOUR_CLIENT_ID&
client_secret=YOUR_CLIENT_SECRET
If the request is successful, you should get a response like the one below:
{
    "access_token": "ACCESS_TOKEN_CONTENT",
    "expires_in": 3600,
    "refresh_token": "REFRESH_TOKEN",
    "scope": "XboxLive.signin XboxLive.offline_access",
    "token_type": "bearer",
    "user_id": "USER_ID"
}
You’re now one step closer to having the Spartan token that will allow you to talk to the Halo API.
Step 5: Requesting User Token #
With the OAuth token in hand, we now need the user token. To do that, I wrote yet another helper method:
public async Task<XboxTicket> RequestUserToken(string accessToken)
{
    XboxTicketRequest ticketData = new();
    ticketData.RelyingParty = XboxEndpoints.XboxLiveAuthRelyingParty;
    ticketData.TokenType = "JWT";
    ticketData.Properties = new XboxTicketProperties()
    {
        AuthMethod = "RPS",
        SiteName = "user.auth.xboxlive.com",
        RpsTicket = string.Concat("d=", accessToken)
    };

    var client = new HttpClient();

    var request = new HttpRequestMessage()
    {
        RequestUri = new Uri(XboxEndpoints.XboxLiveUserAuthenticate),
        Method = HttpMethod.Post,
        Content = new StringContent(JsonConvert.SerializeObject(ticketData), Encoding.UTF8, "application/json")
    };

    request.Headers.Add("x-xbl-contract-version", "1");

    var response = await client.SendAsync(request);
    var responseData = response.Content.ReadAsStringAsync().Result;

    if (response.IsSuccessStatusCode)
    {
        return JsonConvert.DeserializeObject<XboxTicket>(responseData);
    }
    else
    {
        return null;
    }
}
To get the token, we need to issue a POST request to:
https://user.auth.xboxlive.com/user/authenticate
Unlike the previous request, though, we’ll be sending some JSON:
{
    "Properties": {
        "AuthMethod": "RPS",
        "RpsTicket": "d=ACCESS_TOKEN_CONTENT",
        "SiteName": "user.auth.xboxlive.com"
    },
    "RelyingParty": "http://auth.xboxlive.com",
    "TokenType": "JWT"
}
You can re-use the snippet above and substitute the ACCESS_TOKEN label with your actual access token that you got from the previous step. If things go well and the authentication stars shine in your favor, you’ll get a JSON blob in response:
{
    "DisplayClaims": {
        "xui": [
            {
                "uhs": "USER_HASH"
            }
        ]
    },
    "IssueInstant": "2022-01-27T00:46:34.5262465Z",
    "NotAfter": "2022-02-10T00:46:34.5262465Z",
    "Token": "YOUR_USER_TOKEN"
}
There are two things of note here. When you get the ticket with the user token, you will get two values that are needed to generate the XToken (or, the XBL 3.0 token) - uhs, which is the user hash, and Token, which is, well, the user token. However, this is not the token that you’re looking for just yet - you need the XSTS token. Keep the uhs, and use the Token value to exchange it for an XSTS token.
Step 6: Getting an XSTS Token #
To get the coveted Xbox Security Token Service (XSTS) token, we’ll need to craft yet another POST request to the following endpoint:
https://xsts.auth.xboxlive.com/xsts/authorize
Of course, you can also use this helper C# function:
public async Task<XboxTicket> RequestXstsToken(string userToken, bool useHaloRelyingParty = true)
{
    XboxTicketRequest ticketData = new();

    if (useHaloRelyingParty)
    {
        ticketData.RelyingParty = HaloCoreEndpoints.HaloWaypointXstsRelyingParty;
    }
    else
    {
        ticketData.RelyingParty = XboxEndpoints.XboxLiveRelyingParty;
    }

    ticketData.TokenType = "JWT";
    ticketData.Properties = new XboxTicketProperties()
    {
        UserTokens = new string[] { userToken },
        SandboxId = "RETAIL"
    };

    var client = new HttpClient();
    var data = JsonConvert.SerializeObject(ticketData);

    var request = new HttpRequestMessage()
    {
        RequestUri = new Uri(XboxEndpoints.XboxLiveXstsAuthorize),
        Method = HttpMethod.Post,
        Content = new StringContent(data, Encoding.UTF8, "application/json")
    };

    request.Headers.Add("x-xbl-contract-version", "1");

    var response = await client.SendAsync(request);
    var responseData = response.Content.ReadAsStringAsync().Result;

    if (response.IsSuccessStatusCode)
    {
        return JsonConvert.DeserializeObject<XboxTicket>(responseData);
    }
    else
    {
        return null;
    }
}
The JSON blob that you need to send follows this format:
{
    "Properties": {
        "SandboxId": "RETAIL",
        "UserTokens": [
            "YOUR_USER_TOKEN"
        ]
    },
    "RelyingParty": "https://prod.xsts.halowaypoint.com/",
    "TokenType": "JWT"
}
Before we go further, I’d like you to pay attention to the RelyingParty property here. Recall how earlier I mentioned that there are two types of XSTS tokens - XSTSv3HaloAudience and XSTSv3XboxAudience. The difference between the two is what you specify in the RelyingParty property, and it determines what you get access to. The two alternatives map to:
XSTSv3XboxAudience- the value ishttp://xboxlive.com.XSTSv3HaloAudience- the value ishttps://prod.xsts.halowaypoint.com/.
Swap between them accordingly to get the right tokens depending on the authority you’re looking at. Once again, if things go well, you should get a response similar to:
{
    "DisplayClaims": {
        "xui": [
            {
                "uhs": "USER_HASH"
            }
        ]
    },
    "IssueInstant": "2022-01-27T00:55:35.5594847Z",
    "NotAfter": "2022-01-27T04:55:35.5594847Z",
    "Token": "YOUR_XSTS_TOKEN"
}
You now have the user hash, and also the XSTS token. You can now either get the XBL 3.0 token, which is very simple to compose:
public string GetXboxLiveV3Token(string userHash, string userToken)
{
    return $"XBL3.0 x={userHash};{userToken}";
}
Or you can just get the Spartan token and be on your way.
Step 7: Generating the Spartan Token #
The last piece of the puzzle, the Spartan token, can be obtained by using the XSTS token scoped to the Halo audience. Here is the helper function:
public async Task<SpartanToken> GetSpartanToken(string xstsToken)
{
    SpartanTokenRequest tokenRequest = new();
    tokenRequest.Audience = "urn:343:s3:services";
    tokenRequest.MinVersion = "4";
    tokenRequest.Proof = new SpartanTokenProof[]
    {
        new SpartanTokenProof()
        {
            Token = xstsToken,
            TokenType = "Xbox_XSTSv3"
        }
    };

    var client = new HttpClient();
    var data = JsonConvert.SerializeObject(tokenRequest);

    var request = new HttpRequestMessage()
    {
        RequestUri = new Uri(SettingsEndpoints.SpartanTokenV4),
        Method = HttpMethod.Post,
        Content = new StringContent(data, Encoding.UTF8, "application/json")
    };

    request.Headers.Add("User-Agent", GlobalConstants.HALO_WAYPOINT_USER_AGENT);

    var response = await client.SendAsync(request);

    if (response.IsSuccessStatusCode)
    {
        return JsonConvert.DeserializeObject<SpartanToken>(response.Content.ReadAsStringAsync().Result);
    }
    else
    {
        return null;
    }
}
This sends a POST request to the following endpoint:
https://settings.svc.halowaypoint.com/spartan-token
The content of the request? Elementary, Watson - a JSON envelope with your XSTS token:
{
    "Audience": "urn:343:s3:services",
    "MinVersion": "4",
    "Proof": [
        {
            "Token": "YOUR_XSTS_TOKEN",
            "TokenType": "Xbox_XSTSv3"
        }
    ]
}
After the request goes through, you’re good to go with the Spartan token that can be extracted from the SpartanToken property of the obtained JSON.
{
    "ExpiresUtc": {
        "ISO8601Date": "2022-01-27T05:03:47Z"
    },
    "SpartanToken": "YOUR_SPARTAN_TOKEN",
    "TokenDuration": "PT3H59M49.4904271S"
}
As you can tell, the token expires, so you will need to craft logic in your code to refresh the token through the standard Microsoft OAuth mechanism.
Getting the Clearance #
We have the token (that goes into x-343-authorization-spartan) but we still haven’t learned how to get the clearance value that is required for some API calls. As it turns out, it’s only one API call away once you have the Spartan token. A call to the following endpoint:
https://settings.svc.halowaypoint.com/oban/flight-configurations/titles/hi/audiences/RETAIL/players/xuid(PLAYER_XUID)/active?sandbox=UNUSED&build=210921.22.01.10.1706-0
We’re obviously trying to get a clearance token for retail versions of Halo Infinite, as seen by the RETAIL part of the URL that indicates the audience, followed by an UNUSED sandbox and a build version that was extracted from an actual running Halo game. Once the request goes through, you should get a response such as this:
{
    "FlightConfigurationId": "YOUR_CLEARANCE"
}
Keep in mind that you can only get the clearance value for the authenticated account - that is, the Xbox user ID (XUID) belongs to you and is the account that went through the authorization flow to get the Spartan token.
And there you have it! You can now freely explore the Halo Infinite web API with your own credentials without launching the game.