Dynamic Lockscreen Changer For Windows Phone 8, Built With ASP.NET MVC And Azure Mobile Services
Table of Contents
With the release of Windows Phone 8, a few new developer API endpoints were made available that allow third-party applications to change the device lockscreen image. In this article, I am establishing the infrastructure and building a mobile application that provides the ability to choose from a number of dynamic image sets, from which images can be selected and then cycled as lockscreen wallpapers.
What do you need #
You will need to download and install ASP.NET MVC3 to work on the web frontend and Windows Phone 8 SDK to work on the mobile applications. An Azure Mobile Services account will be necessary, and of course don’t forget to download and install the Azure Mobile Services client libraries. All three components are available at no additional charge.
NOTE: Without the Azure Mobile Services SDK installed on the development machine, the compilation process will fail for the Windows Phone application.
Setting up The Data Store #
First we need to establish the general design of the application and organize the workflow. The application will provide two ways to assign the dynamic lockscreen:
- With the help of custom image sets that are provided by the service;
- With the help of self-created image sets, aggregated from images provided by the service but ultimately managed by the end-user.
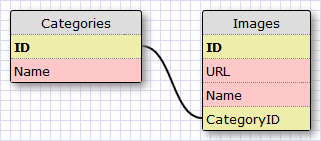
Let’s talk about the general data model. Every image belongs to a certain category and to keep track of each we need a table with two columns—category ID and category name. We also need another core table containing the image references themselves, with the following columns: image URL, descriptive name, and the category ID to which it belongs. The overall structure looks like this:
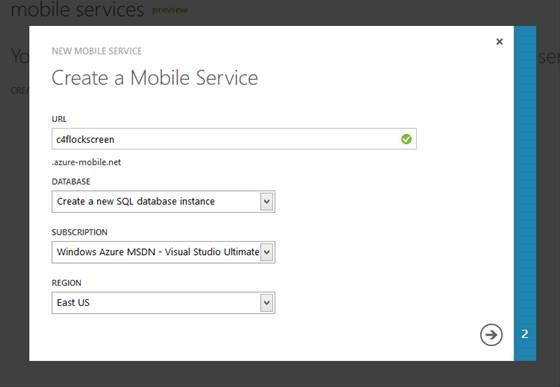
Now to the Windows Azure Management Portal and creating a new Mobile Service.
Once created, you need to specify database information, just like you would with a standard SQL Server database:
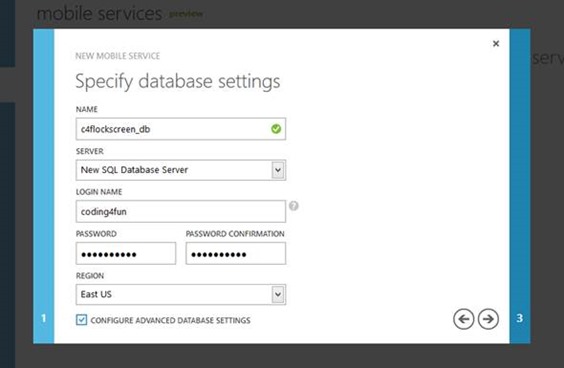
As the database is being created, you can easily integrate it with SQL Server Management Studio. You will need the server address, which may be obtained in the Azure Management Portal. To login, use the credentials that you set when creating the core database.
Create the two tables mentioned above, with the following column configuration:
Categories
- ID -
int - Name –
varchar(100)
Images
- ID –
int - URL –
varchar(500) - Name –
varchar(100) - CategoryID –
int
You can create these tables either in the SQL Server Management Studio or through the Azure Management Portal. However, you will need the Management Studio to create the column structure, as the Azure Management Portal does not offer this functionality right now.
By default, the id column will be created automatically. To add the Name column to the Categories table, run this query:
ALTER TABLE c4flockscreen.Categories
ADD Name VARCHAR(100)
To add the missing columns to the Images table, simply execute this query:
ALTER TABLE c4flockscreen.Images
ADD URL VARCHAR(500),
Name VARCHAR(100),
CategoryID INT
Now that the database is ready, we’ll proceed to working on the web layer, which will effectively be the administrative portal for the service.
Creating the Web Portal #
There should be a way to easily manage images and constantly expand the collection of possible lockscreen wallpapers. One way to do this is create a basic management portal that can carry basic CRUD operations.
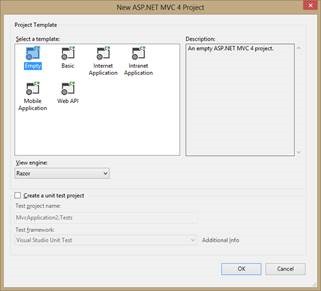
Start by creating an empty project:
If you are not yet aware of the Model-View-Controller (MVC) development pattern, here is a good read explaining the fundamentals.
Create a new controller in the Controllers folder, named HomeController. This will be the only controller created in this project. For now, add an ActionResult-based function that will return the main view:
using System.Web.Mvc;

namespace Coding4Fun.Lockscreen.Web.Controllers
{
    public class HomeController : Controller
    {
        public ActionResult MainView()
        {
            return View();
        }
    }
}
Having the controller without the proper views is pointless, so create a new view in Views/Home and name it MainView. For now, do not focus on the visual layout of the page, but rather on the functional aspect of the web frontend. If you run the application now, you will most likely get a 404 response. That is because the associated home view is by default not found. Open App_Start/RouteConfig.cs and make sure that the default view is set to MainView instead of Index.
routes.MapRoute(
name: "Default",
url: "{controller}/{action}/{id}",
defaults: new { controller = "Home", action = "MainView", id = UrlParameter.Optional }
);
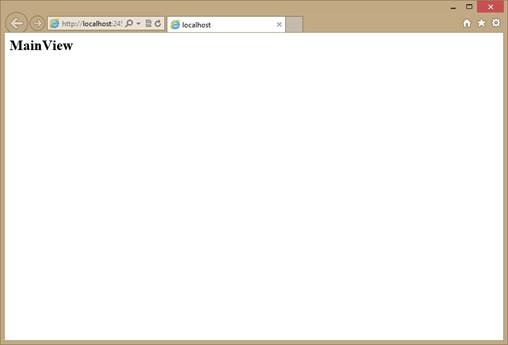
The core is created and now if running the web application you will see a basic HTML page:
We now need to handle data from the Azure Mobile Services database. Out-of-the-box, there is no ASP.NET SDK available, but the database can be easily accessed through a REST API. But before that, we need to define the data models for the Categories and Images table. Begin by creating two classes in the Models folder:
Category.cs:
public class Category
{
    public int? id { get; set; }
    public string Name { get; set; }
}
Image.cs:
public class Image
{
    public int? id { get; set; }
    public string URL { get; set; }
    public string Name { get; set; }
    public int CategoryID { get; set; }
}
Each of the properties is tied to the associated column in the database we created earlier. Notice that the ID values are nullable. This is introduced because the index will by default be automatically assigned. When new instances of Category or Image are created, I will not explicitly set the id property, so keeping it null instead of at a potential default value of 0 will ensure that it is properly set on the backend.
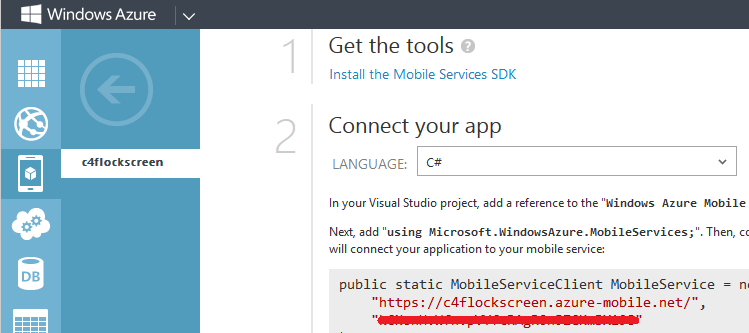
Let’s now create the connectivity engine that will allow us to query the content of the data store. For this purpose, I created a DataStore folder and a DataEngine class inside it. We will need a unique API key for each of our requests, so open the Azure Management Portal and obtain it from there:
In order to keep consistency between projects, and to be able to re-use the same Azure Mobile Services API key and core URL, I created an AuthConstants class in the context of the Coding4Fun.Lockscreen.Core project. It carries three static fields:
public static class AuthConstants
{
    public static string AmsApiKey = "YOUR_KEY_HERE";
    public const string AmsUrl = "https://c4flockscreen.azure-mobile.net/";
    public const string AmsTableUrl = AmsUrl + "tables/";
}
Back in the ASP.NET project, the query operations are carried with the help of HttpClient initialized in the class constructor, which also includes the key used to authenticate the requests via the X-ZUMO-APPLICATION header:
private HttpClient client;

public DataEngine()
{
    client = new HttpClient();
    client.DefaultRequestHeaders.Add("X-ZUMO-APPLICATION", KEY);
    client.DefaultRequestHeaders.Accept.Add(new MediaTypeWithQualityHeaderValue("application/json"));
}
This is the basic data harness. I also implemented two core methods in order to get all existing categories:
public IEnumerable<Category> GetAllCategories()
{
    var result = client.GetStringAsync(string.Concat(CORE_URL,"Categories")).Result;
    IEnumerable<Category> categories = JsonConvert.DeserializeObject<IEnumerable<Category>>(result);
    return categories;
}
And images:
public IEnumerable<Image> GetAllImages()
{
    var result = client.GetStringAsync(string.Concat(CORE_URL, "Images")).Result;
    IEnumerable<Image> images = JsonConvert.DeserializeObject<IEnumerable<Image>>(result);
    return images;
}
For each of these, a basic request is made with the table name appended to the base URL (represented by the CORE_URL constant). Since JSON.NET is now bundled with ASP.NET, I am able to easily deserialize the returned JSON data array to an IEnumerable<Type>. There is one problem, however, with the GetAllImages approach. It implies that even if I want to use LINQ to query the existing image collection, I have to first download the entire set locally.
Fortunately, the Azure Mobile Services REST API provides an endpoint with filtering, and that’s what I am using in GetCategoryById and GetImagesByCategoryId:
public Category GetCategoryById(int id)
{
    string composite = string.Concat(CORE_URL, "Categories?$filter=(id%20eq%20", id.ToString(), ")");
    var result = client.GetStringAsync(composite).Result;
    IEnumerable<Category> categories = JsonConvert.DeserializeObject<IEnumerable<Category>>(result);
    return categories.FirstOrDefault();
}

public IEnumerable<Image> GetImagesByCategoryId(int id)
{
    string composite = string.Concat(CORE_URL, "Images?$filter=(CategoryID%20eq%20", id.ToString(), ")");
    var result = client.GetStringAsync(composite).Result;
    IEnumerable<Image> images = JsonConvert.DeserializeObject<IEnumerable<Image>>(result);
    return images();
}
Notice the ?$filter= parameter, in which the conditional is URL encoded and is wrapped in parentheses. For the category query, I am checking the id value, and for the image I’m checking CategoryID.
In the Views/Home folder, create a new view and name it Images. It will be used to list existing images that are associated with one of the selected categories. You also need to adjust the controller code to handle the incoming data:
using Coding4Fun.Lockscreen.Web.DataStore;
using System.Web.Mvc;

namespace Coding4Fun.Lockscreen.Web.Controllers
{
    public class HomeController : Controller
    {
        DataEngine engine;
        public HomeController()
        {
            engine = new DataEngine();
        }

        public ActionResult MainView()
        {
            var categories = engine.GetAllCategories();
            return View(categories);
        }

        public ActionResult Images(int categoryId)
        {
            var images = engine.GetImagesByCategoryId(categoryId);
            if (images != null)
            {
                return View(images);
            }

            return View("MainView");
        }
    }
}
For the main view, I am getting the list of categories and passing them as the bound model. For the Images view, the category ID is passed as an argument that will later enable the engine to return a list of all images that have CategoryID set to that value. In case the returned list is not null, the view is shown. Otherwise, the main view is the terminal point.
In its current state, I’ll be able to use the frontend to list existing categories and images, but not to add, remove, or update items. Adding a category and an image is a matter of modifying an HttpClient request, with the help of HttpRequestMessage. For example, here is how I can add a category through my DataEngine class:
public HttpStatusCode AddCategory(Category category)
{
    var serializedObject = JsonConvert.SerializeObject(category, new JsonSerializerSettings() { NullValueHandling = NullValueHandling.Ignore });
    var request = new HttpRequestMessage(HttpMethod.Post, string.Concat(CORE_URL, "Categories"));
    request.Content = new StringContent(serializedObject, Encoding.UTF8, "application/json");
    var response = client.SendAsync(request).Result;
    return response.StatusCode;
}
JSON.NET capabilities are used to serialize the object that needs to be inserted. The POST request is executed against the standard table URL, with the UTF8 encoded JSON string. Since the client is already carrying the basic authentication header, all that needs to be done is calling the SendAsync function.
Updating a category follows the same approach, though a PATCH method is used for the request and the URL contains the index of the category that needs to be updated:
public HttpStatusCode UpdateCategory(Category category)
{
    var request = new HttpRequestMessage(new HttpMethod("PATCH"), string.Concat(CORE_URL, "Categories", "/", category.id));
    var serializedObject = JsonConvert.SerializeObject(category);
    request.Content = new StringContent(serializedObject, Encoding.UTF8, "application/json");
    var response = client.SendAsync(request).Result;
    return response.StatusCode;
}
To delete a category from the data store, one simply needs to pass a parameter to it that identifies the index of the category that needs to be removed:
public HttpStatusCode DeleteCategoryFromId(int categoryId)
{
    var request = new HttpRequestMessage(HttpMethod.Delete, string.Concat(CORE_URL, "Categories", "/", categoryId));
    var response = client.SendAsync(request).Result;
    return response.StatusCode;
}
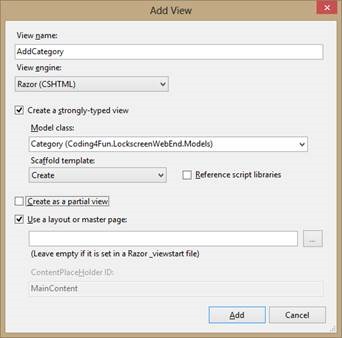
For images, the same methods can be used, with the Images table passed as the name for the target in the composite URL. Let’s now get back to working on some of the views. A static category list is not fun, so let’s create a way to add new categories. Right click on the Views/Home folder and select Add View:
A great thing about the view creation process in Visual Studio is the fact that you are able to use a basic scaffold template for a strongly-typed view. In this case, I am associating it with a Category class and using the Create template. I now need to modify the controller code to process requests to AddCategory. I need to handle two types of requests, GET and POST, because the view will be displayed to both add an item and submit an item:
public ActionResult AddCategory()
{
    return View();
}

[HttpPost]
public ActionResult AddCategory(Category category)
{
    if (ModelState.IsValid)
    {
        engine.AddCategory(category);
        return RedirectToAction("MainView");
    }

    return View();
}
For a GET request, I am simply returning the view. For a POST view, I am adding the category that was defined by the bound model through the local DataEngine instance, after which the user is redirected to the main view. But we also need to add an ActionResult for the MainView to obtain the list of items that are currently in the Categories table:
public ActionResult MainView()
{
    var categories = engine.GetAllCategories();
    return View(categories);
}
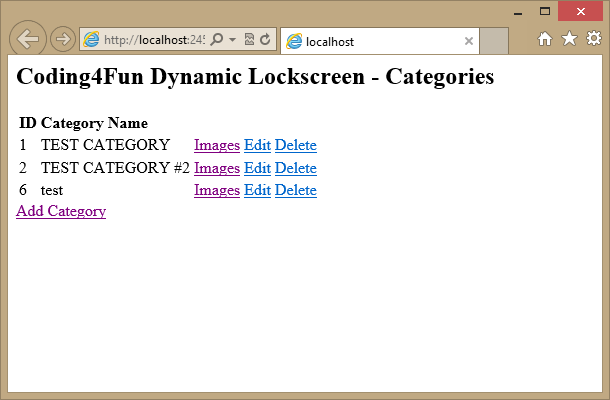
The DataEngine instance will return all categories in an IEnumerable<Category> form that are passed as the model for the main view. The layout of MainView.cshtml can be as simple as a table:
@{
    ViewBag.Title = "Coding4Fun Dynamic Lockscreen";
}

<h2>Coding4Fun Dynamic Lockscreen - Categories</h2>

<table>
<tr>
<td>
<b>ID</b>
</td>
<td>
<b>Category Name</b>
</td>
</tr>

@foreach (var p in Model)
{
    <tr>
    <td>
    @p.id
    </td>
    <td>
    @p.Name
    </td>
    <td>
@Html.ActionLink("Images", "Images", new { categoryId = p.id })
    </td>
    <td>
@Html.ActionLink("Edit", "EditCategory", new { categoryId = p.id })
    </td>
    <td>
@Html.ActionLink("Delete", "DeleteCategory", new { categoryId = p.id })
    </td>
    </tr>
}

</table>

@Html.ActionLink("Add Category", "AddCategory")
The ActionLink helper allows me to invoke a view and, if necessary, pass specific parameters to it (e.g., when I need to identify the category that needs to be deleted or edited). Some of the views listed here are not yet created, but I can easily use placeholder names in any case.
The ultimate result for the main page will look like this:
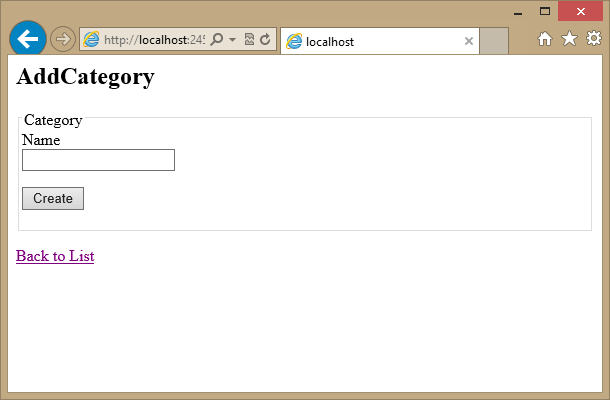
Notice that you are also able to add new categories now by clicking on the Add Category link on the bottom. This will redirect you to the AddCategory view that we created:
Let’s see how to implement the category editing in the web frontend. First of all, create a new view in Views/Home and name it EditCategory. Use the Edit scaffold template. Like AddCategory, EditCategory needs to be handled in two separate ways for GET and POST requests in the controller:
public ActionResult EditCategory(int categoryId)
{
    Category category;
    category = engine.GetCategoryById(categoryId);
    if (category != null)
       return View(category);
    return View("MainView");
}

[HttpPost]
public ActionResult EditCategory(Category category)
{
    if (ModelState.IsValid)
    {
        engine.UpdateCategory(category);
        return RedirectToAction("MainView");
    }

    return View();
}
For a GET request, we need to identify the category that needs to be added by its index, so we are using a categoryId argument passed to the view, which is later used by the DataEngine instance to retrieve the category from the data store. For a POST action, the implementation for UpdateCategory from above is used, where a PATCH request is run with the serialized object bound to the view.
For the Delete action, no additional view is necessary but the controller still needs a handler, so we can use a snippet like this:
public ActionResult DeleteCategory(int categoryId)
{
    engine.DeleteCategoryFromId(categoryId);
    return RedirectToAction("MainView");
}
You can use the same approach to add, delete, and edit items in the list of images. For adding images, however, you might want to pass the category identifier. When images are listed after the category has been selected, it is necessary to provide a way to identify the category to which new entities should be added. To do this, we can. in the main controller. pass the category index to the view when the Images action is being triggered:
public ActionResult Images(int categoryId)
{
    var images = engine.GetImagesByCategoryId(categoryId);
    if (images != null)
    {
        ViewData["CID"] = categoryId;
        return View(images);
    }

    return View("MainView");
}
Afterwards, the categoryId value can be obtained by using the CID key for ViewData inside the view itself.
Let’s now take a look at how images are represented for each category. I created a custom view to list all the images associated with the Images category. If you look above at the controller code, you will notice that I am passing the category ID, through which the image set query is executed, and the returned collection is set as the bound model:
public ActionResult Images(int categoryId)
{
    var images = engine.GetImagesByCategoryId(categoryId);
    if (images != null)
    {
        ViewData["CID"] = categoryId;
        return View(images);
    }

    return View("MainView");
}
When an image needs to be added, call the AddImage view. In HomeController.cs, it carries implementations for both GET and POST requests:
public ActionResult AddImage(int categoryId)
{
    Image image = new Image();
    image.CategoryID = categoryId;
    return View(image);
}

[HttpPost]
public ActionResult AddImage(HttpPostedFileBase file, Image image)
{
    if (file != null && file.ContentLength > 0)
    {
        var fileName = Path.GetFileName(file.FileName);
        var path = Path.Combine(Server.MapPath("~/Uploads"), image.CategoryID.ToString(), fileName);
        string dirPath = Path.GetDirectoryName(path);

        if (!Directory.Exists(dirPath))
            Directory.CreateDirectory(dirPath);

        file.SaveAs(path);

        string applicationUrl = string.Format("{0}://{1}{2}",
            HttpContext.Request.Url.Scheme,
            HttpContext.Request.ServerVariables["HTTP_HOST"],
            (HttpContext.Request.ApplicationPath.Equals("/")) ? string.Empty : HttpContext.Request.ApplicationPath
        );

        image.URL = Path.Combine(applicationUrl, "Uploads", image.CategoryID.ToString(), fileName);
    }

    if (ModelState.IsValid && image.URL != null)
    {
        engine.AddImage(image);
        return RedirectToAction("Images", new { categoryID = image.CategoryID });
    }

    return View();
}
When a GET request is executed against the AddImage endpoint, I pass the category ID as the flag, signaling which category the image should be included in. When a POST request is executed, it can go two ways—either the user is passing an existing link to a hosted image or the user is uploading his own image to the local server. When an upload is inbound, HttpPostedFileBase carries the content that needs to be pushed to the server.
The upload component on the view itself is done by creating a form with a file input:
<h2>Or you could upload your own file: </h2>

@if (Model != null)
{
    using (Html.BeginForm("AddImage", "Home", FormMethod.Post, new { enctype = "multipart/form-data", image = Model }))
    {
        @Html.HiddenFor(model => model.CategoryID);
        <input type="file" name="file" />
        <input type="submit" value="OK" />
    }
}
If there is no file selected, the system assumes that the user just decided to add an existing URL.
It’s important to mention that the upload workflow relies on the availability of the Upload folder. It is created by default when the project is deployed to the server, but you also need to make sure that the ASP.NET user on the machine where IIS is located has the appropriate write permission for the folder.
The Windows Phone 8 Application Foundation #
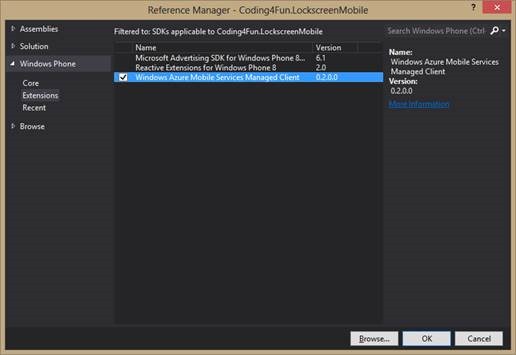
Create a new Windows Phone 8 application and add a reference to Windows Azure Mobile Services Managed Client. It should be available in the Extensions section if you installed the Windows Azure Mobile Services SDK as I mentioned at the beginning of the article:
In App.xaml.cs you need to create an instance of MobileServiceClient that will be used as the central connection point to the database. Notice that I am using the predefined AMS and API KEY string constants:
public static MobileServiceClient MobileService =
new MobileServiceClient(AuthConstants.AmsUrl, AuthConstants.AmsApiKey);
The mobile application should also carry the data models for both the categories and images. That said, we can reorganize those a bit for a more convenient data binding layout. To ensure that we can reuse the classes from different application components, I am once again using the Coding4Fun.Lockscreen.Core project.
Create a new folder called Models and add a new class called Category:
using System.Collections.ObjectModel;

namespace Coding4Fun.Lockscreen.Core.Models
{
    public class Category
    {
        public Category()
        {
            Images = new ObservableCollection<Image>();
        }

        public int? id { get; set; }
        public string Name { get; set; }

        public ObservableCollection<Image> Images { get; set; }

        public override string ToString()
        {
            return Name;
        }
    }
}
We are still relying on a nullable index value, but now there is an ObservableCollection for images. The reason for using this specific collection type is because with an ObservableCollection, binding updates are performed automatically when new items are added or removed, therefore cutting the need to implement the notification mechanism.
The ToString function is overridden to simplify data extraction on binding. When a collection with categories will be hooked to a list, for example, I don’t have to create a converter or a property link.
For the Image model, create a new class called Image in the same Models folder:
namespace Coding4Fun.Lockscreen.Core.Models
{
    public class Image
    {
        public int? id { get; set; }
        public string URL { get; set; }
        public string Name { get; set; }
        public int CategoryID { get; set; }
    }
}
Application Workflow & Storage #
Let’s talk about how image categories will be handled in the application. On application startup, the database is queried for the available categories and each of them is listed on the home screen. If the user taps on one of the categories, the database is queried for the images that are associated with the category index.
However, the user should also be able to create his own custom categories that will only be available in-app. Those categories can carry images from multiple other categories, if necessary, with the default reference set to the internal storage.
Since we are working with local storage, let’s create a helper class called LocalStorageHelper in the Coding4Fun.Lockscreen.Core project in the Storage folder. This class will carry basic read and write functions, allowing us to store data internally:
public static class LocalStorageHelper
{
    public async static void WriteData(string folderName, string fileName, byte[] content)
    {
        IStorageFolder rootFolder = ApplicationData.Current.LocalFolder;

        if (folderName != string.Empty)
        {
            rootFolder = await rootFolder.CreateFolderAsync(folderName,
            CreationCollisionOption.OpenIfExists);
        }

        IStorageFile file = await rootFolder.CreateFileAsync(fileName, CreationCollisionOption.ReplaceExisting);
        using (var s = await file.OpenStreamForWriteAsync())
        {
            s.Write(content, 0, content.Length);
        }
    }

    public static async void ClearFolder(string folderName)
    {
        var folder = await ApplicationData.Current.LocalFolder.GetFolderAsync(folderName);
        if (folder != null)
        {
            foreach (IStorageFile file in await folder.GetFilesAsync())
            {
                await file.DeleteAsync();
            }
        }
    }

    public static async Task<string> ReadData(string fileName)
    {
        byte[] data;
        StorageFolder folder = ApplicationData.Current.LocalFolder;
        StorageFile file = await folder.GetFileAsync(fileName);
        using (Stream s = await file.OpenStreamForReadAsync())
        {
            data = new byte[s.Length];
            await s.ReadAsync(data, 0, (int)s.Length);
        }

        return Encoding.UTF8.GetString(data, 0, data.Length);
    }
}
Notice that I am using the newly-introduced StorageFolder/StorageFile capabilities. If you worked with Windows Store application development, you are probably already familiar with them. Application.Current.LocalFolder gives me direct access to the local directory. which can be modified from within the application itself. It works in a manner similar to IsolatedStorageFile in Windows Phone 7, but with more flexibility when it comes to creating new folders and files and well doing file sweeps.
As I mentioned above, there will be internal data stored as XML. For this purpose, I need a class that carries serialization and deserialization routines, and I can simplify this task by using the Coding4Fun Toolkit Serialize.Save<T> and Serialize.Open<T> capabilities. Calls to these functions allow flexible serialization, where by default the static class is not aware of the serialization type, but is instead able to dynamically infer it from the incoming data. Once the byte layout is obtained for the content, I use the LocalStorageHelper class to write it to a file.
As there are multiple UI items that need to be bound to collections and object instances, I have a CentralBindingPoint class in my main project that is my main view model (it implements INotifyPropertyChanged). It implements the singleton pattern, so that the main instance is created on initialization and is subsequently re-used as necessary:
using Coding4Fun.Lockscreen.Core.Models;
using System;
using System.Collections.ObjectModel;
using System.ComponentModel;

namespace Coding4Fun.Lockscreen.Mobile
{
    public class CentralBindingPoint : INotifyPropertyChanged
    {
        static CentralBindingPoint instance = null;
        static readonly object padlock = new object();

        public CentralBindingPoint()
        {
            Categories = new ObservableCollection<Category>();
            CustomCategories = new ObservableCollection<Category>();
        }

        public static CentralBindingPoint Instance
        {
            get
            {
                lock (padlock)
                {
                    if (instance == null)
                    {
                        instance = new CentralBindingPoint();
                    }

                    return instance;
                }
            }
        }

        private ObservableCollection<Category> _categories;
        public ObservableCollection<Category> Categories
        {
            get
            {
                return _categories;
            }
            set
            {
                if (_categories != value)
                {
                    _categories = value;
                    NotifyPropertyChanged("Categories");
                }
            }
        }

        private ObservableCollection<Category> _customCategories;
        public ObservableCollection<Category> CustomCategories
        {
            get
            {
                return _customCategories;
            }
            set
            {
                if (_customCategories != value)
                {
                    _customCategories = value;
                    NotifyPropertyChanged("CustomCategories");
                }
            }
        }

        private Category _currentCategory;
        public Category CurrentCategory
        {
            get
            {
                return _currentCategory;
            }
            set
            {
                if (_currentCategory != value)
                {
                    _currentCategory = value;
                    NotifyPropertyChanged("CurrentCategory");
                }
            }
        }

        public event PropertyChangedEventHandler PropertyChanged;
        private void NotifyPropertyChanged(String info)
        {
            if (PropertyChanged != null)
            {
                System.Windows.Deployment.Current.Dispatcher.BeginInvoke(
                () =>
                {
                    PropertyChanged(this, new PropertyChangedEventArgs(info));
                });
            }
        }
    }
}
On the main page, I create a Pivot-based layout to have an easy way to transition between the web collections (categories) and the local ones:
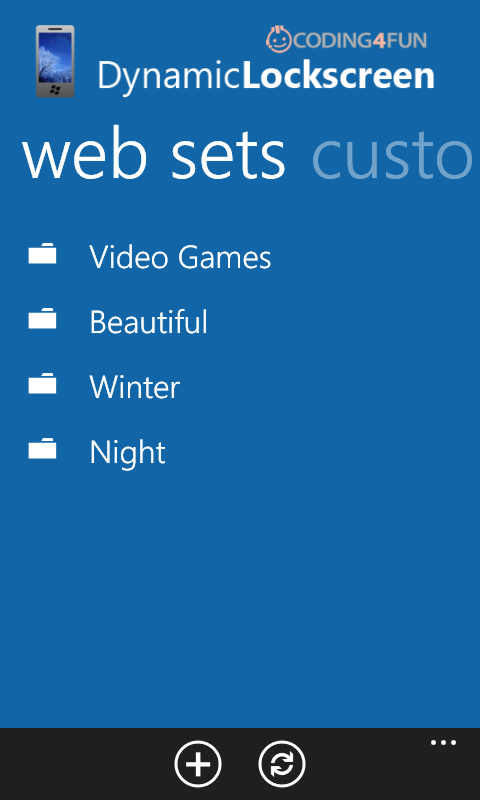
For each of the collection types, there is a ListBox with a custom DataTemplate assigned for each item. The items are obtained from the Categories collection for web sets and the CustomCategories collection for local sets, both in the CentralBindingPoint view model.
The categories are loaded with the help of the DataEngine class that I added in the Data folder in the main application project. It is a wrapper for the Azure Mobile Services data operations, allowing me to aggregate the list of categories and images, given that I know the category index:
public class DataEngine
{
    async public Task<List<Category>> GetCategoryList()
    {
        IMobileServiceTable<Category> table = App.MobileService.GetTable<Category>();
        List<Category> data = await table.ToListAsync();

        return data;
    }

    async public Task<List<Image>> GetImagesByCategoryId(int categoryId)
    {
        IMobileServiceTable<Image> table = App.MobileService.GetTable<Image>();
        List<Image> data = await table.Where(x => x.CategoryID == categoryId).ToListAsync();

        return data;
    }
}
When the main page loads, I use the local DataEngine instance to call GetCategoryList and obtain a List<Category> collection that is subsequently transformed into an ObservableCollection through one of the default constructors:
async void MainPage_Loaded(object sender, RoutedEventArgs e)
{
    CentralBindingPoint.Instance.Categories = new ObservableCollection<Category>(await dataEngine.GetCategoryList());
}
When a category is selected in the web sets list, I assign the selected item as the current category and navigate to the ImageSetPage.xaml page that will display the associated images:
async void ListBox_SelectionChanged_1(object sender, System.Windows.Controls.SelectionChangedEventArgs e)
{
    var box = (ListBox)sender;

    if (box.SelectedItem != null)
    {
        Category selectedCategory = (Category)box.SelectedItem;
        selectedCategory.Images = new ObservableCollection<Coding4Fun.Lockscreen.Core.Models.Image>
        (await dataEngine.GetImagesByCategoryId((int)selectedCategory.id));

        CentralBindingPoint.Instance.CurrentCategory = selectedCategory;
        NavigationService.Navigate(new Uri("/ImageSetPage.xaml", UriKind.Relative));
    }
}
Notice that the images are not loaded at the same time as the categories; rather, they’re loaded only when a category has been selected, hence the GetImagesByCategoryId call on selection.
For a custom set, the procedure is pretty much the same, the only difference being the fact that image references are already present since those were deserialized from the local storage:
private void lstCustomSets_SelectionChanged_1(object sender, SelectionChangedEventArgs e)
{
    var box = (ListBox)sender;

    if (box.SelectedItem != null)
    {
        Category selectedCategory = (Category)box.SelectedItem;
        CentralBindingPoint.Instance.CurrentCategory = selectedCategory;
        NavigationService.Navigate(new Uri("/ImageSetPage.xaml", UriKind.Relative));
    }
}
In ImageSetPage.xaml I use a ListBox with a WrapPanel in the ItemsPanelTemplate, which ensures that I can have only two images in a row and any additions will be wrapped, with a fixed row length. You can get that control from the WPToolkit (formerly known as Silverlight Toolkit for Windows Phone, available on NuGet).
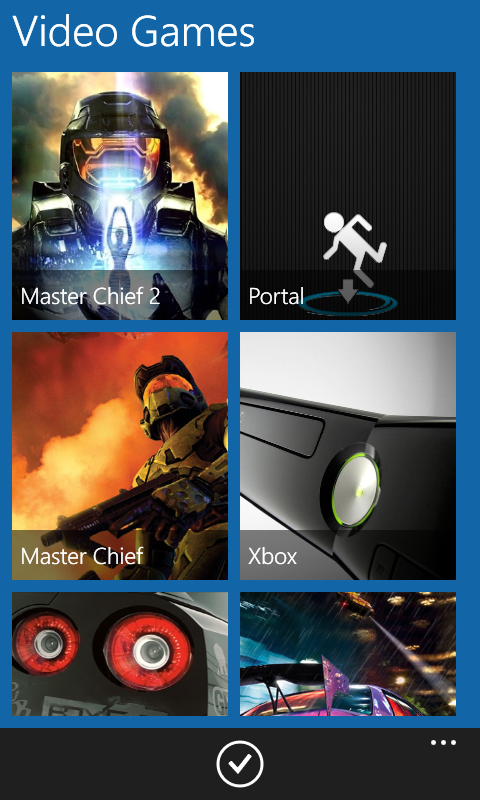
Here is the basic XAML layout:
<ListBox
    SelectionMode="Single"
    Margin="24"
    x:Name="lstImages" SelectionChanged="lstImages_SelectionChanged_1"
    ItemsSource="{Binding Path=Instance.CurrentCategory.Images,
    Source={StaticResource CentralBindingPoint}}"
    ItemTemplate="{StaticResource ListItemTemplate}">
    <ListBox.ItemsPanel>
        <ItemsPanelTemplate>
            <toolkit:WrapPanel ItemWidth="216" ItemHeight="260"/>
        </ItemsPanelTemplate>
    </ListBox.ItemsPanel>
</ListBox>
Now that we have a basic skeleton for the incoming data, let’s see how it can be transformed into a live lockscreen, on which wallpapers can be cycled. In the ImageSetPage.xaml page I have a button in the application bar that allows me to set the current category as the source for the switching wallpapers.
Currently, each Image instance carries an image URL and the images can be located anywhere outside the application. This can cause problems with the wallpaper setting process, however, since the API only allows local images to be set as background. This means that I need to download each image to the local application folder:
private async void btnSetStack_Click_1(object sender, EventArgs e)
{
    var isProvider = Windows.Phone.System.UserProfile.LockScreenManager.IsProvidedByCurrentApplication;

    if (!isProvider)
    {
        var op = await Windows.Phone.System.UserProfile.LockScreenManager.RequestAccessAsync();
        isProvider = op == Windows.Phone.System.UserProfile.LockScreenRequestResult.Granted;
    }

    if (isProvider)
    {
        downloadableItems = new List<string>();
        fileItems = new List<string>();

        foreach (var image in CentralBindingPoint.Instance.CurrentCategory.Images)
        {
            downloadableItems.Add(image.URL);
            fileItems.Add(Path.GetFileName(image.URL));
        }

        SerializationHelper.SerializeToFile(fileItems, "imagestack.xml");
        LocalStorageHelper.ClearFolder("CurrentSet");
        DownloadImages();
        grdDownloading.Visibility = System.Windows.Visibility.Visible;
    }
}
First of all, I need to make sure that the application can set a lockscreen background and is registered in the OS as a provider. The application needs to state its intent to be able to access the wallpaper by adding this snippet to the WMAppManifest.xml, right after the Tokens node:
<Extensions>
      <Extension ExtensionName="LockScreen_Background" ConsumerID="{111DFF24-AA15-4A96-8006-2BFF8122084F}" TaskID="_default" />
</Extensions>
downloadableItems is a collection that represents the download queue. fileItems contains the local file names for each image that is about to be downloaded and will be serialized and used in the background agent to iterate through the category files. Whenever the download process is started, an overlay becomes visible to notify the user that the image acquisition process is in progress.
Also, notice the fact that I am calling LocalStorageHelper.ClearFolder, passing the name of the folder as the first argument. I do not want to keep images for sets that are not active, therefore when a new set is selected, the currently stored images are deleted from the CurrentSet folder and replaced by the ones that are about to be downloaded. The implementation of the ClearFolder function looks like this:
public static void ClearFolder(string folderName
{
    if (store.DirectoryExists(folderName))
    {
        foreach (string file in store.GetFileNames(folderName + "\\*.*"))
        {
            store.DeleteFile(folderName + "\\" + file);
        }
    }
}
Once the file names are stored in imagestack.xml, the image contents are downloaded via DownloadImages:
void DownloadImages()
{
    WebClient client = new WebClient();
    string fileName = Path.GetFileName(downloadableItems.First());
    client.OpenReadAsync(new Uri(downloadableItems.First()));
    client.OpenReadCompleted += (sender, args) =>
    {
        Debug.WriteLine("Downloaded " + fileName);
        LocalStorageHelper.WriteData("CurrentSet", fileName, StreamToByteArray(args.Result));
        downloadableItems.Remove(downloadableItems.First());
        if (downloadableItems.Count != 0)
            DownloadImages();
        else
        {
            grdDownloading.Visibility = System.Windows.Visibility.Collapsed;
            LocalStorageHelper.CycleThroughImages();

            //ScheduledActionService.LaunchForTest("LockscreenChanger", TimeSpan.FromSeconds(5));
        }
    };
}
Here you can see that I am making a call to LocalStorageHelper.CycleThroughImages — a function that reads the file that contains the current set and picks the first image, assigning it to be the current wallpaper and then pushing it to the back of the list, making the succeeding image the next in line for the wallpaper:
public static void CycleThroughImages()
{
    List<string> images = Coding4Fun.Phone.Storage.Serialize.Open<List<string>>("imagestack.xml");
    if (images != null)
    {
        string tempImage = images.First();
        Uri currentImageUri = new Uri("ms-appdata:///Local/CurrentSet/" + tempImage, UriKind.Absolute);
        Windows.Phone.System.UserProfile.LockScreen.SetImageUri(currentImageUri);
        images.Remove(tempImage);
        images.Add(tempImage);
        Coding4Fun.Phone.Storage.Serialize.Save<List<string>>("imagestack.xml", images);
    }
}
You might be wondering why I’m not using Queue<T> for this. After all, Enqueue and Dequeue would make things a bit easier. The problem is that a Queue instance cannot be directly serialized without being transformed to a flat list. Therefore, I am sticking to minimal resource processing by manipulating a List<T> instance instead.
The recursive image download method runs until the download queue is emptied, after which the overlay is hidden.
Background Agent #
At this point, we have the images locally stored and listed in an XML file. If the user accepted the system prompt, the application has also been registered as a lockscreen background provider, but there is not yet a single piece of code that would actually set the wallpaper cycle. For that, create a new Background Agent project in your solution. I named mine Coding4Fun.Lockscreen.Agent.
The OnInvoke function in ScheduledAgent.cs is executed at 30-minute intervals. This is a time limit defined by the PeriodicTask background agent type that we’ll be using here. You need to add the following snippet to it:
protected override void OnInvoke(ScheduledTask task)
{
    var isProvider = Windows.Phone.System.UserProfile.LockScreenManager.IsProvidedByCurrentApplication;
    if (isProvider)
    {
        LocalStorageHelper.CycleThroughImages();
    }
    NotifyComplete();
}
As with the download snippet, I am ensuring that before I attempt to change the wallpaper the application is a registered provider. Otherwise, an exception will be thrown and the background agent will crash. The bad thing about periodic tasks crashing is the fact that once two consecutive crashes occur, the task is removed from the task queue and the backgrounds will not be changed.
If the application is a provider, call CycleThroughImages to set the new background and push the old one to the end of the list. To make sure that a different image is selected each time, the original deserialized list is modified, where the first image now becomes last, switching the stack up, after which it is serialized back into imagestack.xml.
The background agent needs to be registered in the WMAppManifest.xml. Inside the Tasks node, add an ExtendedTask:
<ExtendedTask Name="LockscreenChangerTask">
    <BackgroundServiceAgent Specifier="ScheduledTaskAgent"
        Name="LockscreenChanger"
        Source="Coding4Fun.Lockscreen.Agent"
        Type="Coding4Fun.Lockscreen.Agent.ScheduledAgent" />
</ExtendedTask>
Also, when the application starts, you need to ensure that the task is registered, and register it if it isn’t yet. Use the Application_Launching event handler for this task:
private void Application_Launching(object sender, LaunchingEventArgs e)
{
    string taskName = "LockscreenChanger";
    var oldTask = ScheduledActionService.Find(taskName) as PeriodicTask;

    if (oldTask != null)
    {
        ScheduledActionService.Remove(taskName);
    }

    PeriodicTask task = new PeriodicTask(taskName);
    task.Description = "Change lockscreen wallpaper.";

    ScheduledActionService.Add(task);
    LoadCustomCategories();
}
Here, LoadCustomCategories will deserialize the existing custom categories, so that those can be shown in the main page after the application starts:
private async void LoadCustomCategories()
{
    try
    {
        CentralBindingPoint.Instance.CustomCategories =
        (ObservableCollection<Category>)await SerializationHelper.DeserializeFromFile(
        typeof(ObservableCollection<Category>), "customcat.xml");
    }
    catch
    {
        Debug.WriteLine("No customcat.xml - no registered custom categories.");
    }
}
Now the backgrounds will automatically change based on the web sets that you will activate every 30 minutes.
Working with Custom Categories #
Let’s create some custom sets. To manage user input, I leverage the CustomMessageBox control available in the Windows Phone Toolkit. It has enough flexibility to let me choose between adding a TextBox control, to have the user create the new category or use a ListPicker to show the available custom categories in a consistent UI layout.
When the user decides to create a new category, he taps the plus button in the application bar on the main page:
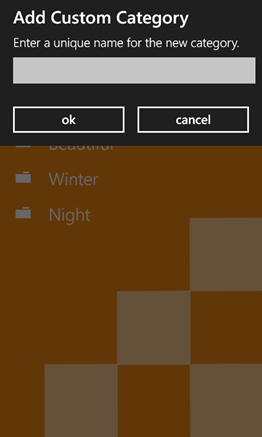
The implementation for the call is simple:
private void btnSetStack_Click_1(object sender, EventArgs e)
{
    TextBox textBox = new TextBox();
    CustomMessageBox box = new CustomMessageBox()
    {
        Caption = "Add Custom Category",
        Message = "Enter a unique name for the new category.",
        LeftButtonContent = "ok",
        RightButtonContent = "cancel",
        Content = textBox
    };

    box.Dismissed += (s, boxEventArgs) =>
    {
        if (boxEventArgs.Result == CustomMessageBoxResult.LeftButton)
        {
                    if (!string.IsNullOrWhiteSpace(textBox.Text))
                    {
                        var categoryCheck = (from c in CentralBindingPoint.Instance.CustomCategories
                        where
                        c.Name == textBox.Text
                        select c).FirstOrDefault();

                        if (categoryCheck == null)
                        {
                            Category category = new Category() { Name = textBox.Text };
                            CentralBindingPoint.Instance.CustomCategories.Add(category);
                            Coding4Fun.Toolkit.Storage.Serialize.Save<ObservableCollection<Category>>(
                            "customcat.xml", CentralBindingPoint.Instance.CustomCategories);
                        }
                        else
                        {
                            MessageBox.Show("Add Custom Category",
                            "This category name was already taken!",
                            MessageBoxButton.OK);
                        }
                    }
        }
    };

    box.Show();
}
When the message box is dismissed, I check which button is pressed to take the appropriate course of action. Let’s assume that the user decided to add the new category—we need to check and make sure that there isn’t already a category with the same name in the existing collection. If there isn’t one, a new Category instance is created, added to the collection in the main view model, and serialized to customcat.xml.
The user also needs to be able to add images from any category to another custom category. To do this, I decided to give the user the option to carry across the image name and URL when he taps on an image in the ImageSetPage.xaml.
Remember, if there are no current custom categories registered, the user should be informed that he should create some first, so the alternative route for the dialog with custom category name selection should be a message box alert:
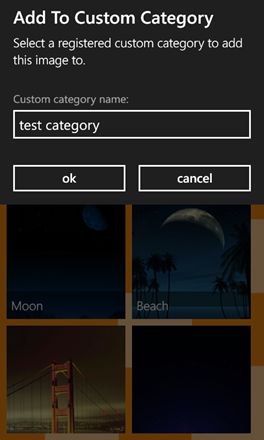
Here is the snippet that does this:
private void lstImages_SelectionChanged_1(object sender, SelectionChangedEventArgs e)
{
    if (CentralBindingPoint.Instance.CustomCategories.Count > 0)
    {
        if (lstImages.SelectedItem != null)
        {
            ListPicker picker = new ListPicker()
            {
                Header = "Custom category name:",
                ItemsSource = CentralBindingPoint.Instance.CustomCategories,
                Margin = new Thickness(12, 42, 24, 18)
            };

            CustomMessageBox messageBox = new CustomMessageBox()
            {
                Caption = "Add To Custom Category",
                Message = "Select a registered custom category to add this image to.",
                Content = picker,
                LeftButtonContent = "ok",
                RightButtonContent = "cancel"
            };

            messageBox.Dismissing += (s, boxEventArgs) =>
            {
                if (picker.ListPickerMode == ListPickerMode.Expanded)
                {
                    boxEventArgs.Cancel = true;
                }
            };

            messageBox.Dismissed += (s2, e2) =>
            {
                switch (e2.Result)
                {
                    case CustomMessageBoxResult.LeftButton:
                    {
                        if (picker.SelectedItem != null)
                        {
                            Category category = (from c in CentralBindingPoint.Instance.CustomCategories
                            where c.Name == picker.SelectedItem.ToString()
                            select c).FirstOrDefault();

                            if (category != null)
                            {
                                category.Images.Add((Coding4Fun.Lockscreen.Core.Models.Image)lstImages.SelectedItem);
                                Coding4Fun.Toolkit.Storage.Serialize.Save<ObservableCollection<Category>>(
                                "customcat.xml", CentralBindingPoint.Instance.CustomCategories);
                            }

                            lstImages.SelectedItem = null;
                            lstImages.IsEnabled = true;
                        }
                        break;
                    }

                    case CustomMessageBoxResult.RightButton:
                    case CustomMessageBoxResult.None:
                    {
                        lstImages.SelectedItem = null;
                        break;
                    }
                }
            };

            messageBox.Show();
        }
    }
    else
    {
        MessageBox.Show("Add To Custom Category",
        "Tapping on an image will prompt you to add it to a custom category" + Environment.NewLine +
        "Seems like you don't have any custom categories yet.", MessageBoxButton.OK);
    }
}
Once the category is selected from the list, the image is added to the Images collection in the Category instance, and the category list is serialized to preserve the changes. There are no restrictions as to which categories can fetch images to other categories — we can even select images from custom categories and include them in other categories. The image can be added multiple times to the same category as well.
Conclusion #
With Azure Mobile Services and a managed SDK available for Windows Phone, as well as an open REST API, it is fairly easy to build connected applications on multiple platforms at once without major logic and code base modifications.