Visual Studio Code And docs.microsoft.com API Docs
Table of Contents
Last week I thought I would sit down and learn how to write a Visual Studio Code extension - what better way is there to test the documentation your company ships and give yourself the best holiday present of the year?
I will start this by saying right away how easy it is to work on the extension across two platforms - part of it was written on a Windows machine, and another part of a mac. There was absolutely zero friction, as everything is done within the same environment and with the same cross-platform toolchain.
Getting started - setting up the environment #
It’s a little meta, but you will be developing extensions for Visual Studio Code in Visual Studio Code. Of course, that doesn’t mean you can’t use another editor, but it certainly makes the workflow easier.
I got started by just downloading the Hello World example, provisioning npm and Yeoman on both developer machines and then starting to introduce modifications to the scaffolding. Visual Studio Code was already installed on my machines, as it’s by far the most used app in my toolbox, but in case you need do download it - you can get it here.
How the extension works #
The idea behind the extension is fairly simple - when a developer writes an application in one of the languages we support on docs.microsoft.com, they can get some reference material by leveraging a key combination within the editor.
To do that, the extension will take the user’s selection and run it against the search service on docs.microsoft.com, and also do some light parsing to extract content from rendered HTML pages.
To do all the above, I thought I would take advantage of functionality exposed in the following packages:
- superagent - allows performing HTTP requests. One of the great things about it is that it supports promises.
- xpath - allows performing XPath queries against the content that we take from docs.microsoft.com.
- xmldom - allows the construction of the DOM from the string we download when we get the documentation page.
- file-url - helps converting a relative path to a file URL akin to
file://some/path/to/file.png. - js-htmlencode - helper package that allows me to encode raw string content in a render-friendly format that does not break general markup conventions (e.g. loose tags - you’ll see more about this later).
The code #
One of the important items that is important to define in the Visual Studio Code extension, is the command registration - when the extension is activated, any custom commands have to be integrated into the environment - that is typically done through vscode.commands.registerCommand:
let disposable = vscode.commands.registerCommand('extension.lookupApi', () => {
    return commands.executeCommand('vscode.previewHtml', apiPreviewUri, vscode.ViewColumn.Two, 'Rapid API Search').then((success) => {
    }, (reason) => {
        vscode.window.showErrorMessage(reason);
    });
});
Remember how earlier I mentioned that I am already using the Hello World sample? In that case, the registerCommand call is already provisioned for you. You should be able to just set a different command name, but also make sure to update it in package.json:
"contributes": {
    "commands": [
        {
            "command": "extension.lookupApi",
            "title": "Lookup API"
        }
    ],
    "keybindings": [
        {
            "command": "extension.lookupApi",
            "key": "ctrl+f1",
            "mac": "cmd+f1",
            "when": "editorTextFocus"
        }
    ]
}
There are two things happening here:
- The
commandssection determines the command itself, with a helpful title. That will be shown in the Command Palette. - The
keybindingssection determines key combinations that the user can trigger the command in the extension by.
In my case, I only have one command, so I decided to bind it to Ctrl+F1 (Cmd+F1 on a mac).
If we look back at the command trigger, notice that I am triggering the execution of the command with the previewHtml parameter. You can read up more on that in the Complex Commands page of the official documentation - it’s used to render custom HTML in a WebView alongside the main content that the user is editing.
Before the command registration, I am also declaring a custom document content provider, that will be the one generating the preview:
let provider = new ApiTextDocumentContentProvider();
let registration = workspace.registerTextDocumentContentProvider('rapid', provider);
This class processes the data in several steps:
Confirm that the language used #
async performApiSearch(): Promise<string> {
    let editor = vscode.window.activeTextEditor;
    if (!editor) {
        return;
    }

    let selection = editor.selection;
    let text = editor.document.getText(selection);
    let requestLocation = apiBrowserEndpoint;

    // This will determine what API Browser endpoint we will be checking
    // to get API information.
    if (editor.document.languageId === 'csharp' || editor.document.languageId === 'vb') {
        requestLocation = requestLocation.replace('API_PLATFORM_V6G','dotnet');
    } else {
        requestLocation = requestLocation.replace('API_PLATFORM_V6G','powershell');
    }

    // No text was selected, so we might as well not do a lookup.
    if (!text) {
        return "NO_SELECTION";
    }
    else {
        console.log(text);
    }

    let response = await superagent.get(requestLocation + text);

    return response["text"];
}
Request document #
Depending on the active language and the user selection, a request is performed to get the basic API information from the docs.microsoft.com servers.
Parsing additional data #
The search service doesn’t return all the information that we need - I also need to get the API signature and some sample code that demonstrates how specific API entities work, where available. For that, there are two XPath queries:
const xPathSignatureLookup = `(//*[local-name()='code' and contains(@class,'lang-API_LANG_V6G')])[1]`;
const xPathExampleLookup = `//*[.='Examples']/following-sibling::pre/code[contains(@class,'lang-API_LANG_V6G')]`;
There is also an exception - in some cases, API documentation is structured in a way where API entities are grouped in the same page, instead of having the dedicated page. Luckily for us, the search service already accounts for that and gives us a hint - the pound sign (#). Depending on it, we can adjust the XPath query:
if (apiUrl.includes("#")) {
    let fragment = apiUrl.substring(apiUrl.indexOf("#")+1);
    signatureLookup = `//*[@id='${fragment}']/ancestor::div[1]//pre[1]/code[contains(@class,'lang-${lang}')]`
    exampleLookup = `//*[@id='${fragment}']/ancestor::div[1]//*[.='Examples']/following-sibling::pre/code[contains(@class,'lang-${lang}')]`;
}
Last but not least, in certain cases the signature fragment is wrapped in a DIV that throws off the XPath lookup. We can eliminate it with some regex:
let regex = /<div class=\"memberNameHolder\">(.|\n|\r)+?<\/div>/g;

do {
    var t = regex.exec(textResponse);
    if (t) {
        let enhancedGarbageWrapper = t[0].replace('<div class="memberNameHolder">','').replace('</div>','');
        textResponse = textResponse.replace(t[0],enhancedGarbageWrapper);
    }
} while (t);
Once the data is processed, I pass the associated object back into the processing pipeline.
Data processing #
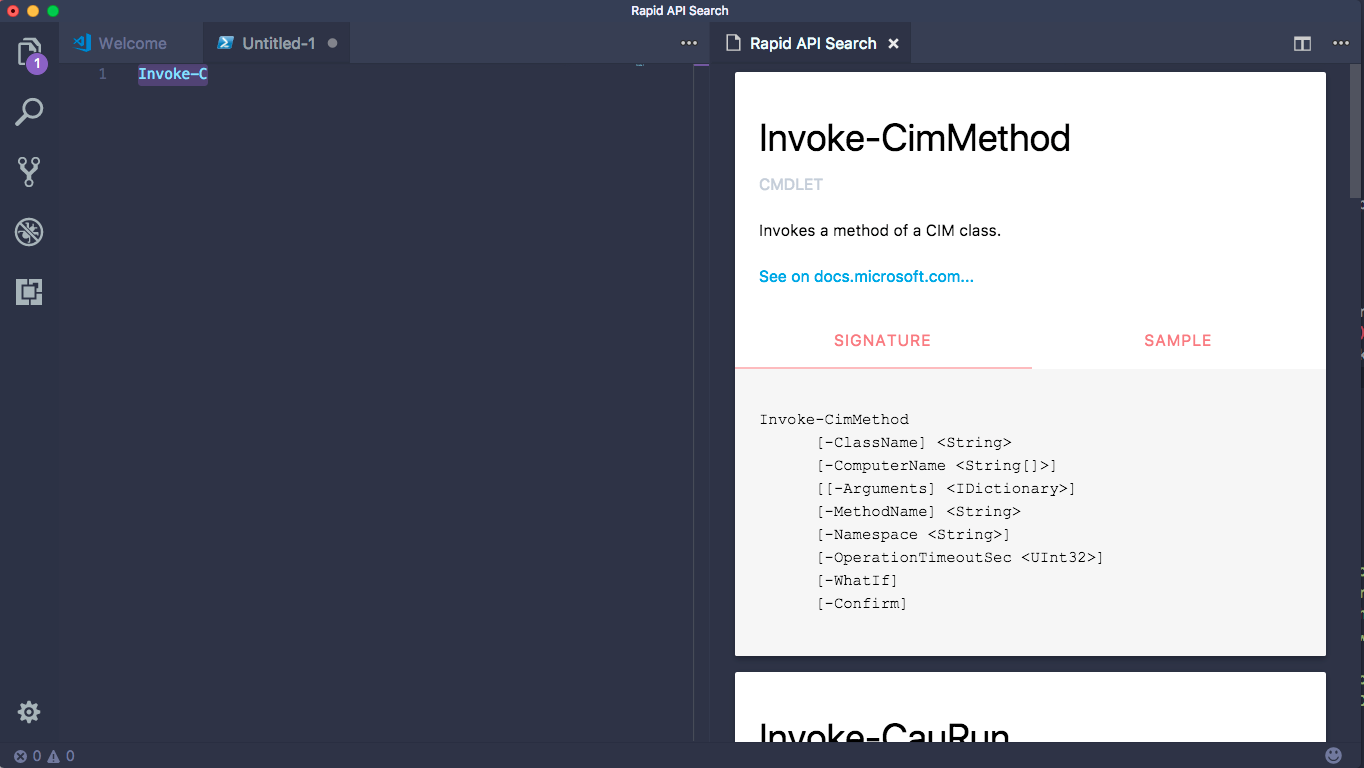
When the JSON is received from the search service, the data is being wrapped in a custom HTML. I’ve decided to use Materialize CSS to present the data in the view, so that there is a little API entity card, with two key tabs - the API signature and a sample.
 async processData(data: string, docLang: string): Promise<string> {
    let self = this;

    let parsedJson = JSON.parse(data);

    let combinedHtml = `<div style="width:230px; margin:0 auto;">
                            <img src="${createStaticFileUri("images/ghost.png")}" style="max-width: 210px; text-align: center;" />
                            <h2 style="text-align: center;">Uh oh...</h2>
                            <p style="text-align: center;">Looks like we don't know what this API is.</p>
                        </div>`;

    if (parsedJson.count > 0) {
        console.log("There are items to work with!");

        combinedHtml = rawPrefixHtml;

        if (parsedJson.results.length > 5) {
            parsedJson.results = parsedJson.results.slice(0, 5);
        }

        for (let i = 0, len = parsedJson.results.length; i < len; i++) {
            let stringFunction = function guid() {
                function s4() {
                    return Math.floor((1 + Math.random()) * 0x10000)
                        .toString(16)
                        .substring(1);
                }
                return s4() + s4() + '-' + s4() + '-' + s4() + '-' +
                    s4() + '-' + s4() + s4() + s4();
            }

            let randomString = stringFunction();
            let apiData = null;

            await this.getApiSignature(parsedJson.results[i].url, docLang).then((data) => {
                apiData = data;
            });

            combinedHtml += ` <div class="card">
                                <div class="card-content">
                                <h4 style="color:black;">${parsedJson.results[i].displayName.replace(/\./g, '.<wbr>')}</h4>
                                <p>${parsedJson.results[i].itemKind.toUpperCase()}</p><br/>
                                <p style="color:black;">${parsedJson.results[i].description != null ? parsedJson.results[i].description : 'No description available.'}</p><br/>
                                <p><a href="${parsedJson.results[i].url}">See on docs.microsoft.com...</a></p>
                                </div>
                                <div class="card-tabs">
                                <ul class="tabs tabs-fixed-width">
                                    <li class="tab"><a class="active" href="#test-1-${randomString}">Signature</a></li>
                                    <li class="tab"><a href="#test-3-${randomString}">Sample</a></li>
                                </ul>
                                </div>
                                <div class="card-content grey lighten-4">
                                <div style="color:black;" id="test-1-${randomString}"><pre>${apiData.signature}</pre></div>
                                <div style="color:black;" id="test-3-${randomString}"><pre>${apiData.example}</pre></div>
                                </div>
                            </div>`;
        }

        combinedHtml += rawSuffixHtml;
    }

    return combinedHtml;
}
Here, I am manually constructing the HTML - granted, there are better ways to do that, but for a prototype this should do the trick (by the way, I accept PRs - would be happy to learn what is the best way to do this).
We end up with an experience like this:
Building and Publishing #
To build the extension, I am using VSTS, with a Hosted Linux Agent. There is already a Gulp-compatible build template that you can leverage. For that, create a .npmrc file in the root of your extension folder, with the following content:
unsafe-perm = true
When npm runs, it takes configuration settings either directly from the command line, or from the .npmrc files. Since in VSTS we can’t directly control the command line, I need to pass the configuration through an appropriate file, and in this case, to avoid access errors (especially common when building VSCode automation), you need to allow unsafe permissions.
In addition, you will need a gulpfile.js, that will describe how the build will happen:
var gulp = require("gulp");

var shell = require("gulp-shell");

gulp.task("compile-typescript", function () {
    gulp.src("package.json").pipe(shell("tsc"));
});

gulp.task("build", ["compile-typescript"]);
With the build automated, I published the extension by following the vsce instructions, and it’s now available in the Visual Studio Marketplace.