Building Docs With GitHub Actions
Table of Contents

Contents
At GitHub Universe 2018, the team announced a new an exciting capability of the platform - GitHub Actions. At its core, this allows you to run “micro-CI” (or not so micro) within the repository itself. The benefit is two-fold: you can still plug in to other CI services, and you can also segment the workflow directly from the repository (there are some pretty interesting workflows out there already 2).
I recently got my invite to the beta, so I thought I’d start with what I know best - API documentation workflows. This summer I’ve written a post that documents how it’s possible to create your own documentation in the cloud - the natural continuation to that is the ability to run the entire process through GitHub actions, without being dependent on another CI system. This post outlines the journey to get there.
What are GitHub Actions #
Let’s start with the fundamental question - what are GitHub Actions and why do I need to use those? In the spirit of configuration-as-code, a user is able to define a containerized workflow that manages their code (e.g. release, validate) based on events that happen within the repository. For example, if I have a repository with code, and want to generate documentation for it, I can set up a workflow where any change to the code base will trigger a documentation generation event, where, within a Docker container, the API will be transformed into a structured documentation representation, followed by an event that would translate the structured content into static HTML and subsequently publish said HTML to some storage location (e.g. via Netlify or directly to Azure Storage or S3).
Being someone who works with documentation, I recommend you check out the official documentation on GitHub Actions instead of relying on my own description.
Defining the workflow #
I thought I would approach the problem from two sides for this post - publishing static hand-written documentation, as well as auto-generated content, sourced from APIs. The goal was also to keep it very simple, because let’s face it - nobody got time for uber-complex configuration to get content hosted somewhere (unless you are dealing with private/secret content, in which case this blog post is not for you).
For the purposes of this project, I will be relying on DocFX - the static documentation generator that my team builds, and which powers docs.microsoft.com. What I like about it is its extensibility model, where I can mix-and-match content types within the same content management workflow - you can combine hand-written content composed entirely in Markdown with API documentation that was produced from reflecting APIs.
I am also going to scope this project to just generating API documentation for a TypeScript-based library - you can extrapolate the instructions to other languages and platforms relatively easy 3. I am going to use TypeDoc and Type2DocFX to get TypeScript APIs in a structured format that DocFX can publish - it will be something very similar to what I’ve done with Doctainers (a project that allows you to generate documentation in containers 4).
Repository setup #
Scene is set - let’s get to work. First, I want to get the repository provisioned with the necessary configuration. To get started, I created a new, empty private repository on GitHub.
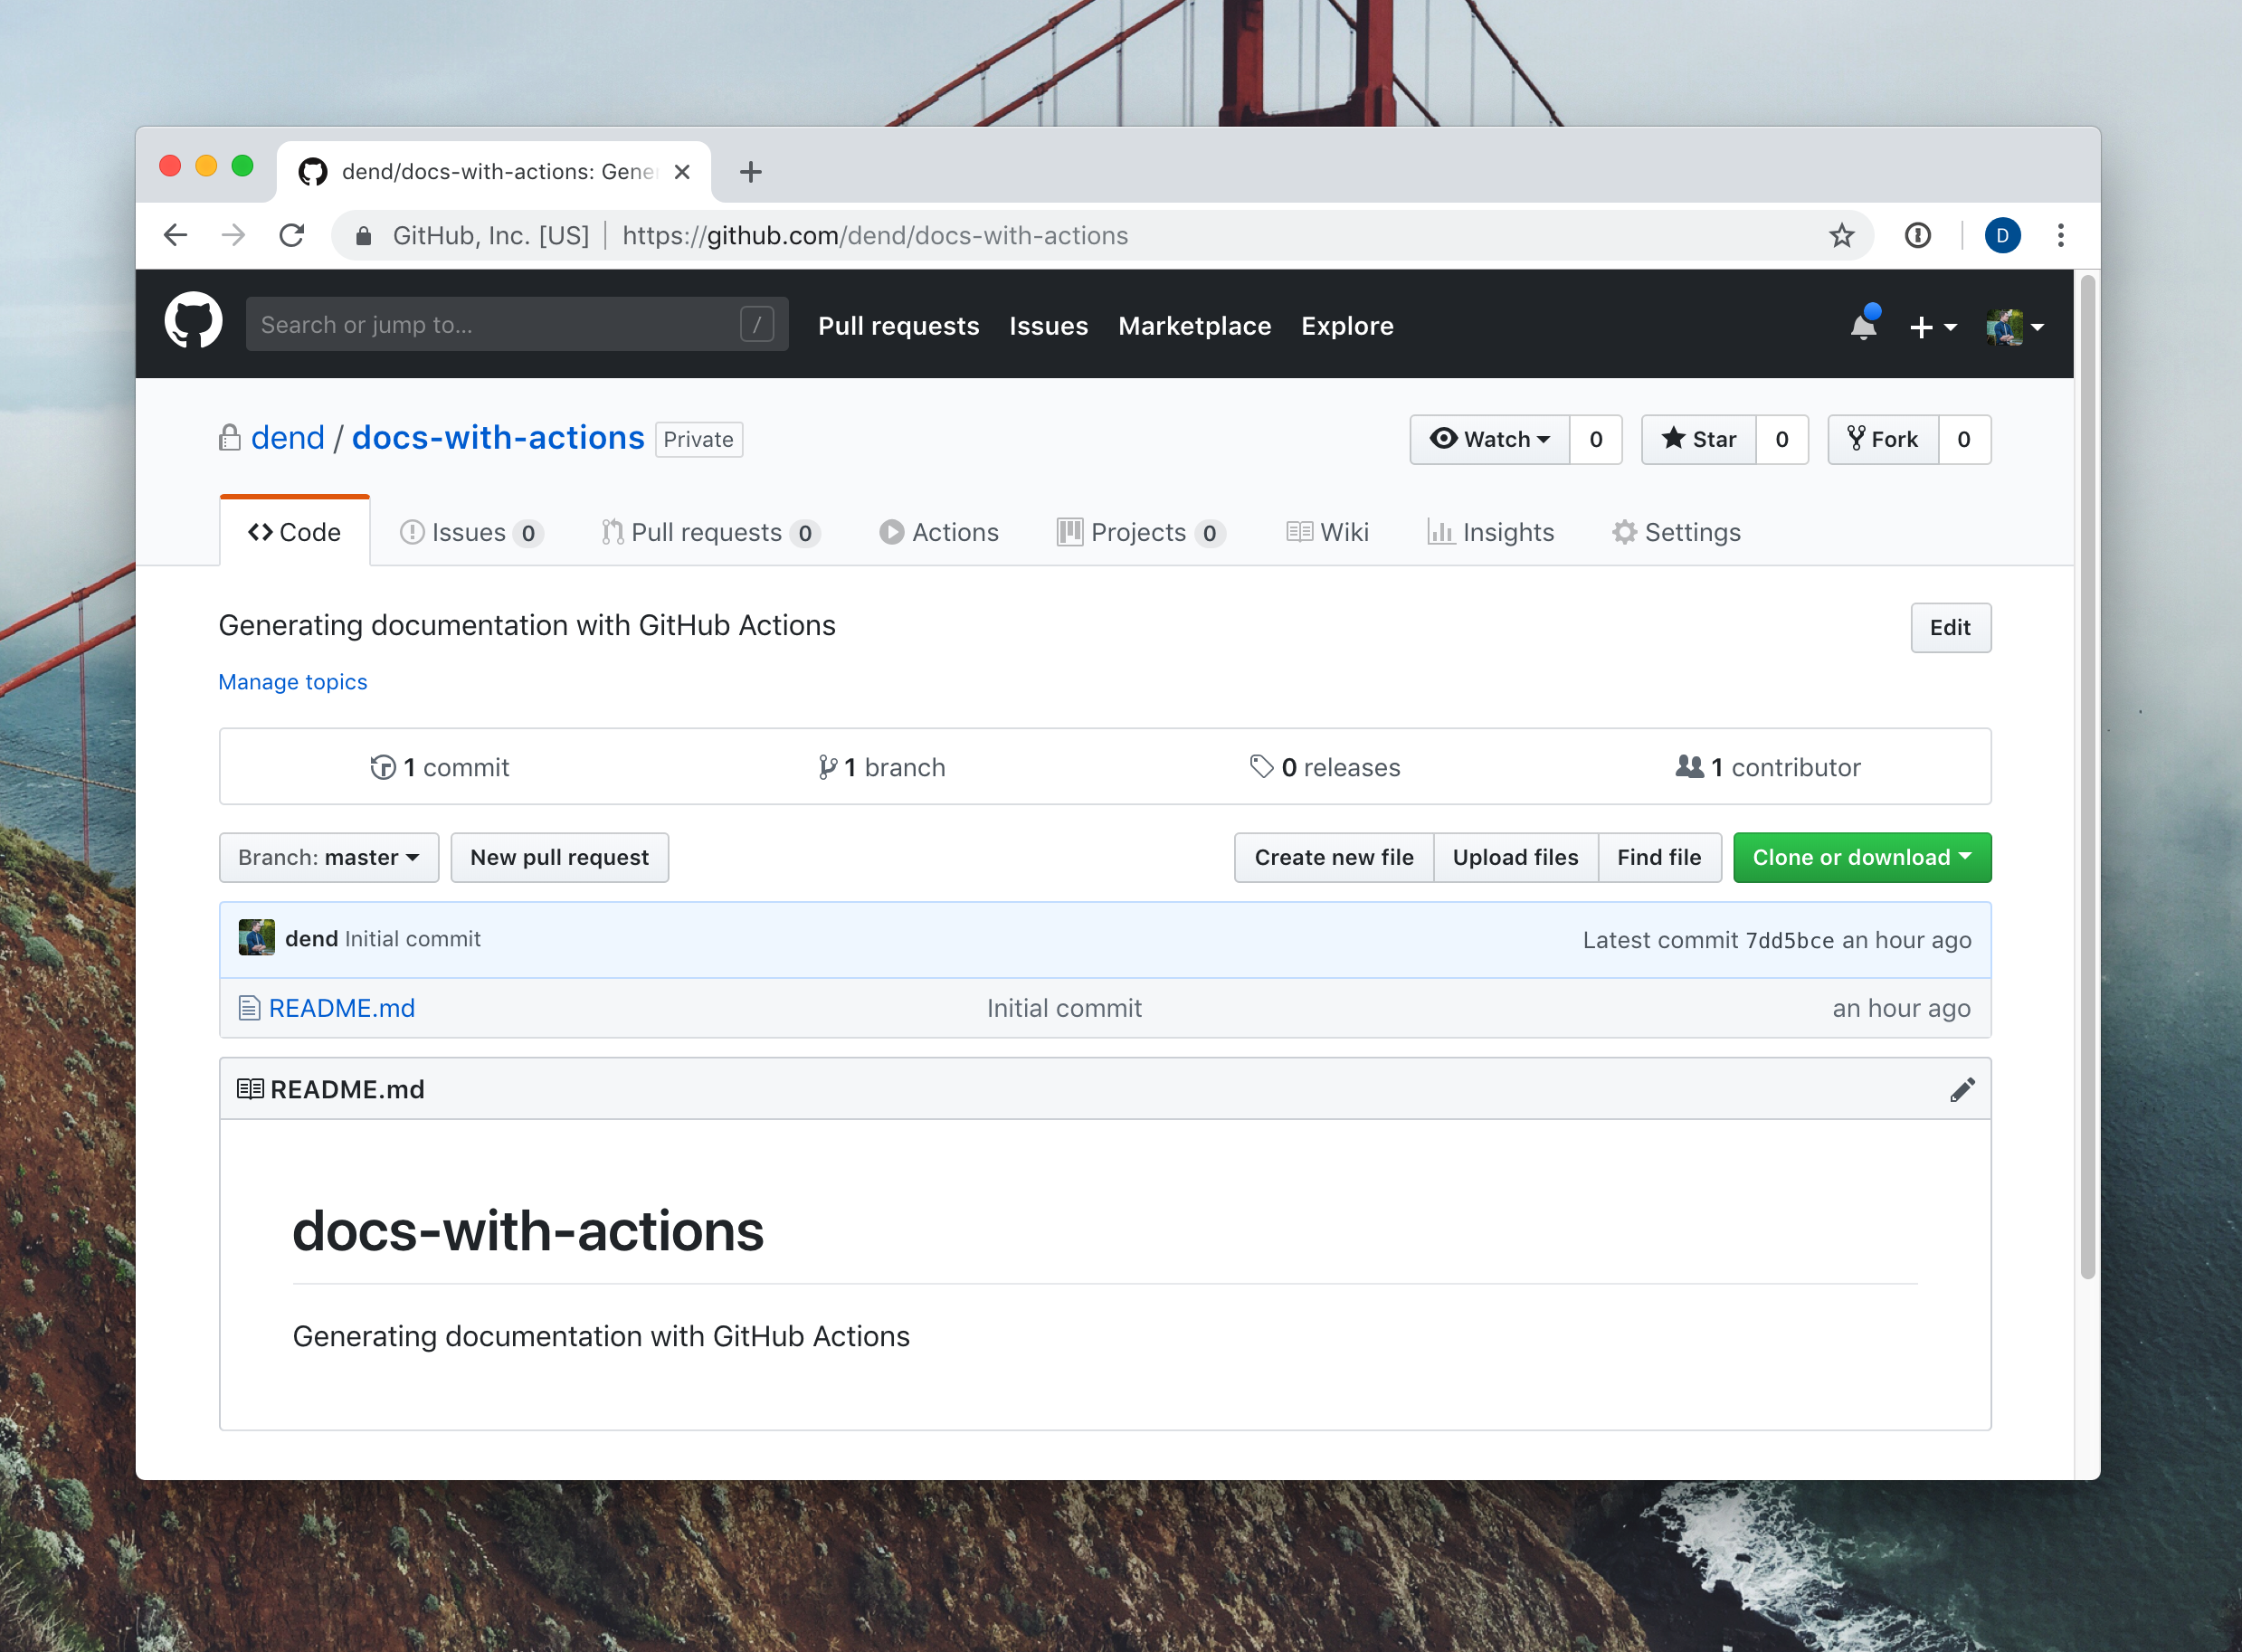
It has nothing interesting within it yet, other than the Actions tab, which is already exciting. What I need to do now is to create DocFX scaffolding and place it in the repository - things that control the build and how the content is generated.
The easiest way to do that is to install DocFX locally, generate the scaffolding, and then check it into the repository. Let’s do just that. Because I am using a MacBook, I have to prepare the local development environment with Mono. The steps are outlined below, and you don’t need to follow them if you are not using macOS.
Install Mono #
Download and install on Mono from the official site 5.
Download and extract DocFX #
You can get the latest release from GitHub. Just get the latest docfx.zip and extract it locally (doesn’t matter where).
Clone the working repository #
The working repository in this case is the repository where you will be housing the documentation, and in my case, it’s the private repository I created earlier. You can do so by calling:
git clone <YOUR_REPO_HERE>
The repository URL, of course, will be your own.
Initialize the repository with DocFX scaffolding #
In your terminal, set the context to the location where you cloned the working repository. You can do so with the help of the cd command.
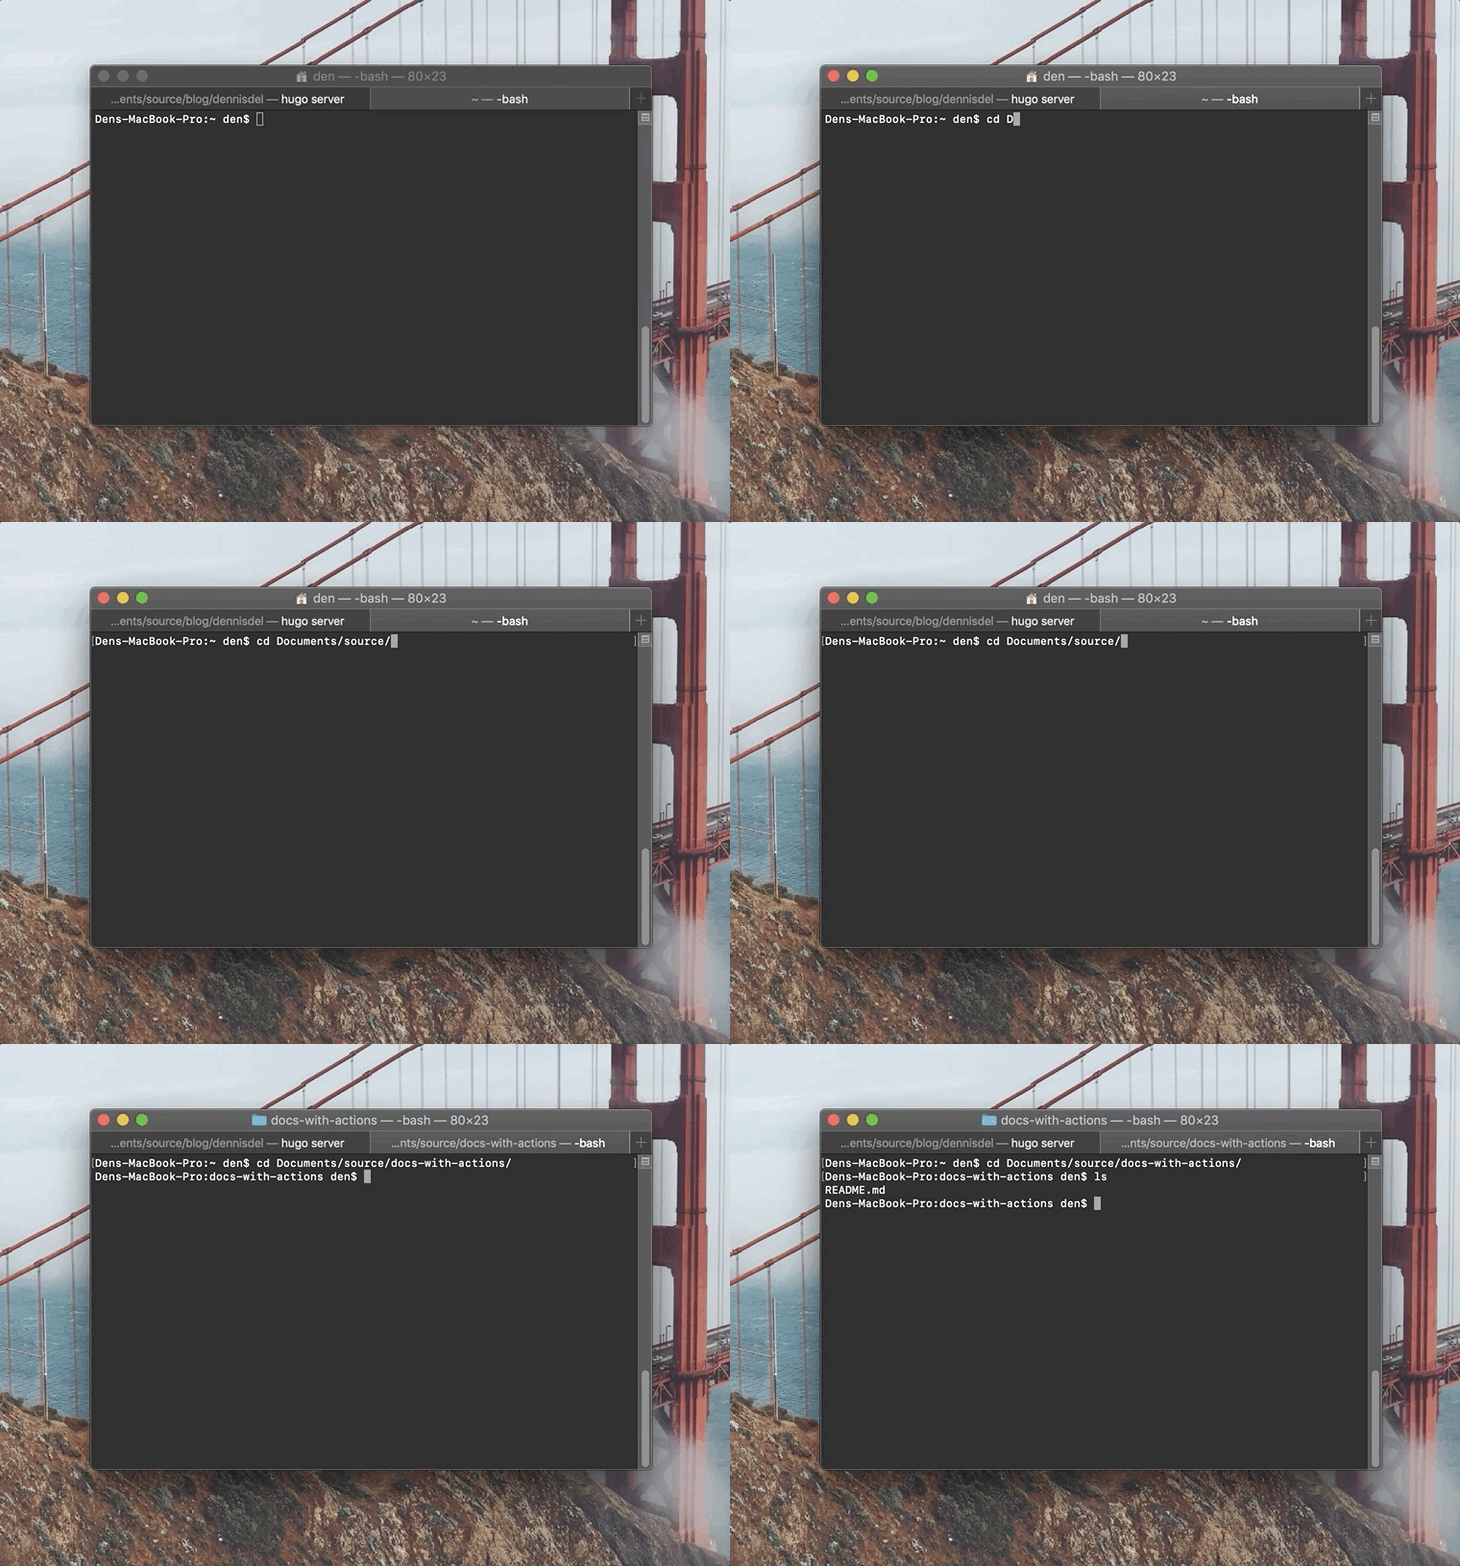
Once in the folder, you can call the following command to bootstrap the DocFX project:
mono /FULL/PATH/TO/docfx.exe init -q
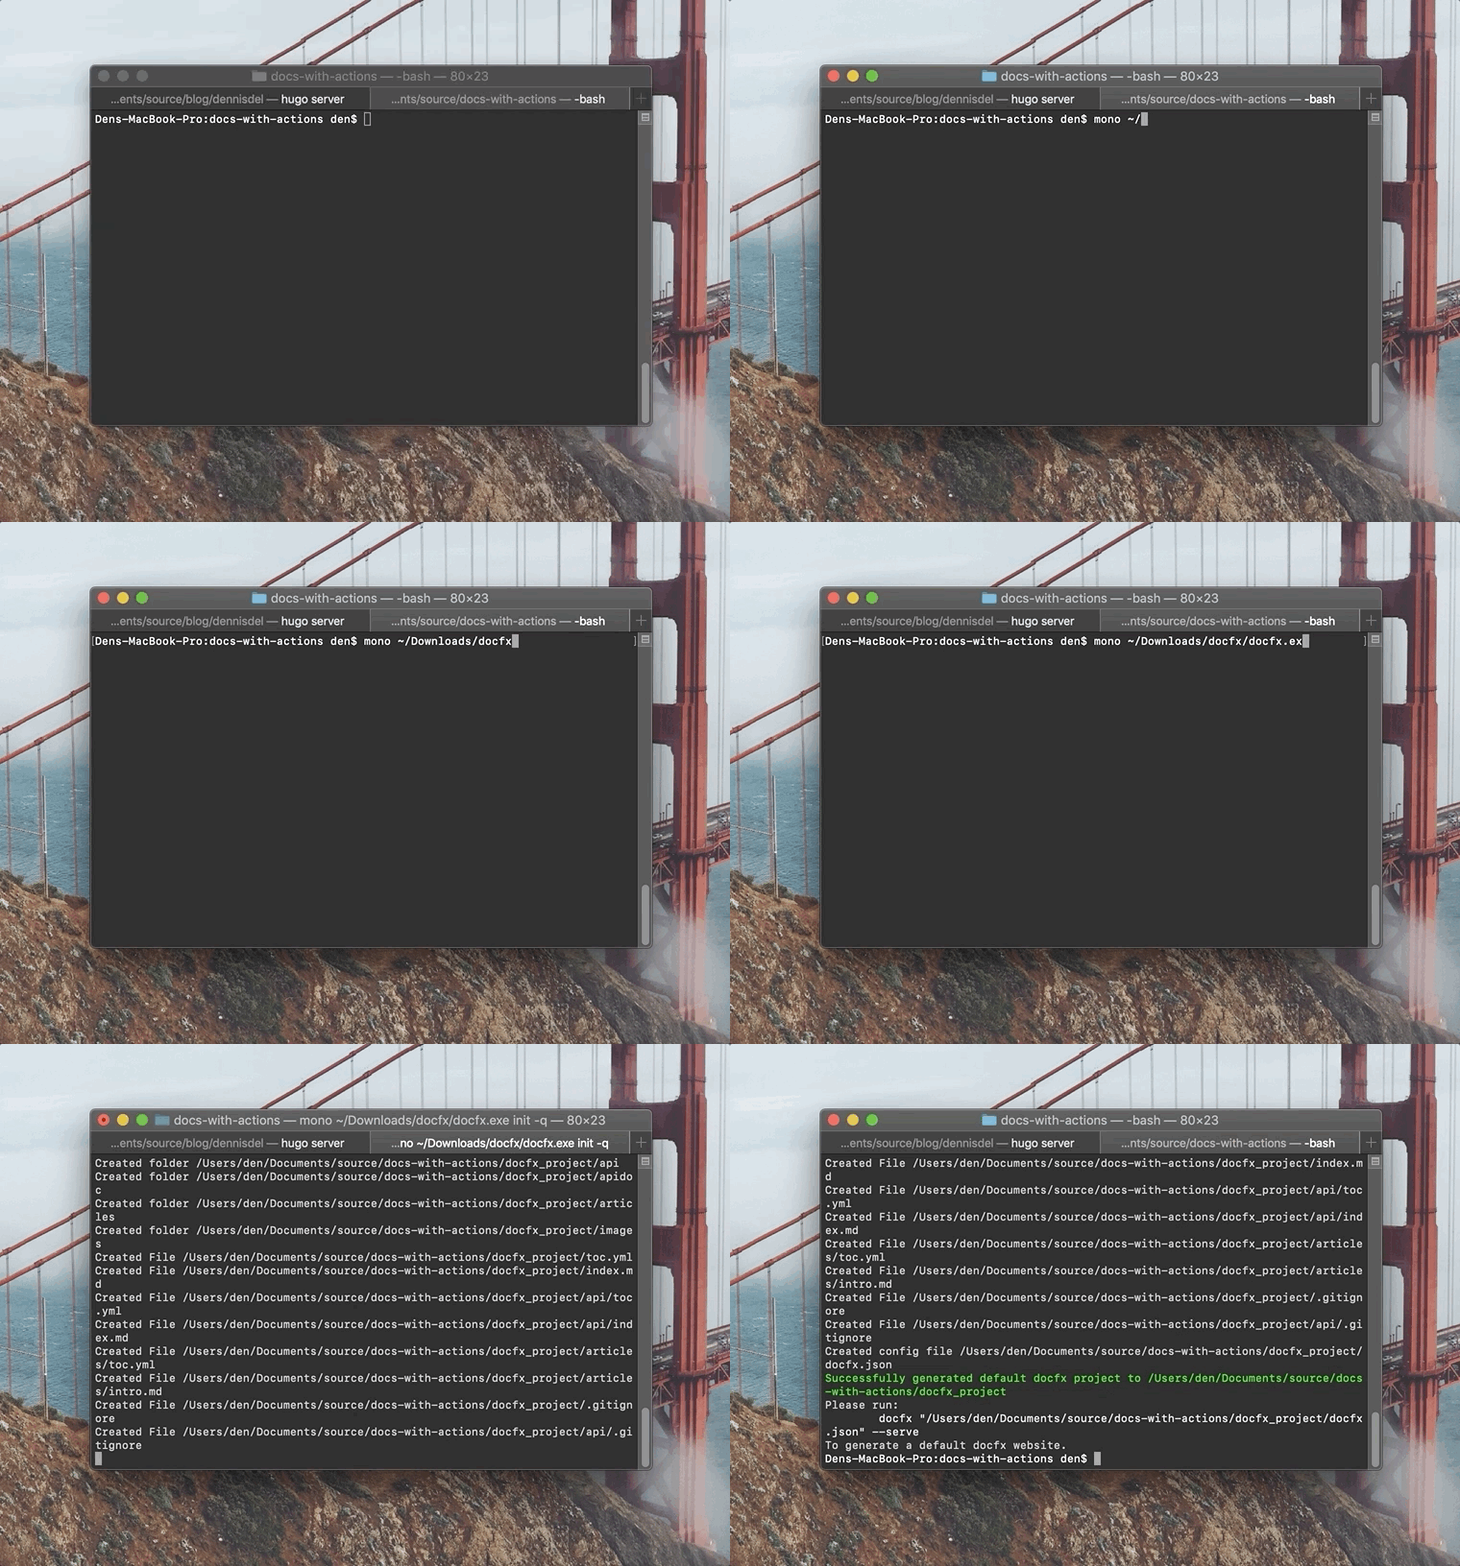
This will initialize the required configuration in “quick” mode, which means that if you want to make any customizations, you would need to do that yourself instead of relying on the configuration wizard. This, however, is OK in our scenario, since we just want to make sure that we have the skeleton for the project.
You should now have a folder called docfx_project in your repository root, that contains some placeholder content, and most importantly - docfx.json, the one configuration file that defines how the build is executed and what content needs to be published.
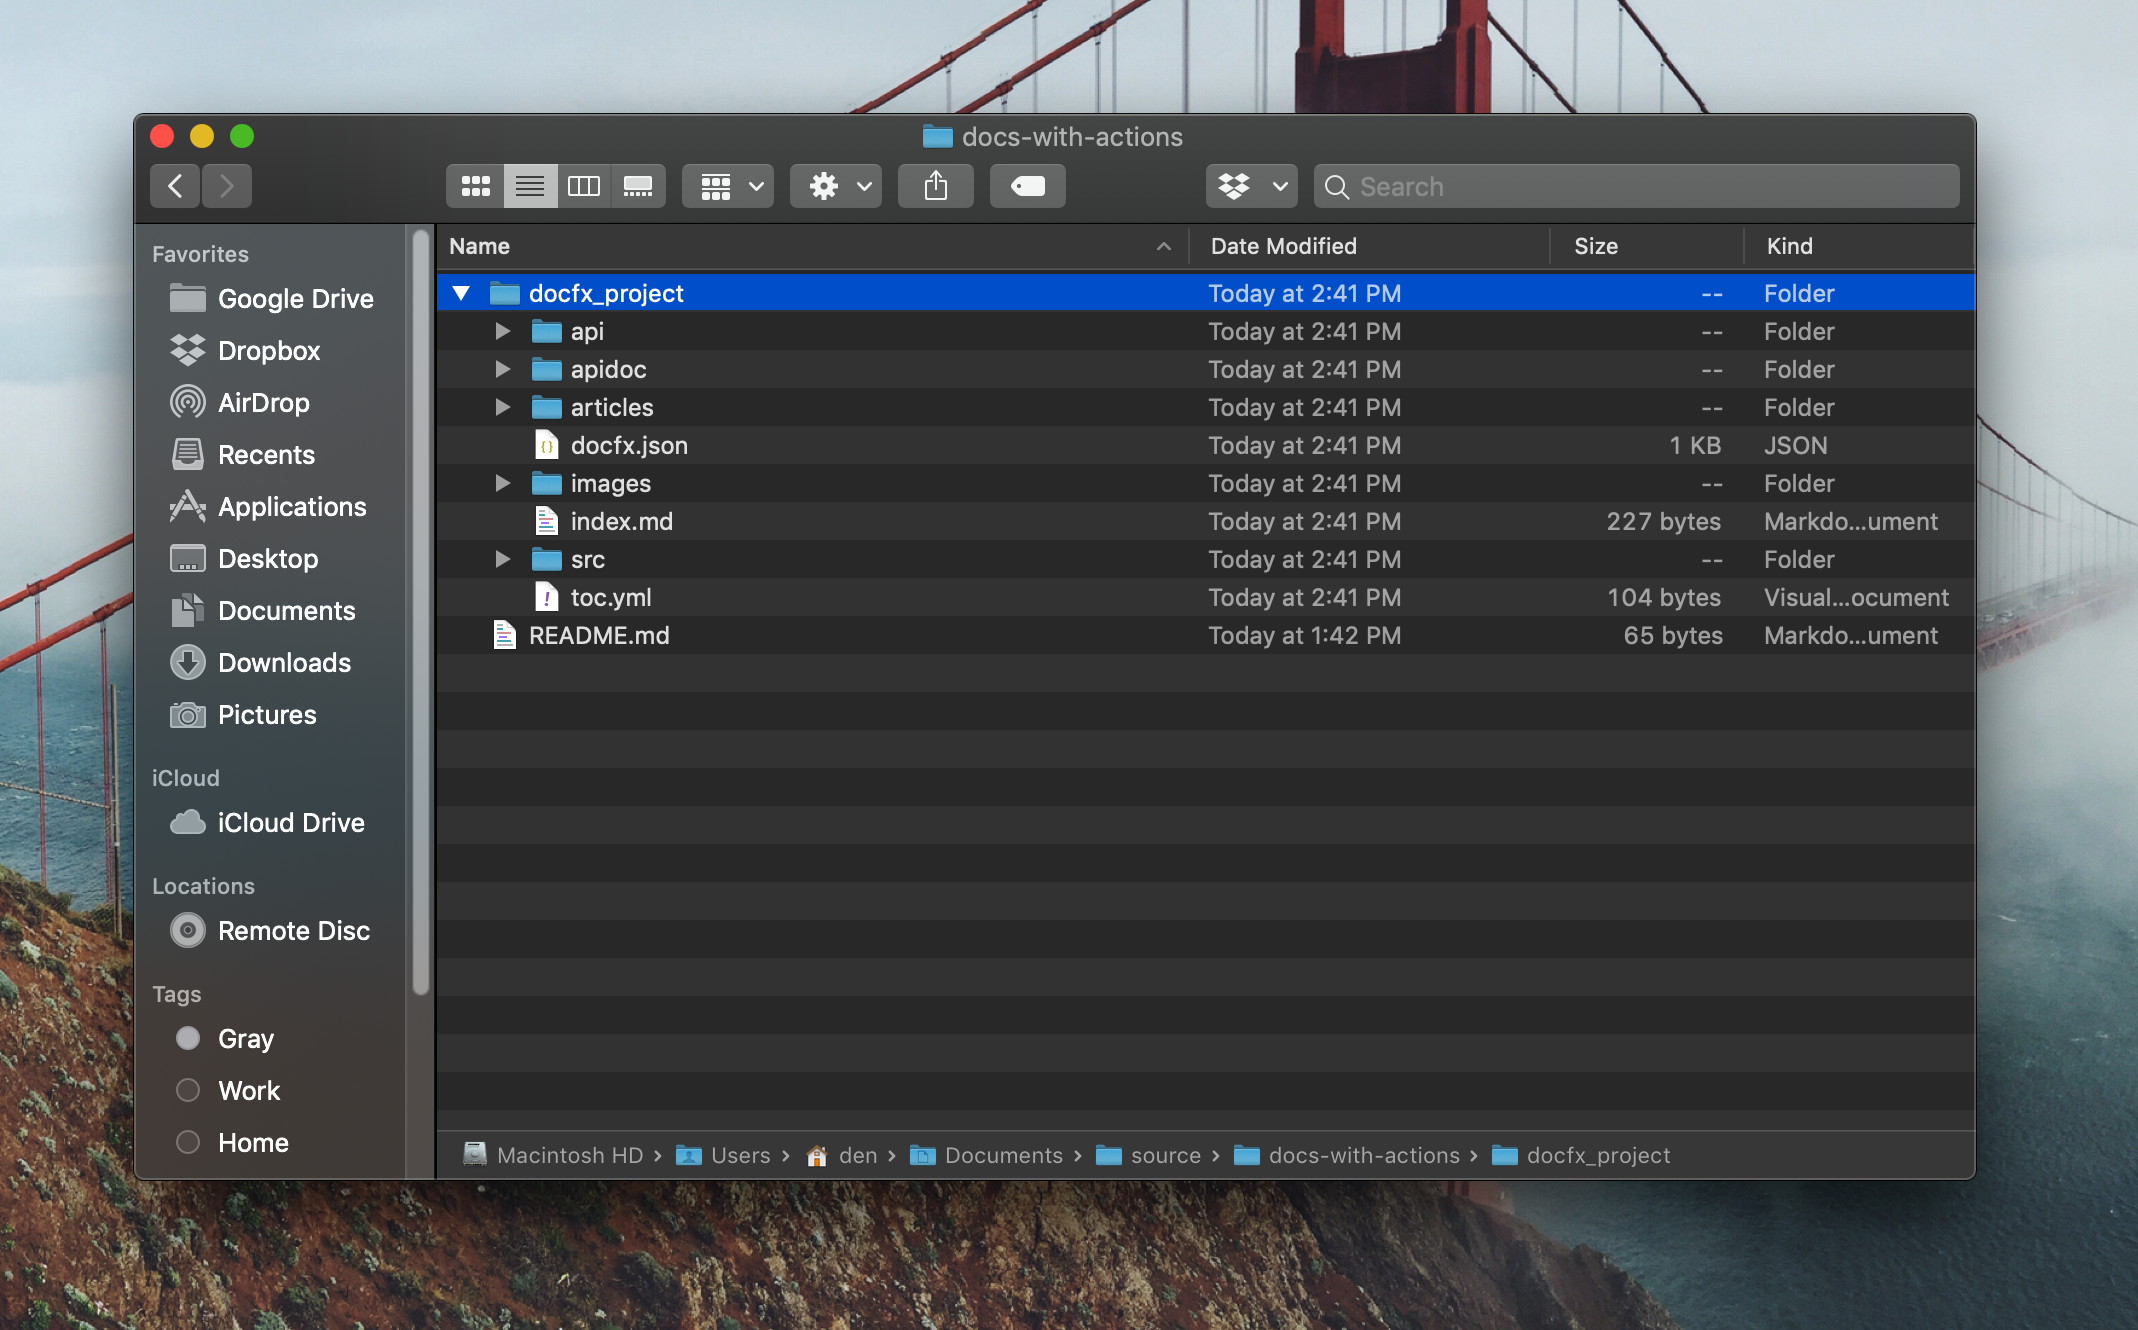
To make it easier to maintain, rename this folder to docs.
Commit the changes #
You are now ready to commit the changes and have the content be available in the repository. Use the following set of commands to do that:
git add .
git commit -m "Basic scaffolding"
git push
You can pat yourself on the back - you’ve now completed the first step to automating your documentation publishing. Your content now lives in a GitHub repository (albeit, very basic content) and you are ready to start setting up GitHub Actions.
Setting up GitHub Actions #
With the content available, let’s take a look at what we have in the repository, that will be important down the line:
docs/docfx.json- as I mentioned earlier, this file controls the DocFX build, and defines how the content is treated in different locations. I would encourage you to open this file and explore what’s in it. The DocFX engineers did a great job in structuring it in a way that makes it mostly intuitive. That said, you should also check out the official documentation for it.docs/api- the folder where the API documentation will be housed. Once we reflect various APIs, we will drop the YAML files here. This location is specified indocfx.json, so you can always change it, if necessary.docs/articles- the location for handwritten Markdown files (e.g. How-To guides).
Now that we know these things, we can start provisioning GitHub Actions. There is no built-in documentation publishing action (yet) - we will create our own.
All actions need the following components:
Dockerfile- sets up the environment and executes the action.entrypoint.sh- defines how the action starts execution..github/*.wofklow- file that defines the basic configuration for the action.
We should probably split our work in multiple actions - one that generates the documentation, one that builds the content, and another one that publishes the content to a storage location. As such, let’s create a new folder at the root of the repo, called actions, and add two sub-folders: tsdocgen and docprep.
In each of the folder, create a Dockerfile and an entrypoint.sh.
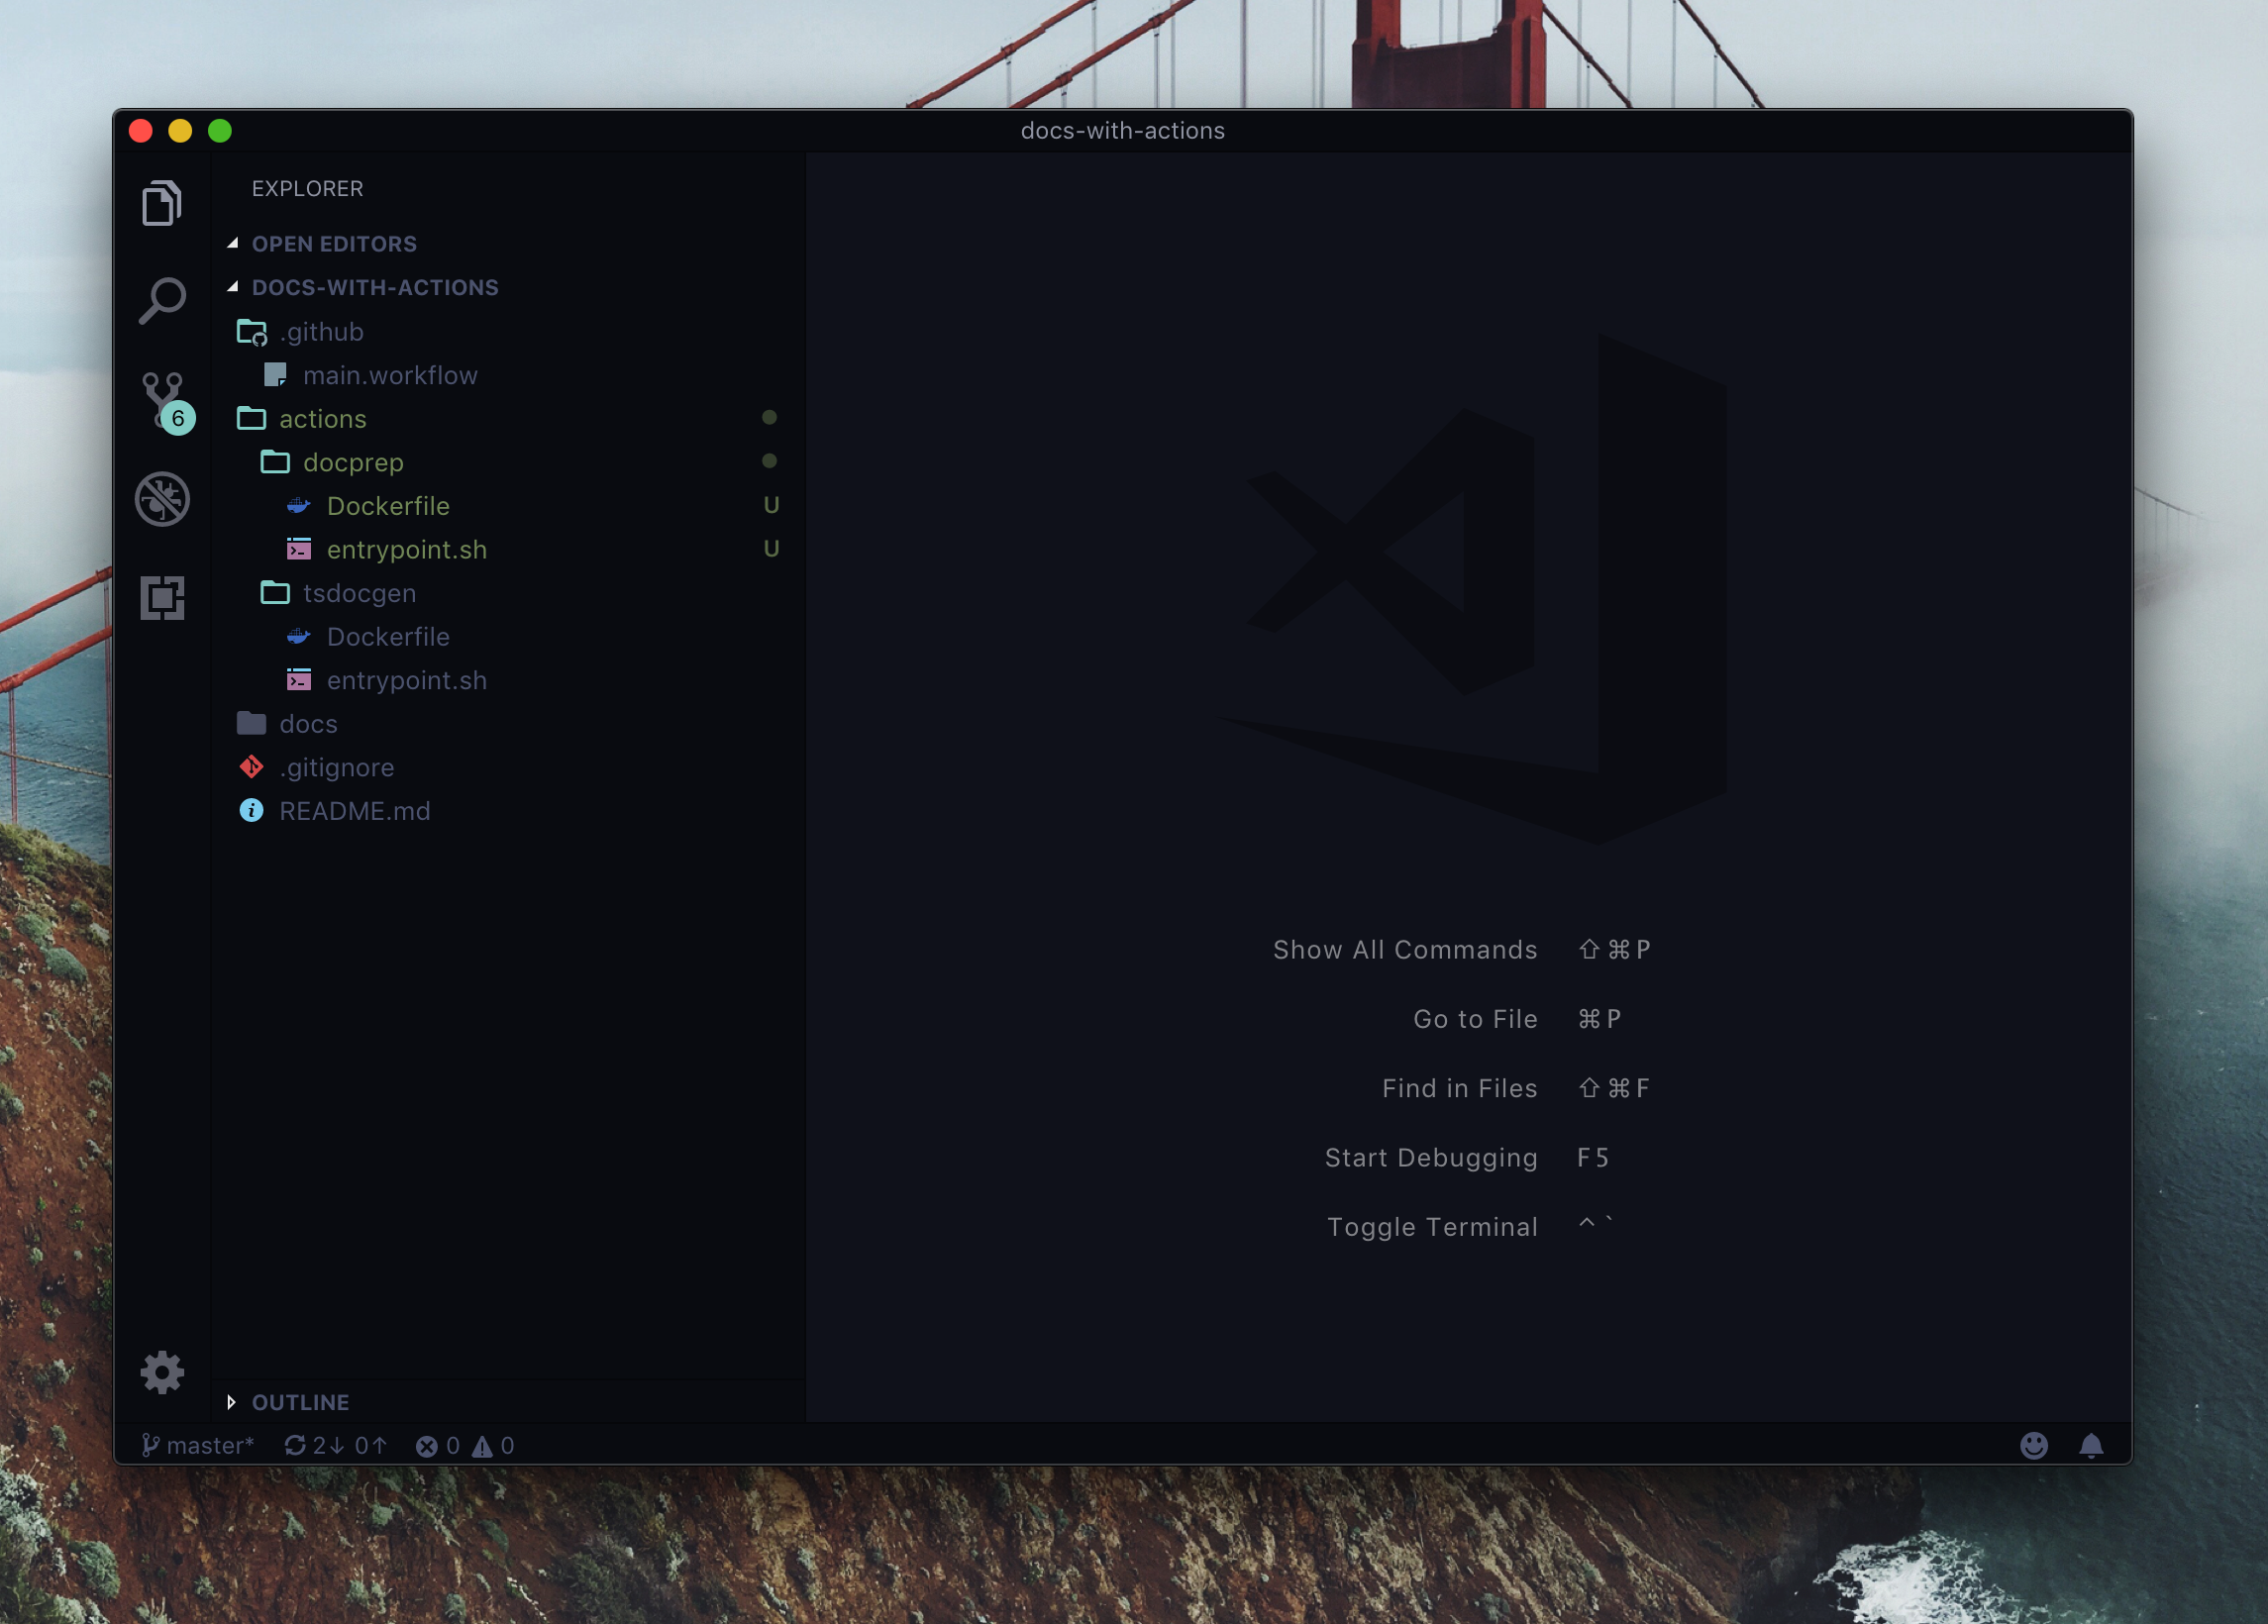
If you read through the GitHub Actions manual, one of the suggestions is to store action code separate from your working repository - this is definitely a suggestion you need to follow in the long-term. For the demo, I will stick with actions living in the same repository with my documentation.
Let’s start by defining the content of individual Dockerfiles entries, along with their entrypoint.sh.
TypeScript documentation generator #
Location:
actions/tsdocgen/Dockerfileactions/tsdocgen/entrypoint.sh
This action is responsible for the generation of the API documentation from a TypeScript library. What this action should do is install a npm package, use TypeDoc to generate the representation of the API in JSON format, and then use Type2DocFX to transform the JSON into DocFX-ready YAML.
The Dockerfile contents are pretty basic:
FROM debian:9.5-slim

LABEL "com.github.actions.name"="DocFX - Generate TypeScript Documentation"
LABEL "com.github.actions.description"="Generates TypeScript API documentation from an npm package."
LABEL "com.github.actions.icon"="code"
LABEL "com.github.actions.color"="red"

LABEL "repository"="<YOUR_REPOSITORY_HERE>"
LABEL "homepage"="https://den.dev"
LABEL "maintainer"="Den"

ADD entrypoint.sh /entrypoint.sh
ENTRYPOINT ["/entrypoint.sh"]
There is a number of mandatory LABEL declarations that you need to specify, that define what the action actually is about. You can read more about the acceptable values in the official GitHub documentation. Beyond that, the Dockerfile simply sets the entrypoint to be the entrypoint.sh file that we created earlier (that at this time is empty).
If at this point you are getting a bit uncomfortable because now you need to start writing shell scripts - that’s OK. For most of the operations that we need to perform, you won’t need to rely on any concepts that go beyond basic execution (a testament to the quality of tooling we are using).
Now let’s actually write the code for the entrypoint.sh - this will be an almost 1:1 copy of what I created earlier in Doctainers, separated in its own shell file:
#!/bin/sh -l

apt-get update
apt-get install -y curl gnupg gnupg2 gnupg1 git
curl -sL https://deb.nodesource.com/setup_11.x | bash -
apt-get install -y nodejs npm
npm install typedoc --save-dev --global
npm install type2docfx --save-dev --global
mkdir _package
rm -rf docs/api/*.yml
npm install $TARGET_PACKAGE --prefix _package
typedoc --mode file --json _output.json _package/node_modules/${TARGET_PACKAGE}/${TARGET_SOURCE_PATH} --ignoreCompilerErrors --includeDeclarations --excludeExternals
type2docfx _output.json docs/api/

echo "_package/node_modules/${TARGET_PACKAGE}/${TARGET_SOURCE_PATH}"

# Do some cleanup.
rm -rf _package
rm -rf _output.json

# Check in changes.
git config --global user.email "$GH_EMAIL"
git config --global user.name "$GH_USER"

git add . --force
git status
git commit -m "Update auto-generated documentation."
git push --set-upstream origin master
This might seem like a handful, so let’s dissect what is going on here:
- Install some dependent packages for packages we will be handling downstream.
- Install
nodeandnpm- this will help us install the TypeScript package down the line. - Install
typedoc- that will allow us to transform the TypeScript API in the package into structured JSON. - Install
type2docfx- the tool that will converttypedocoutput to what we need. - Create a helper folder that we will use for temporary files (
_package) - Remove existing auto-generated content - it’s no longer relevant, since we are re-generating it. This means we can easily remove all
*.ymlfiles from the existing folder. - Install a target package - we want to document it. We’ll get it specified in the workflow configuration. 6
- Generate the initial JSON for the package with
typedoc. - Transform the JSON into YAML with the help of
type2docfx. - Cleanup temporary folder, to make sure we are not checking them in.
- Set up Git configuration for the current user.
- Add all current changes and commit them to the current repository.
Because the action is running in the context of the current user, with the Git token passed into it (we’ll get to that), you don’t really need to mess with remotes - everything is already configured for you to easily put the content in the right place.
There is a number of variables I am using here, notably:
| Variable | Description |
|---|---|
TARGET_PACKAGE |
The ID of the package we want to document. This needs to come from npm. |
TARGET_SOURCE_PATH |
The path to the source code within the package folder. In most cases, this is src. |
GH_EMAIL |
The email address used for the Git user. |
GH_USER |
The username for the GitHub user. You could also use $GITHUB_ACTOR if you want to bind the action to the user that initiated the action instead of a fixed account. 7 |
We will set all these variables when we define the workflow, which we should do now, and at the same time - test it’s effectiveness.
A very important point to remember is that you need to set execution permissions to the entrypoint.sh file - on your local machine, use the following command in the context of the folder where the entrypoint.sh file is located:
chmod +x entrypoint sh
Once this is done, commit the change and push it to the repository. In your .github folder, create a new file, called main.workflow, and set its contents to the following snippet:
workflow "Documentation Generation Workflow" {
  on = "push"
  resolves = ["DocFX - Generate TypeScript Documentation"]
}

action "DocFX - Generate TypeScript Documentation" {
  uses = "./actions/tsdocgen"
  secrets = [
    "GITHUB_TOKEN",
    "GH_USER",
    "GH_EMAIL",
  ]
  env = {
    TARGET_PACKAGE = "@azure/cosmos"
    TARGET_SOURCE_PATH = "src"
  }
}
There are several things that are happening here. First, we declare the workflow - an aggregation of actions. We ensure that it’s triggered when push events happen - this means that any commit to your repository will instantly trigger it. It contains the resolves definition, which is nothing other than an array of actions that we want to resolve as part of this workflow.
Next, we are defining the action that we will integrate first in the workflow, and that is the one that we were engineering in this section, built to generate the YAML files that DocFX can read in and generate static HTML files from. The uses variable points to the location in the repository where the action content is placed, and secrets and env define the secret and open environment variables that we will use within the action. Notice that TARGET_PACKAGE and TARGET_SOURCE_PATH are set to the be the package and the source location within the package from which we will be generating the documentation. Arguably, you can probably delegate the configuration for the package name, version, source location and other build parameters to an external file, however that would mean extra processing on our part, which is not needed at this time.
Once you check in the changes, you should be able to inspect your workflow in the .github folder directly from GitHub:
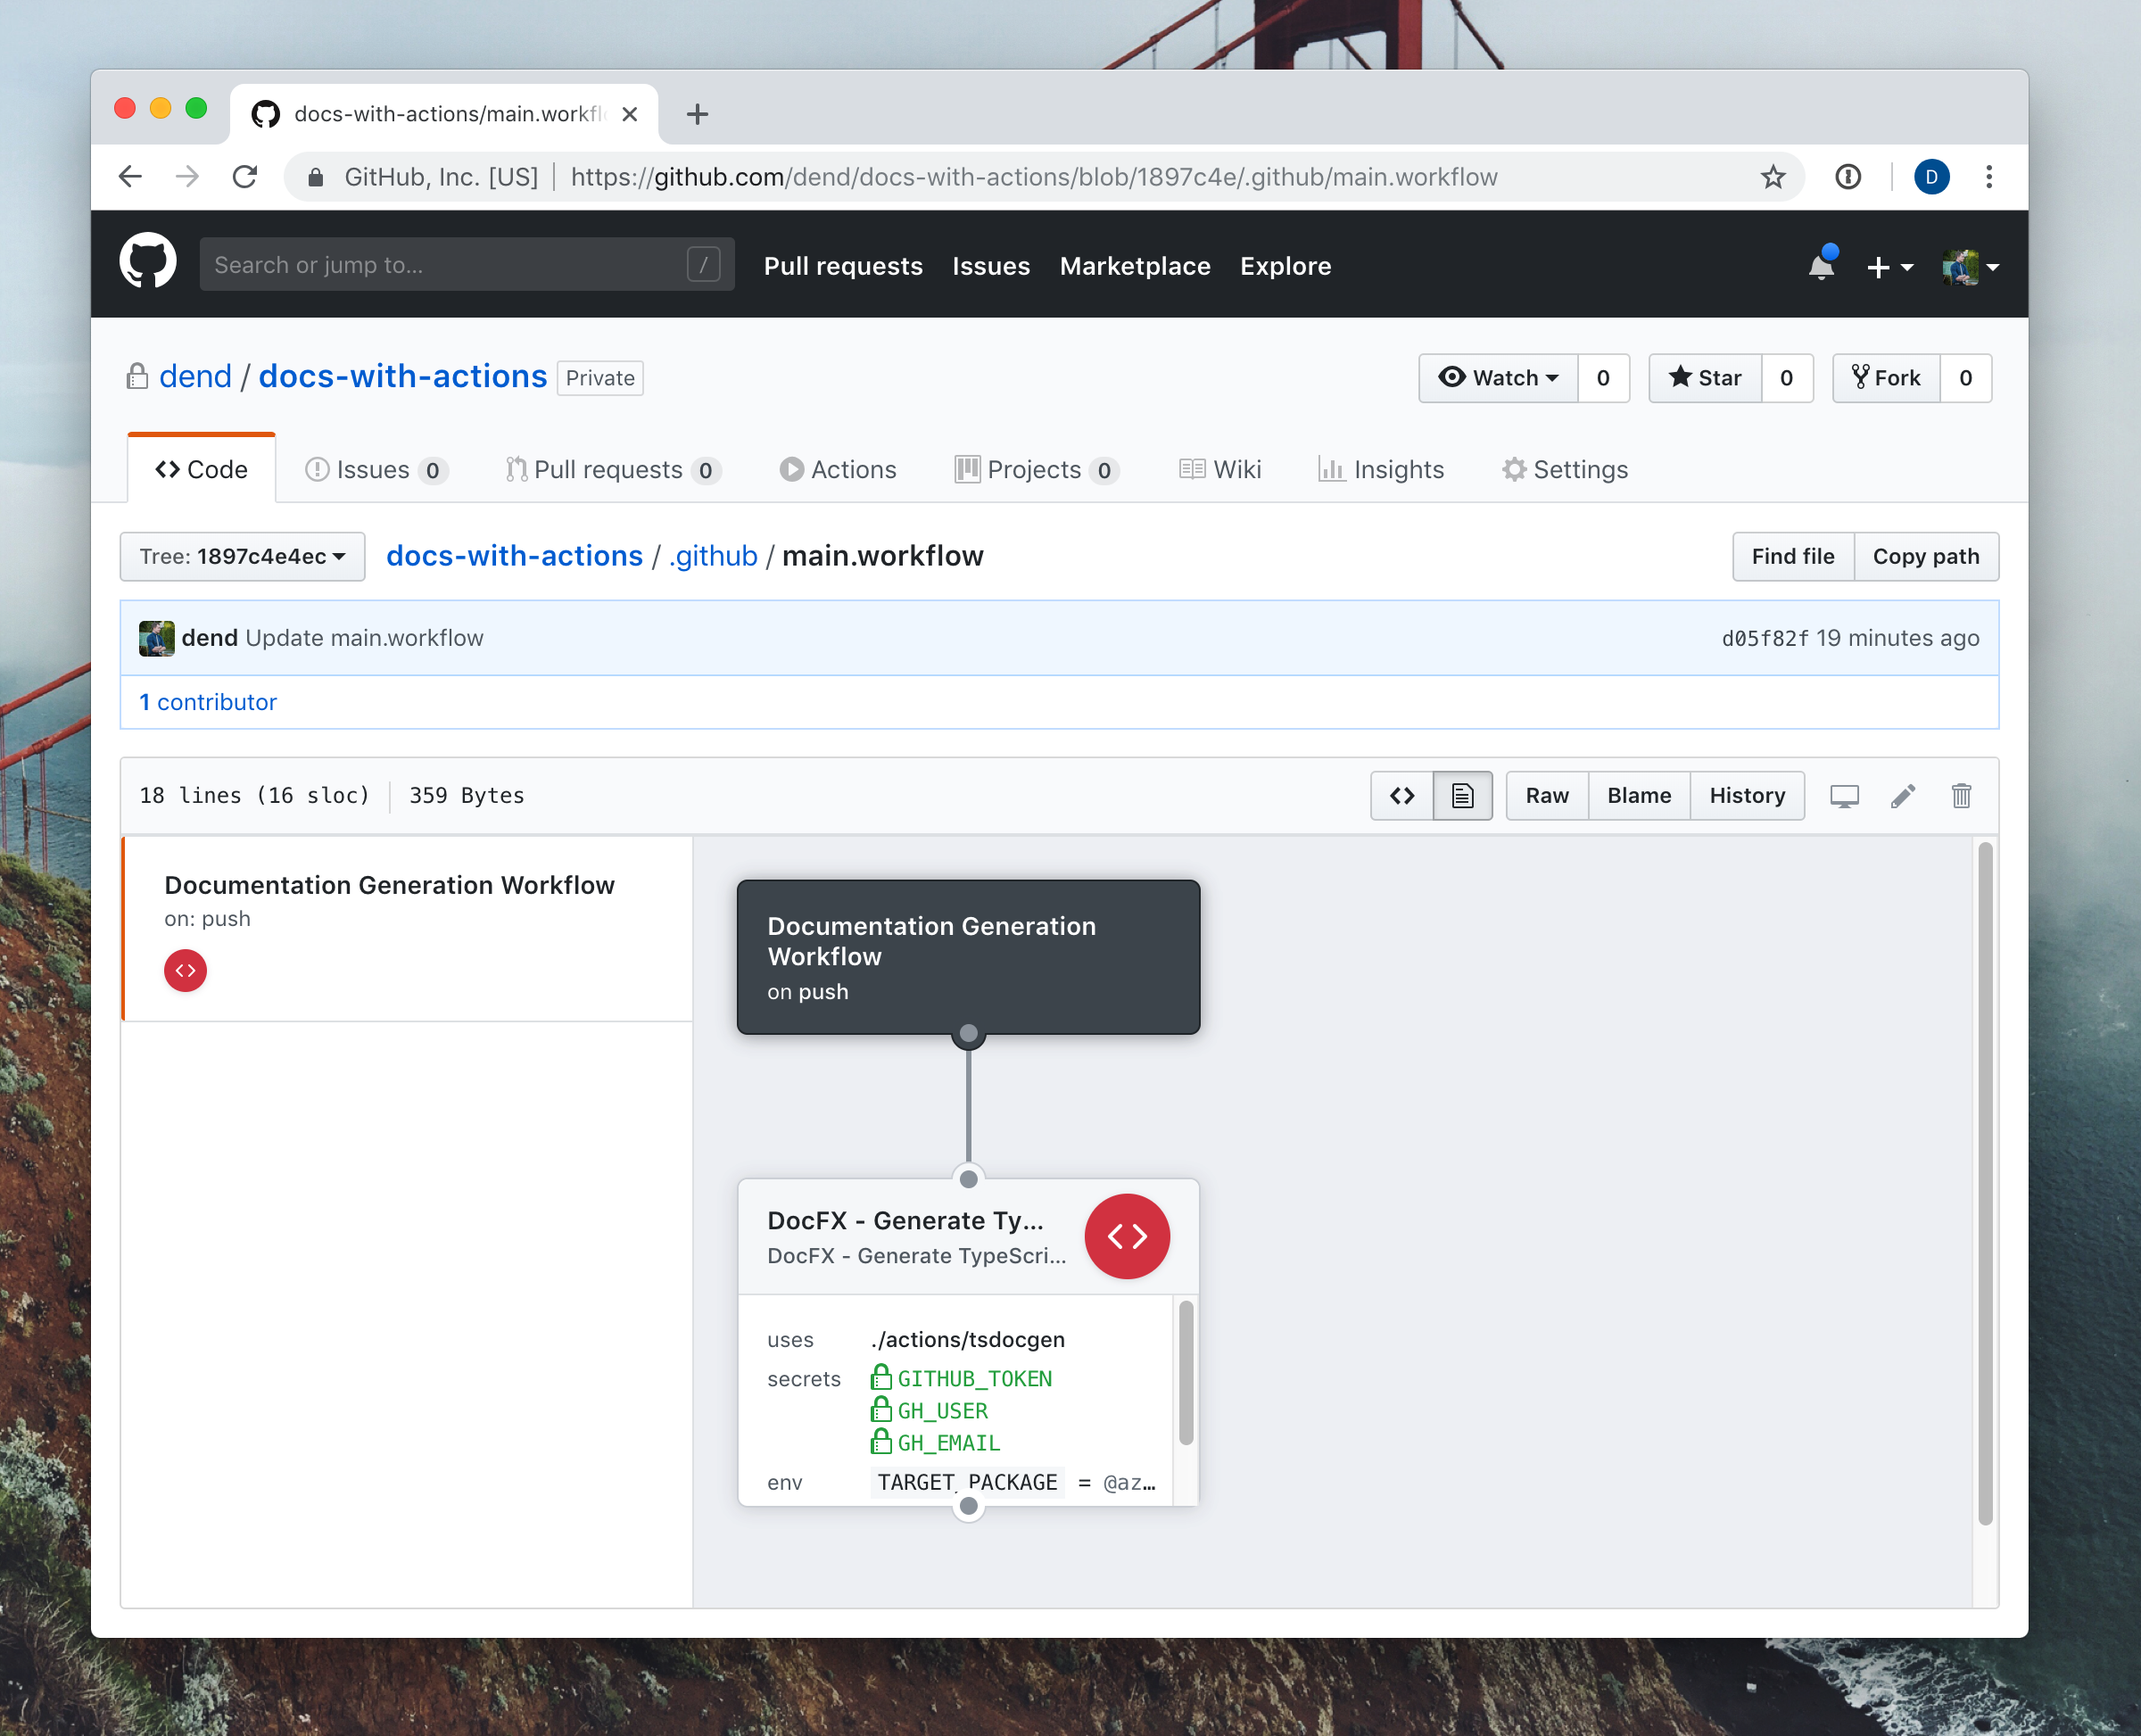
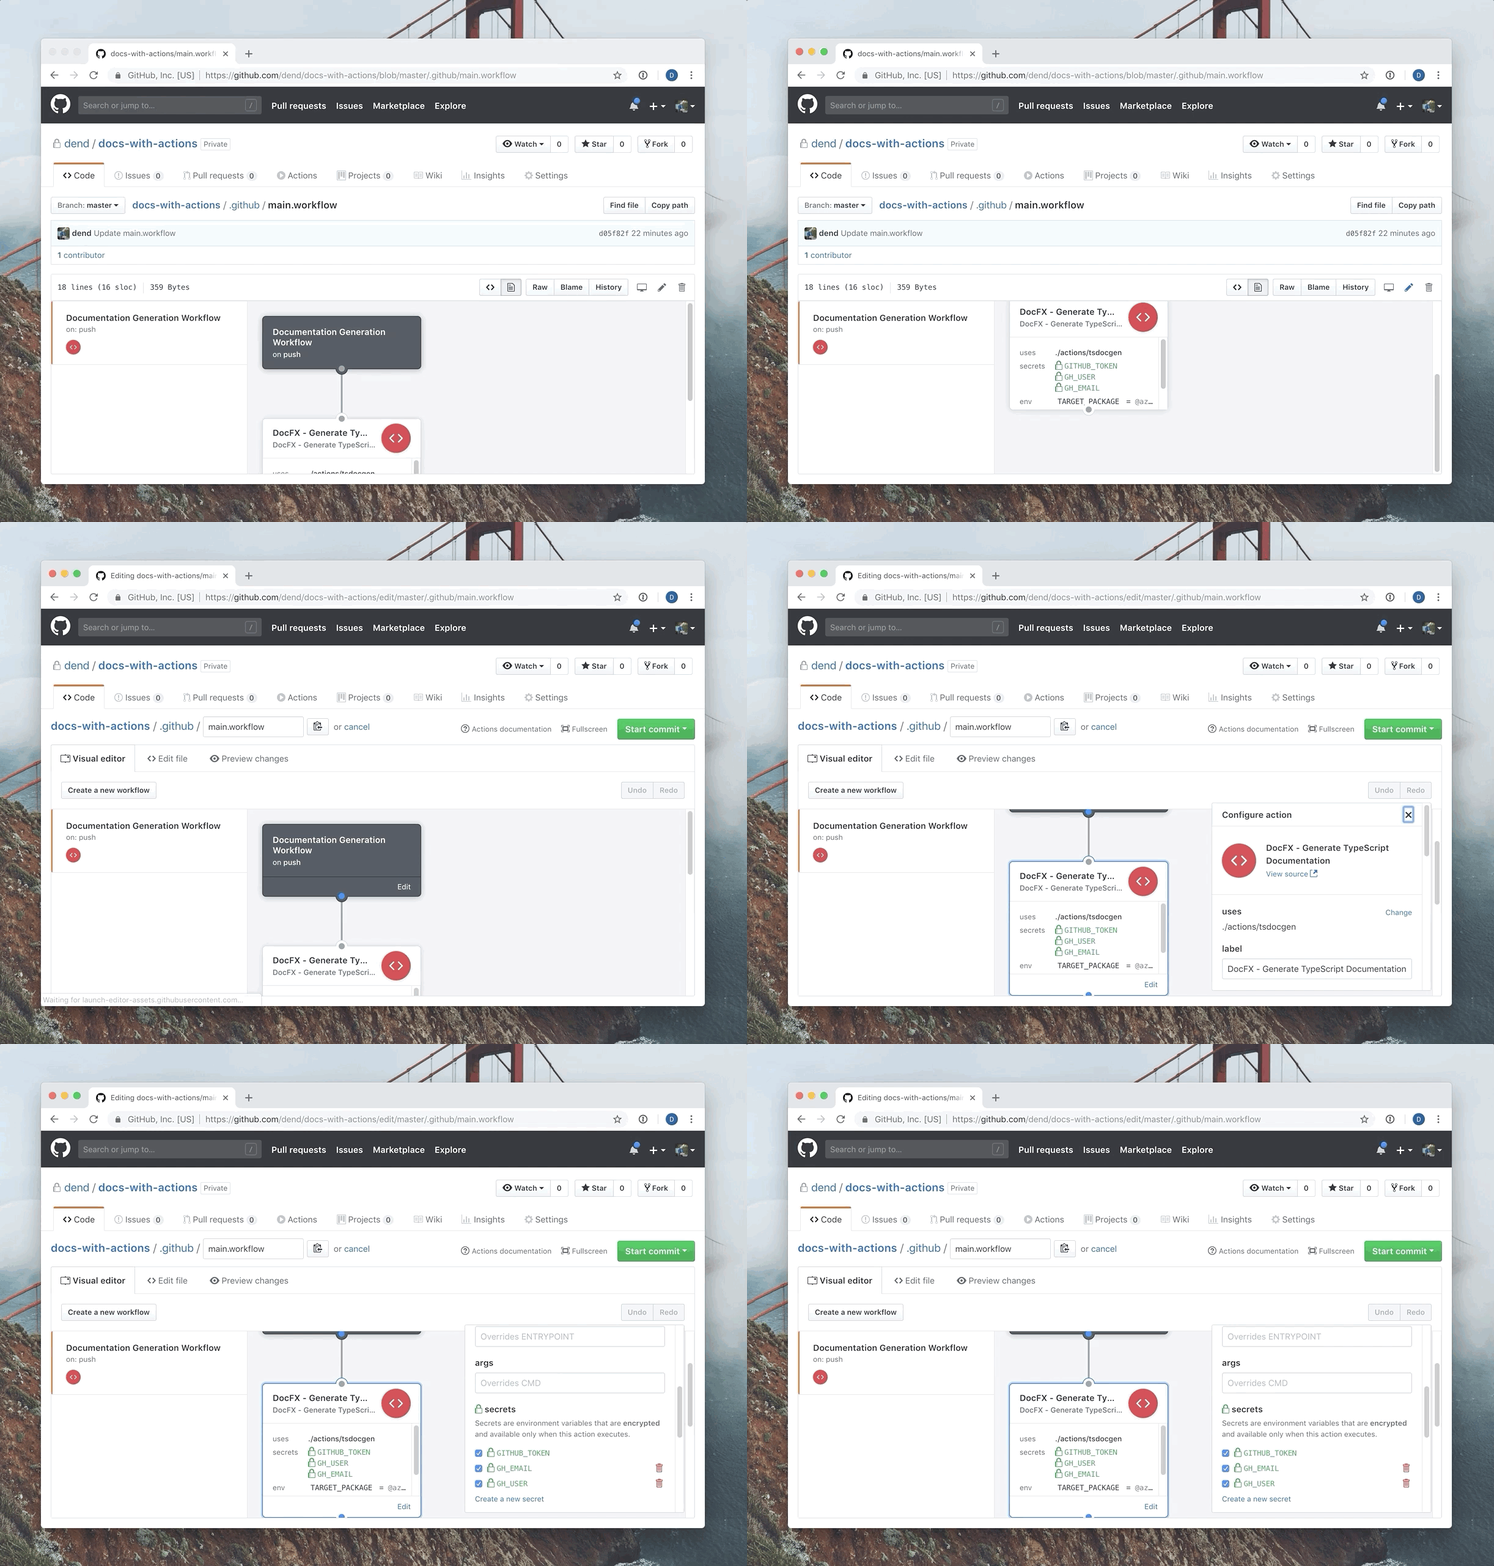
You can now edit the workflow to make sure that you specify the secrets - simply delete them and re-create with the same name, and have the expected values for those, depending on your own GitHub information.
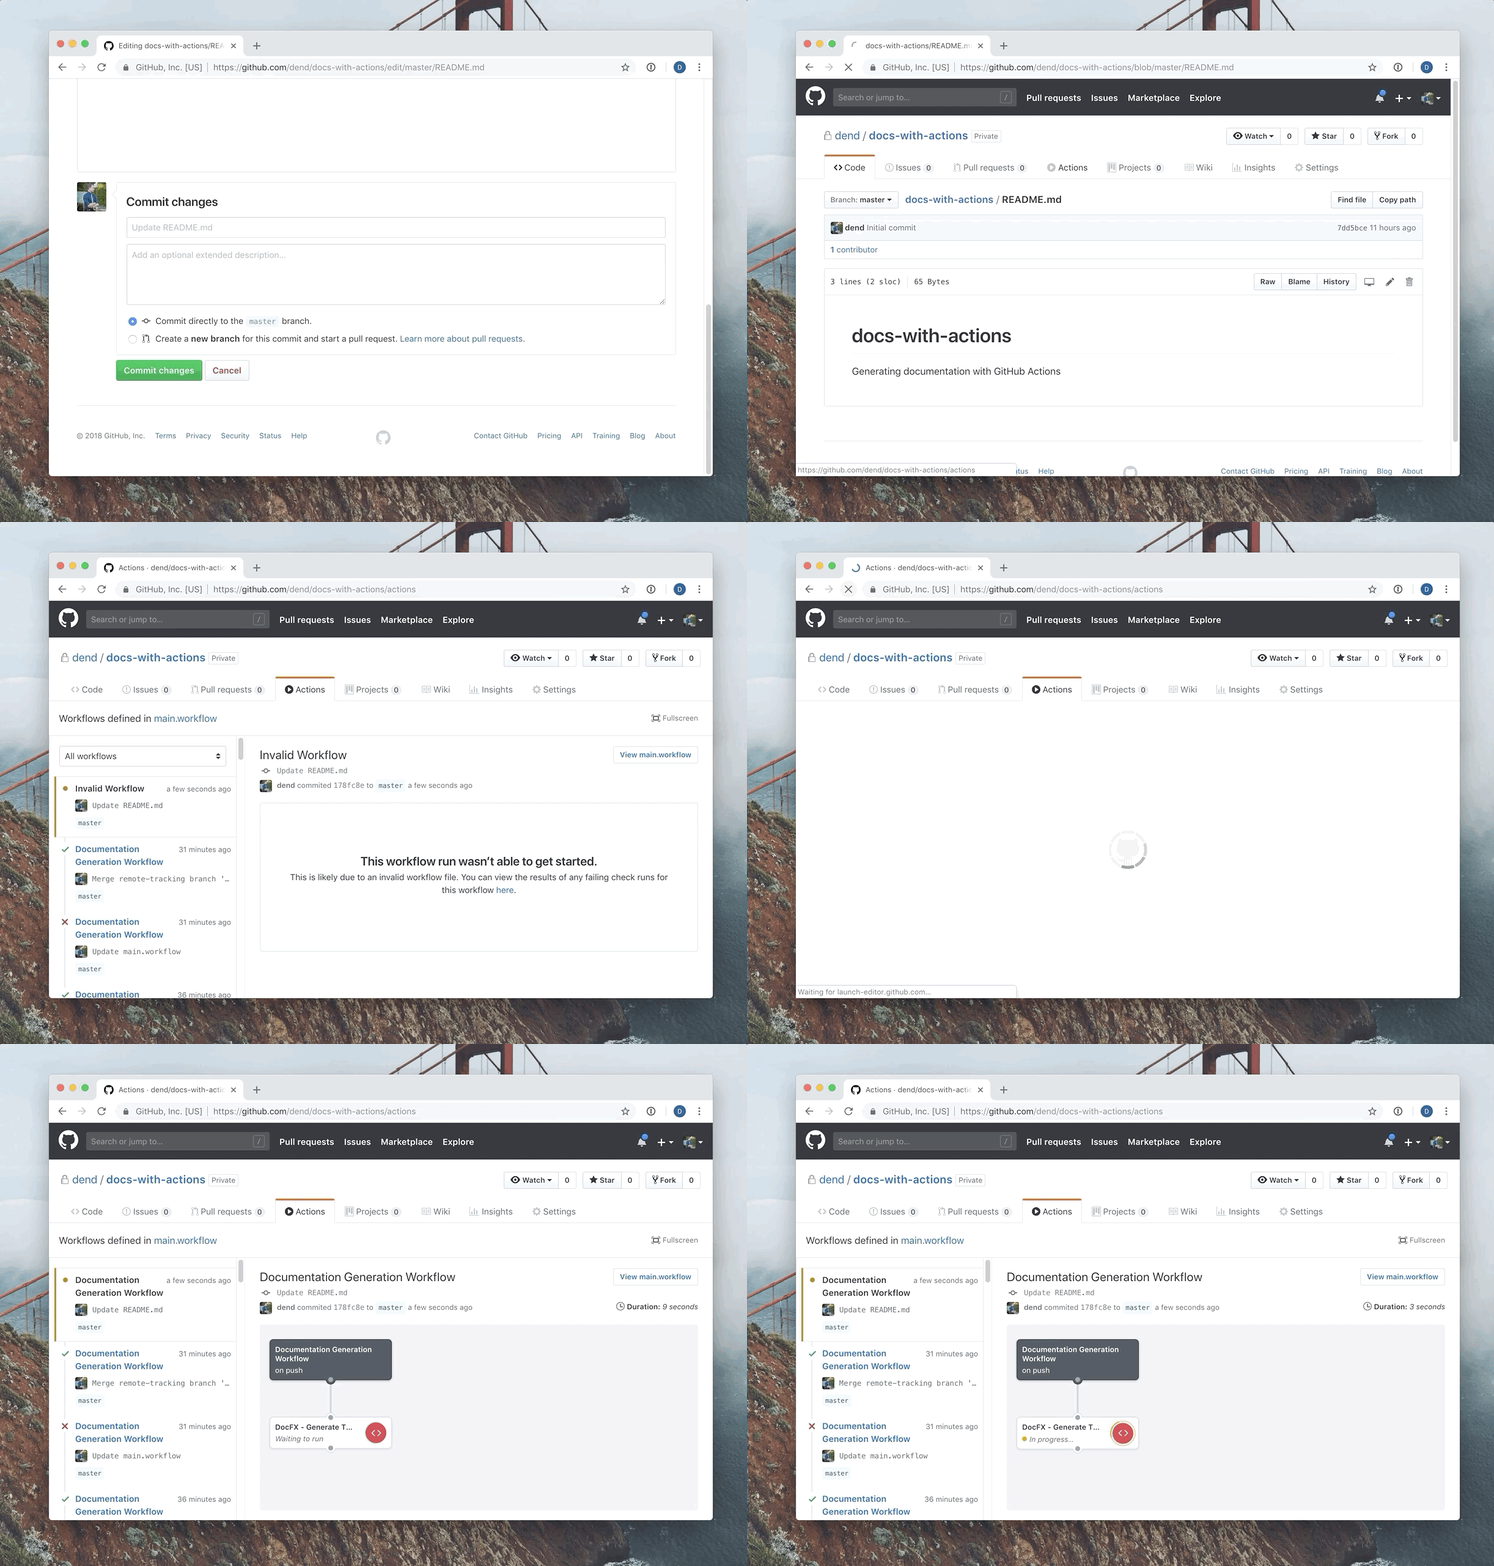
For the moment of truth, let’s try kicking-off the workflow! You can do a “dummy” commit by editing the README.md file, and committing the change. Once that is done, you can navigate to the Actions tab and see the workflow in progress!
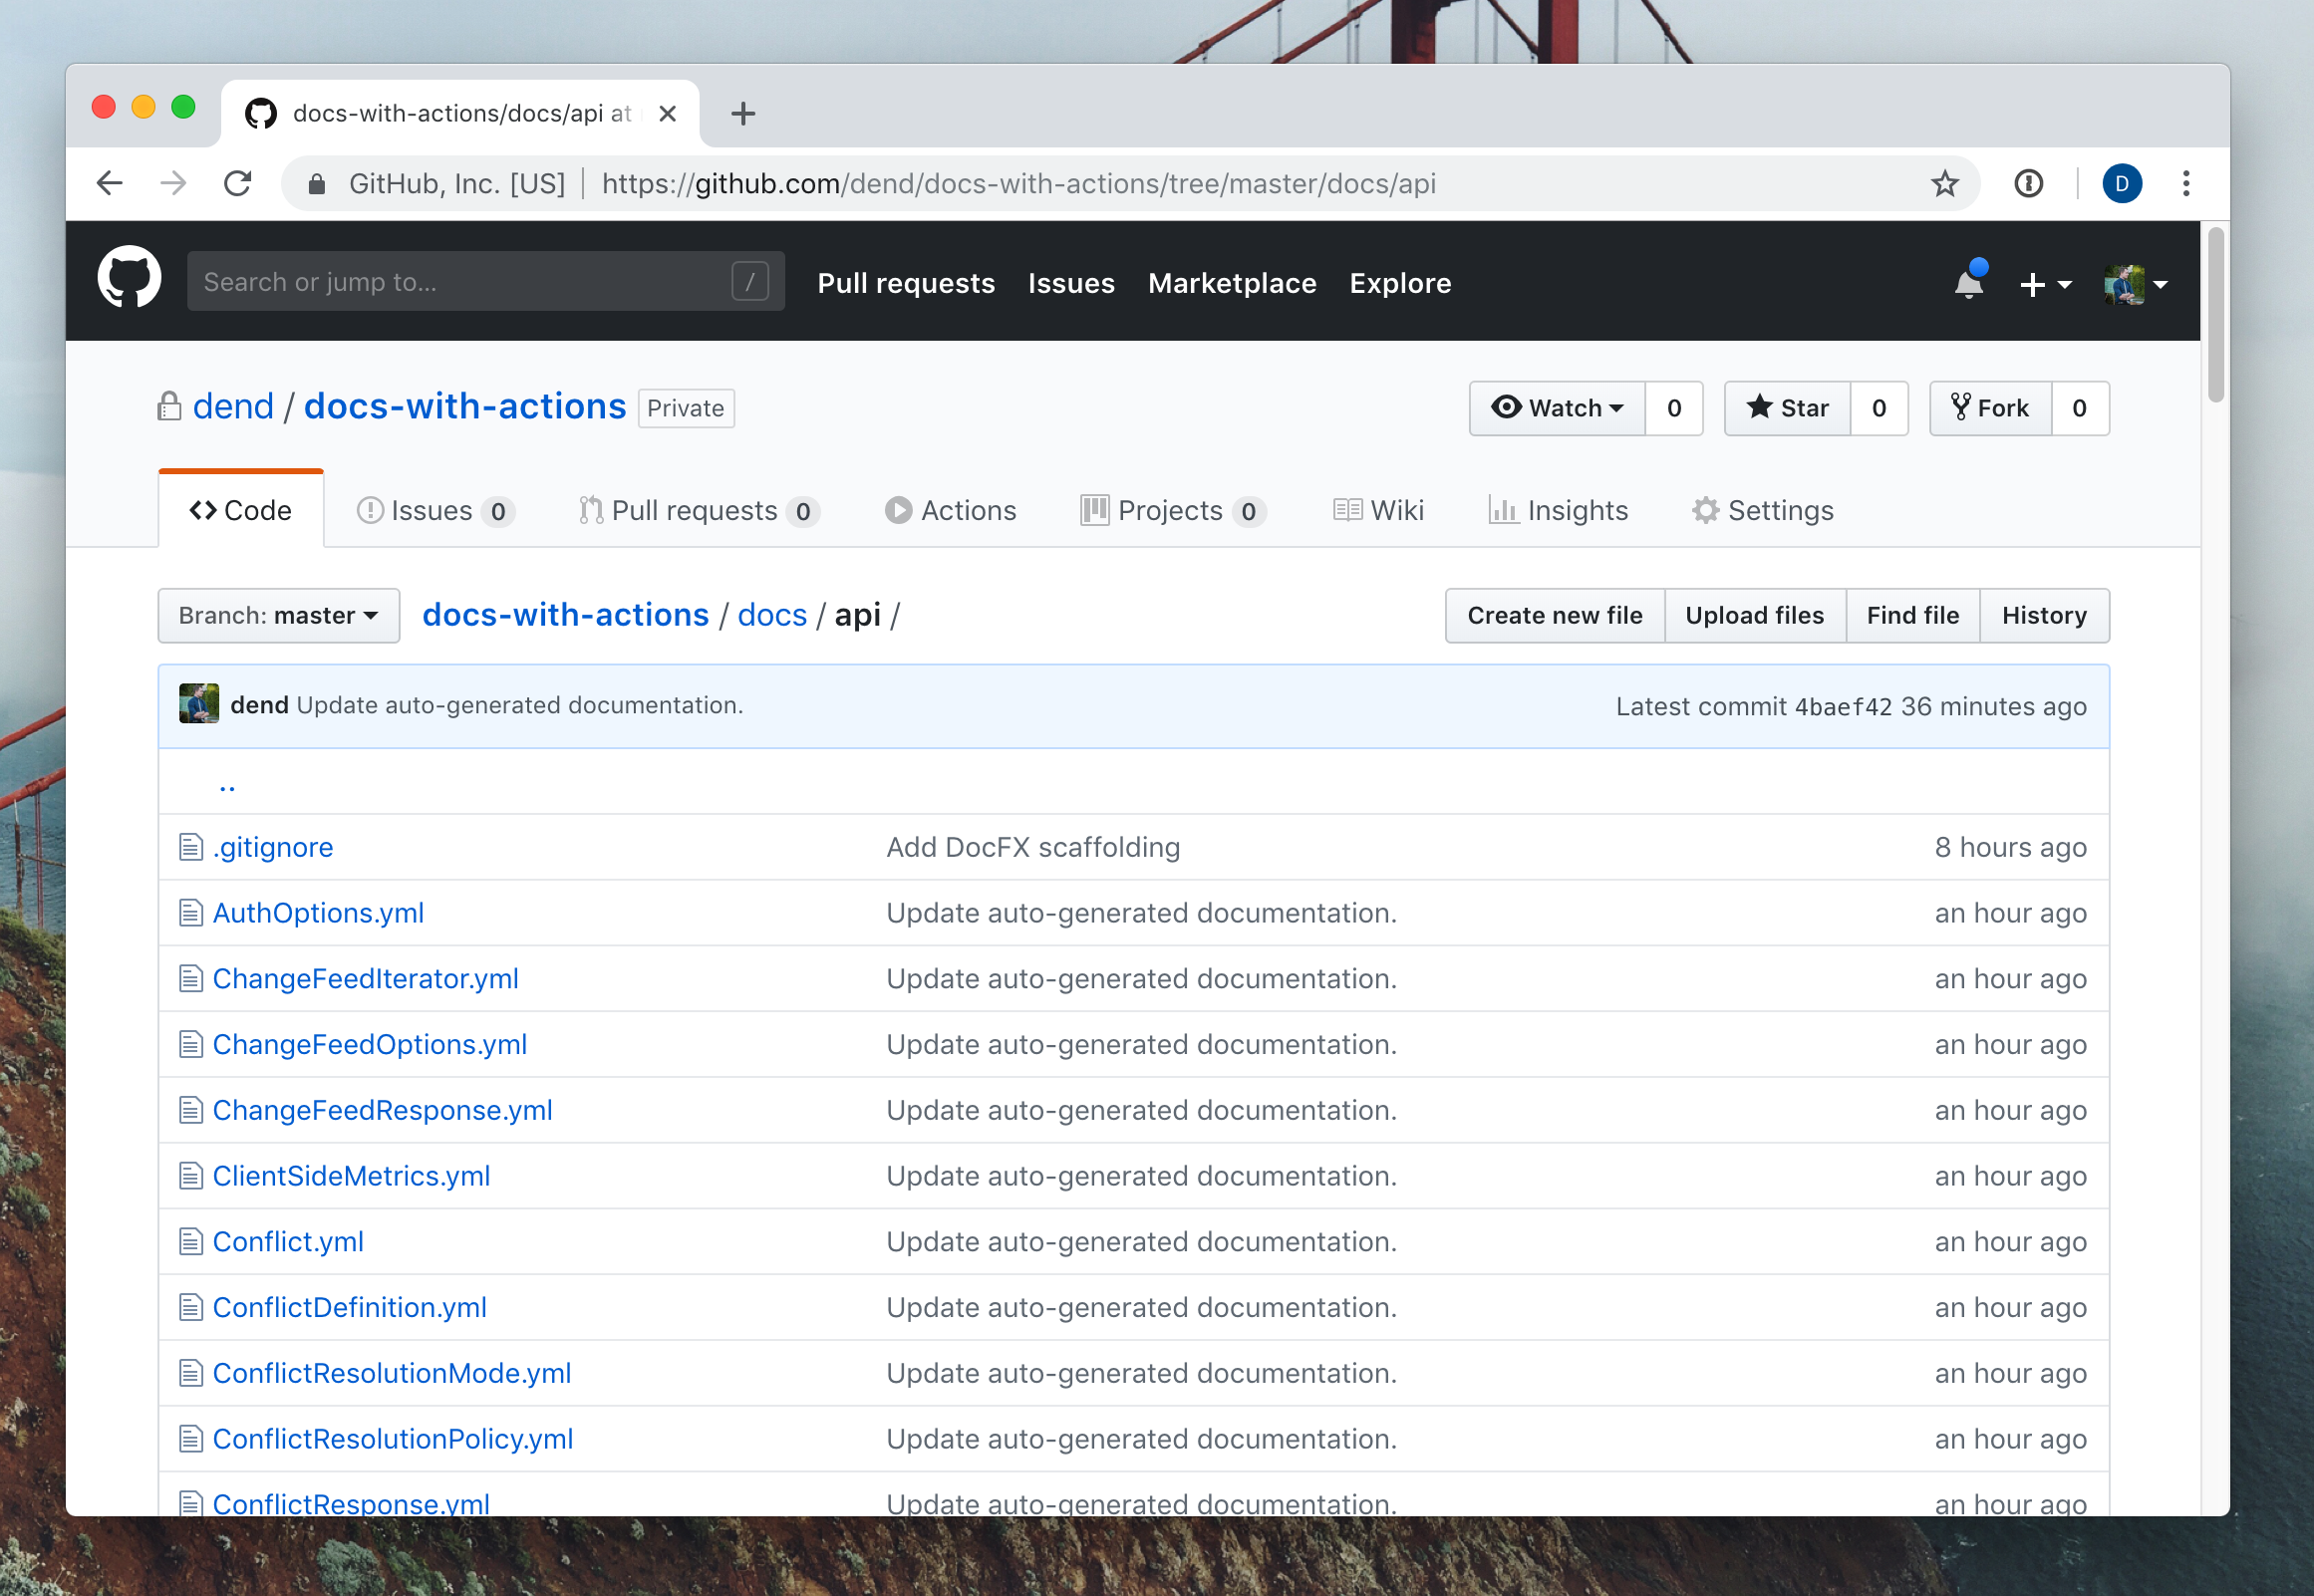
Once the workflow executes, you will see a number of new files checked into the docs/api folder - that’s our structured DocFX YAML representing the API!
Set up a storage account #
Before we get to the build and publish stages, it is important that we have a storage account where we can host the content that we will produce. Because we are operating with a static site, we don’t need to worry much about infrastructure beyond just a blob where we can drop the HTML files that the tooling will generate. To do that, I am going to create an Azure Storage account.
While the instructions in this particular section describe how you can accomplish this work with Azure, it would work just as well on any storage provider of choice - GitHub Actions are absolutely agnostic to that.
Signing up for Azure is easy, and once you do that, you can go to the Azure Portal and use the Create Resource functionality to provision a new storage account:
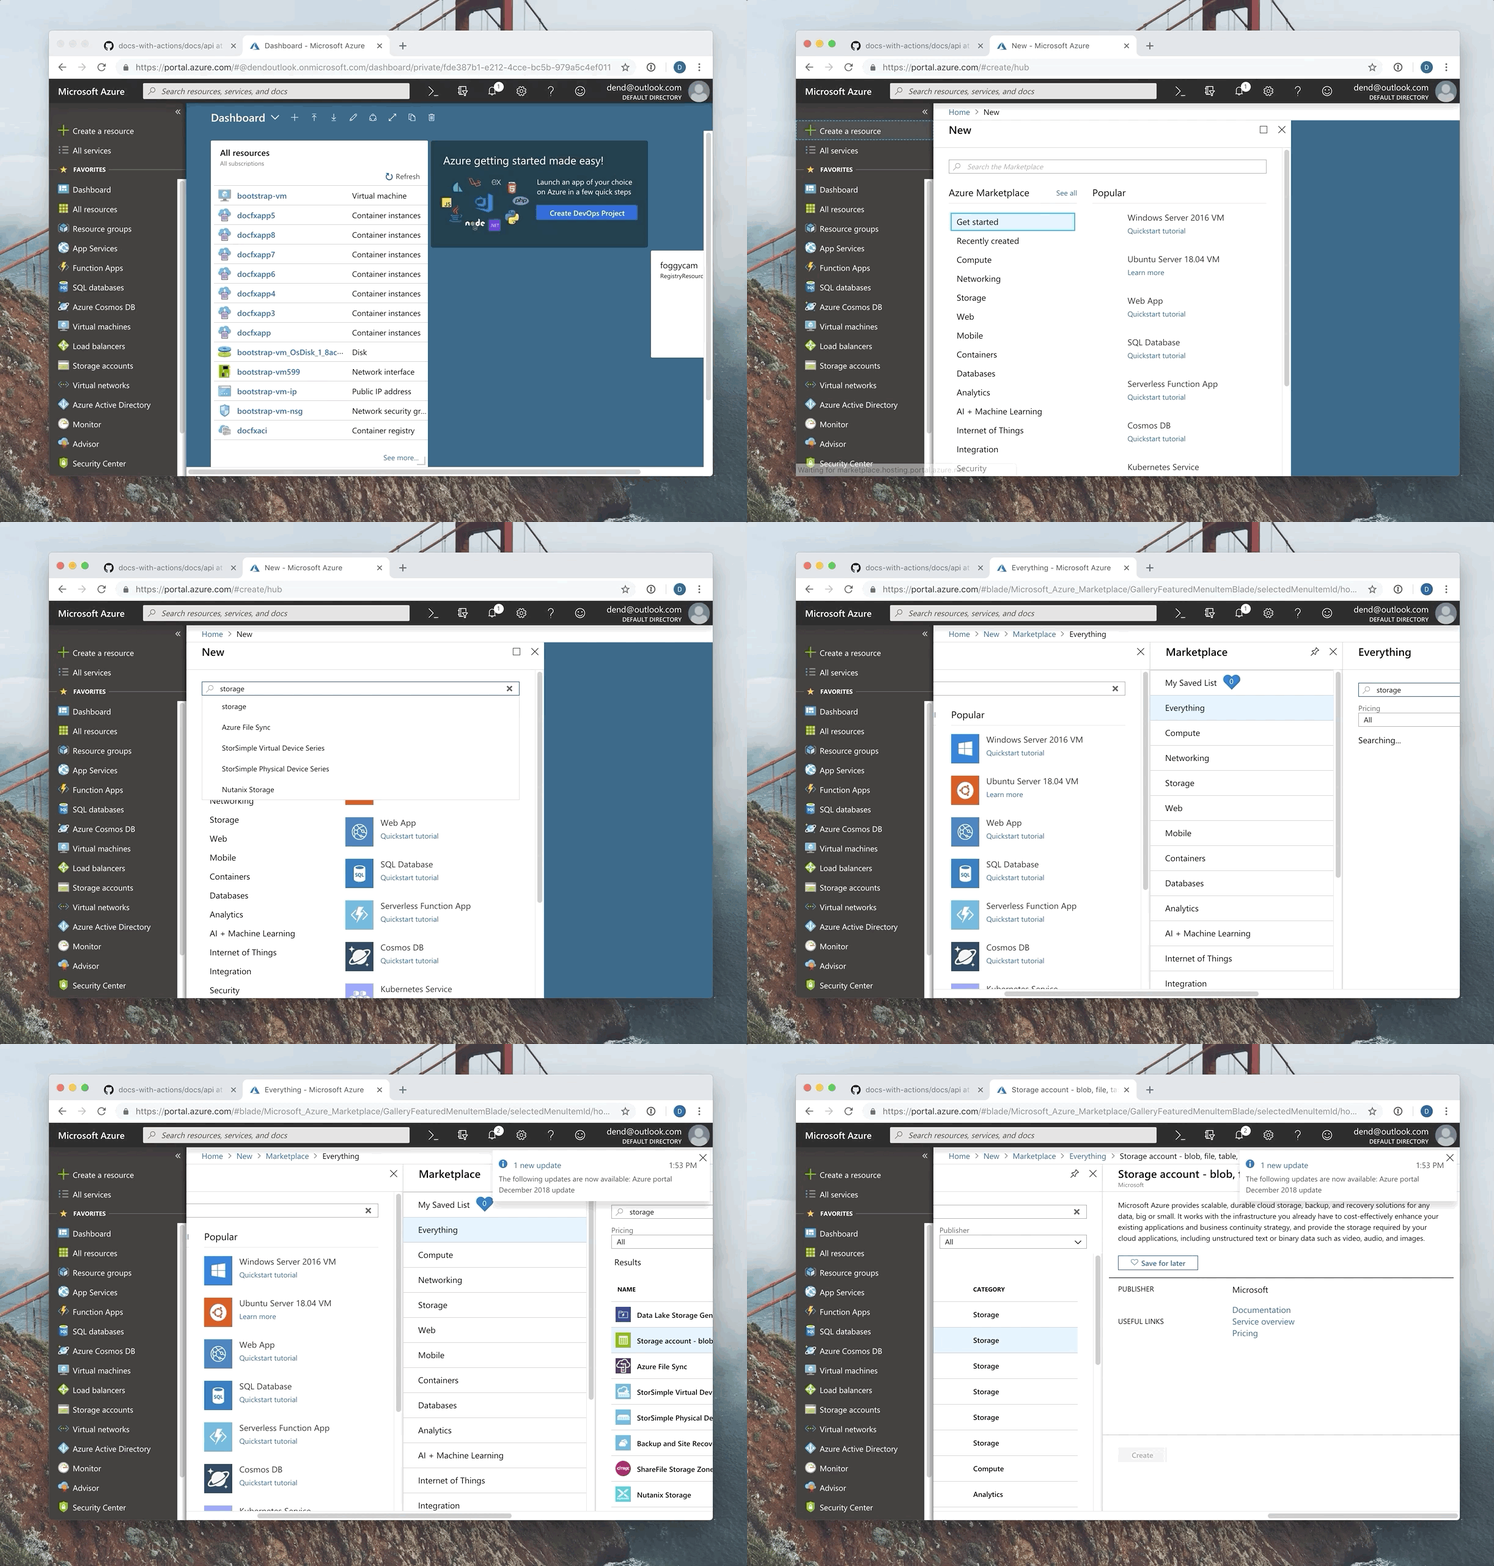
Most options can be left intact - specify a name, and ensure that the Storage V2 account kind is selected (that’s the only one that supports static sites at this time).
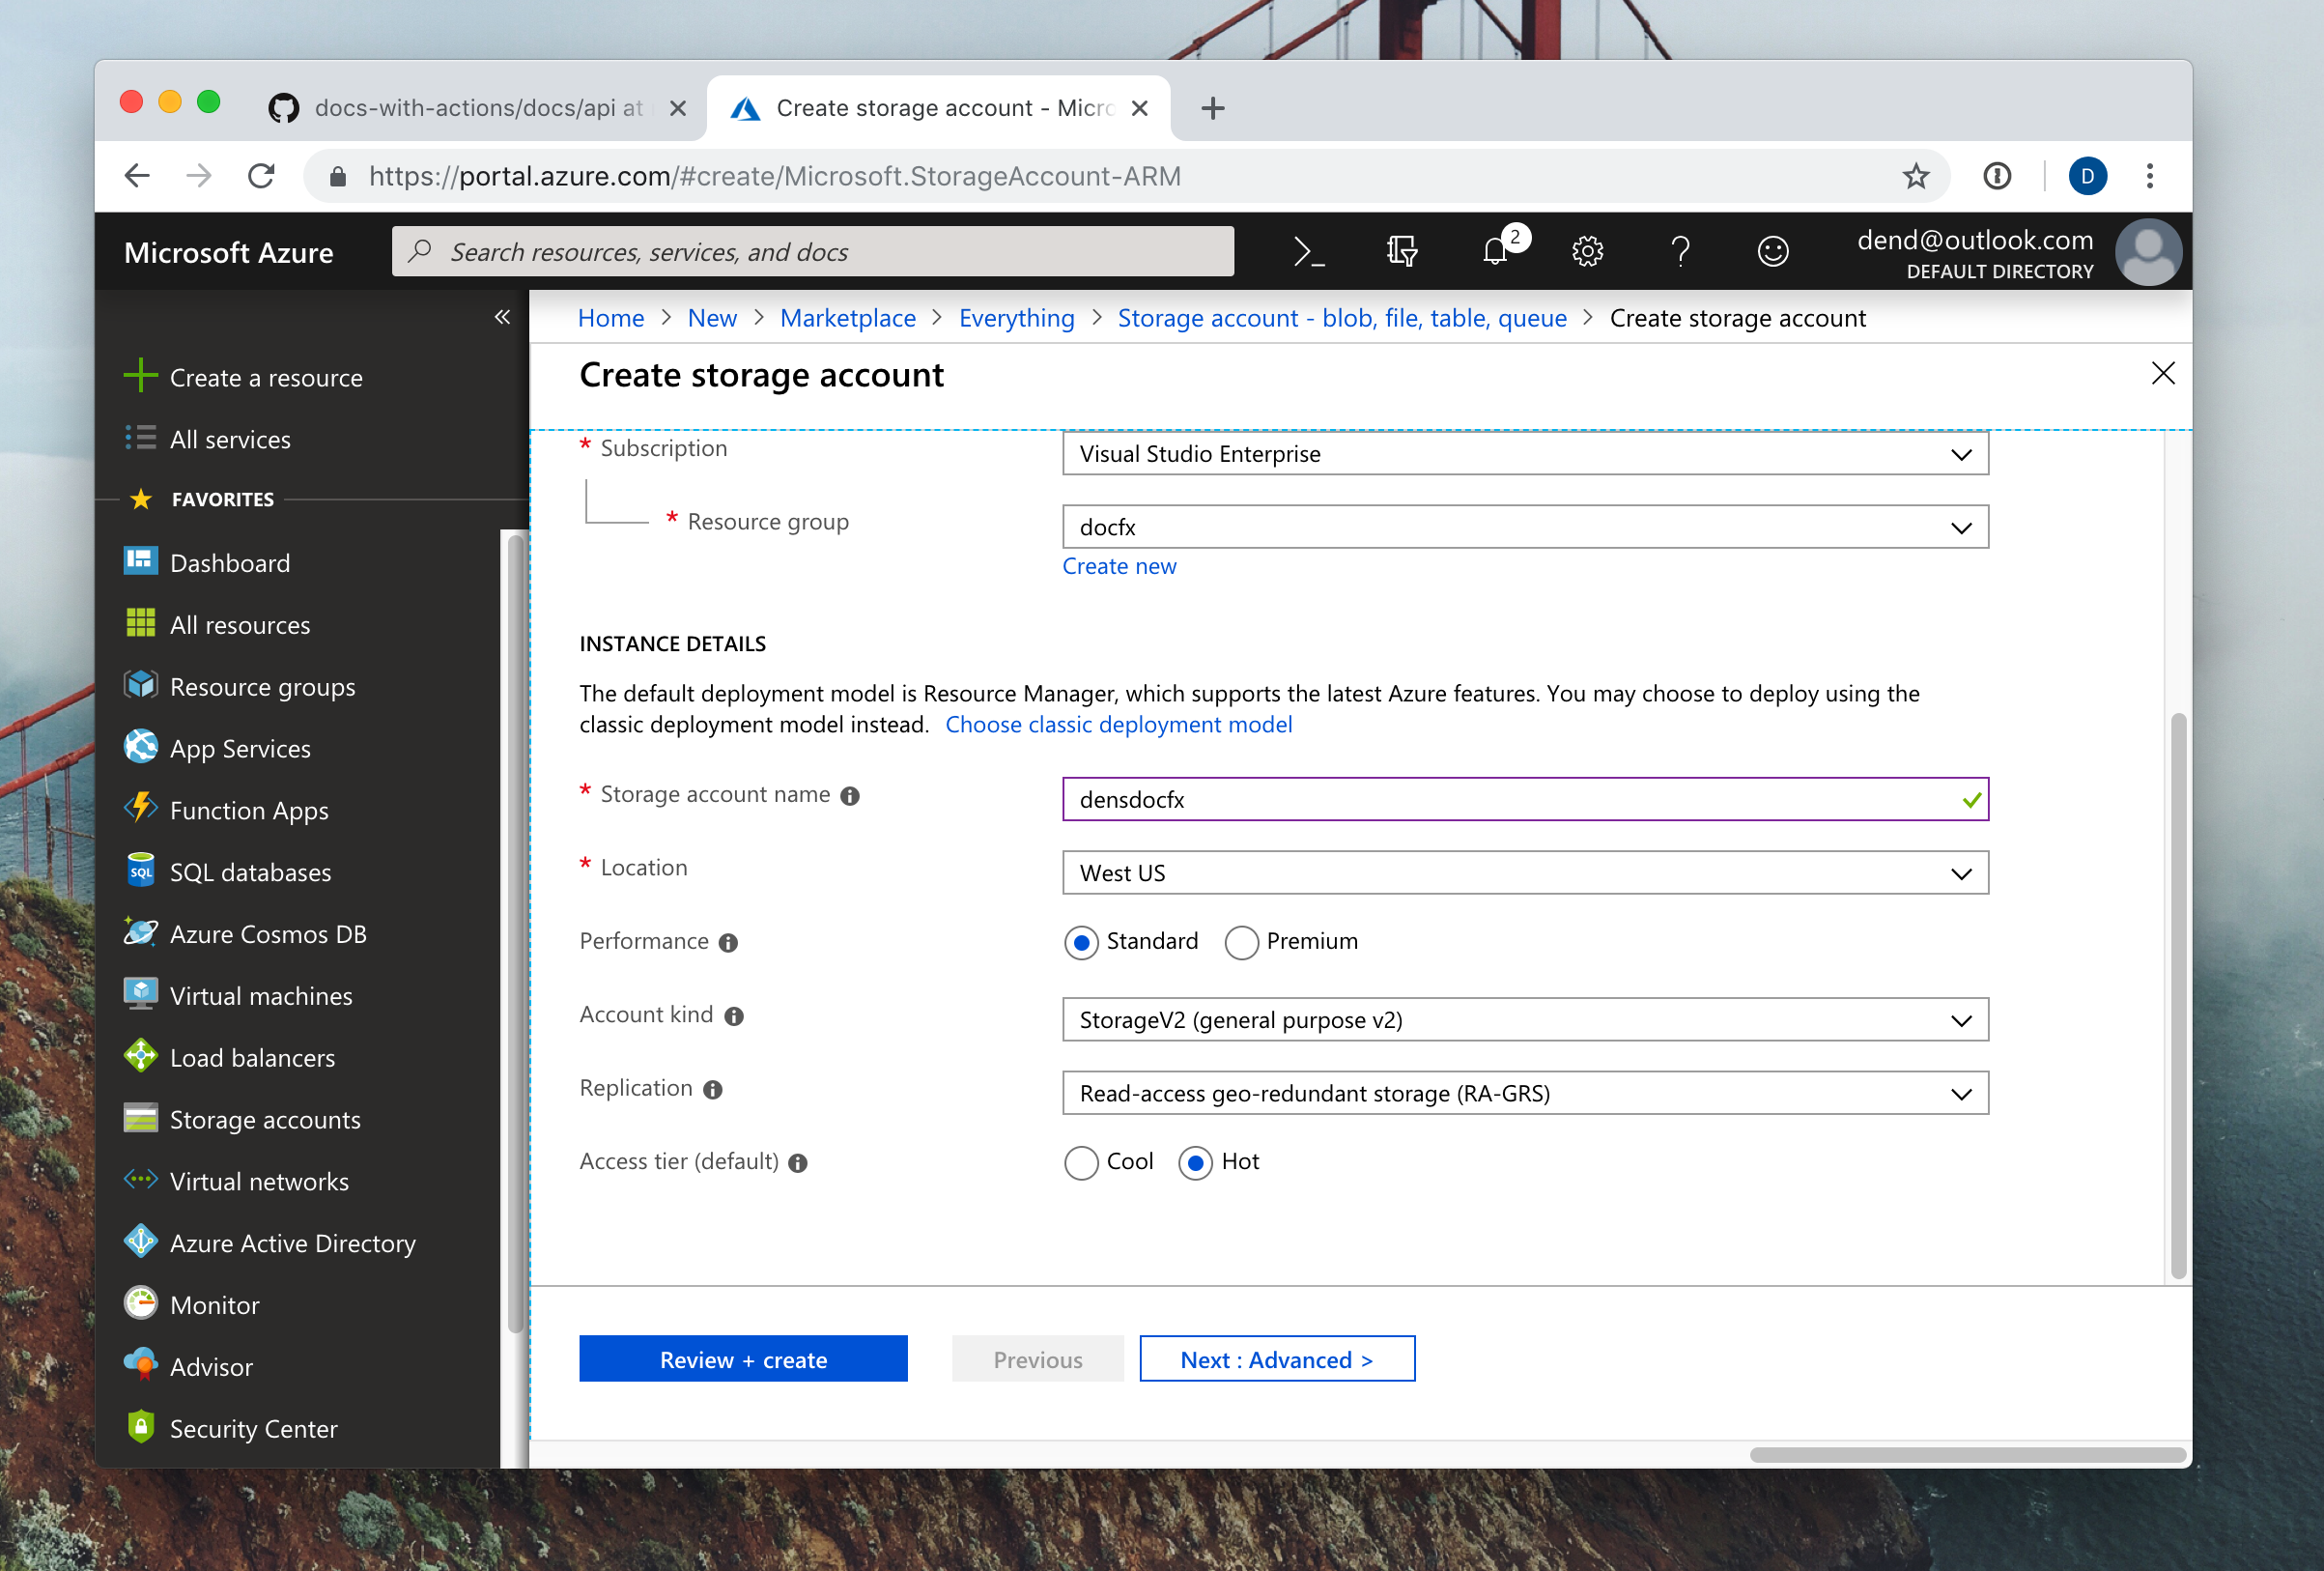
You can click Review + Create and that will (with one more confirmation) trigger the provisioning of a new storage account that we will use in the next section.
Once the provisioning is complete, you will need to enable static site hosting capabilities. You can do that by opening the Static website (preview) view, and clicking Enable. Specify the name of the landing page (in this case, index.html) and the error page (we are using 404.html).
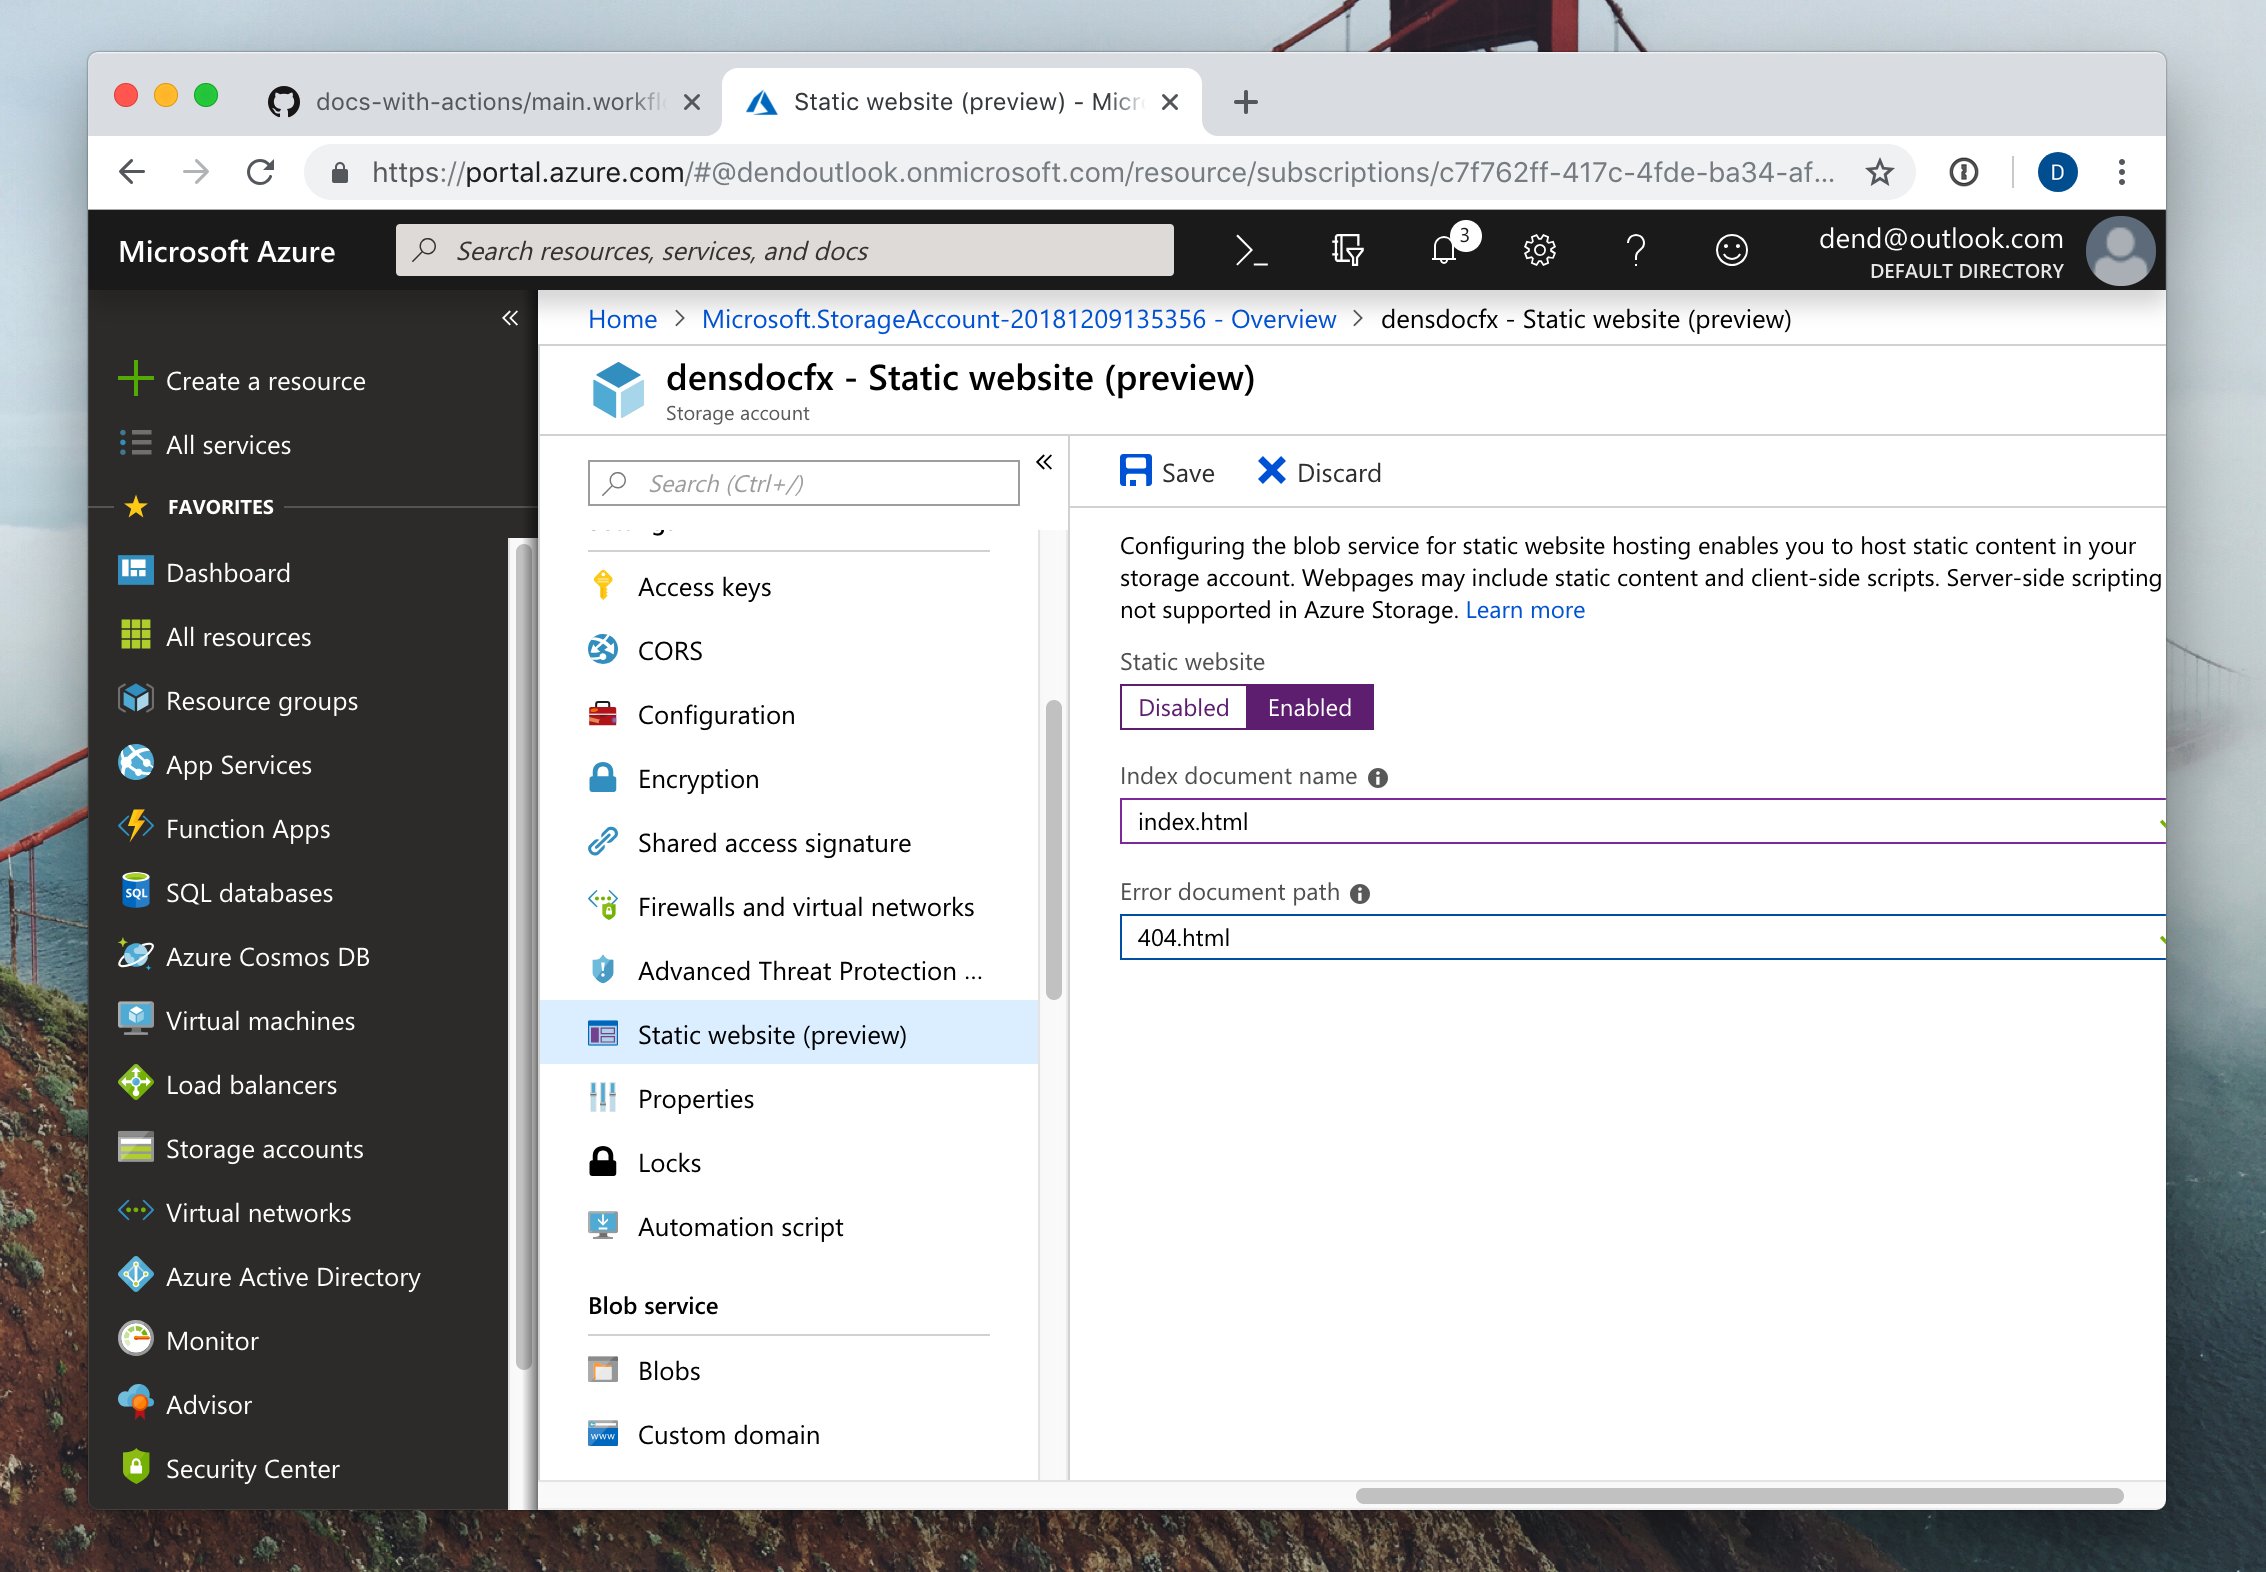
Saving the configuration will result in endpoint information being shown to you:
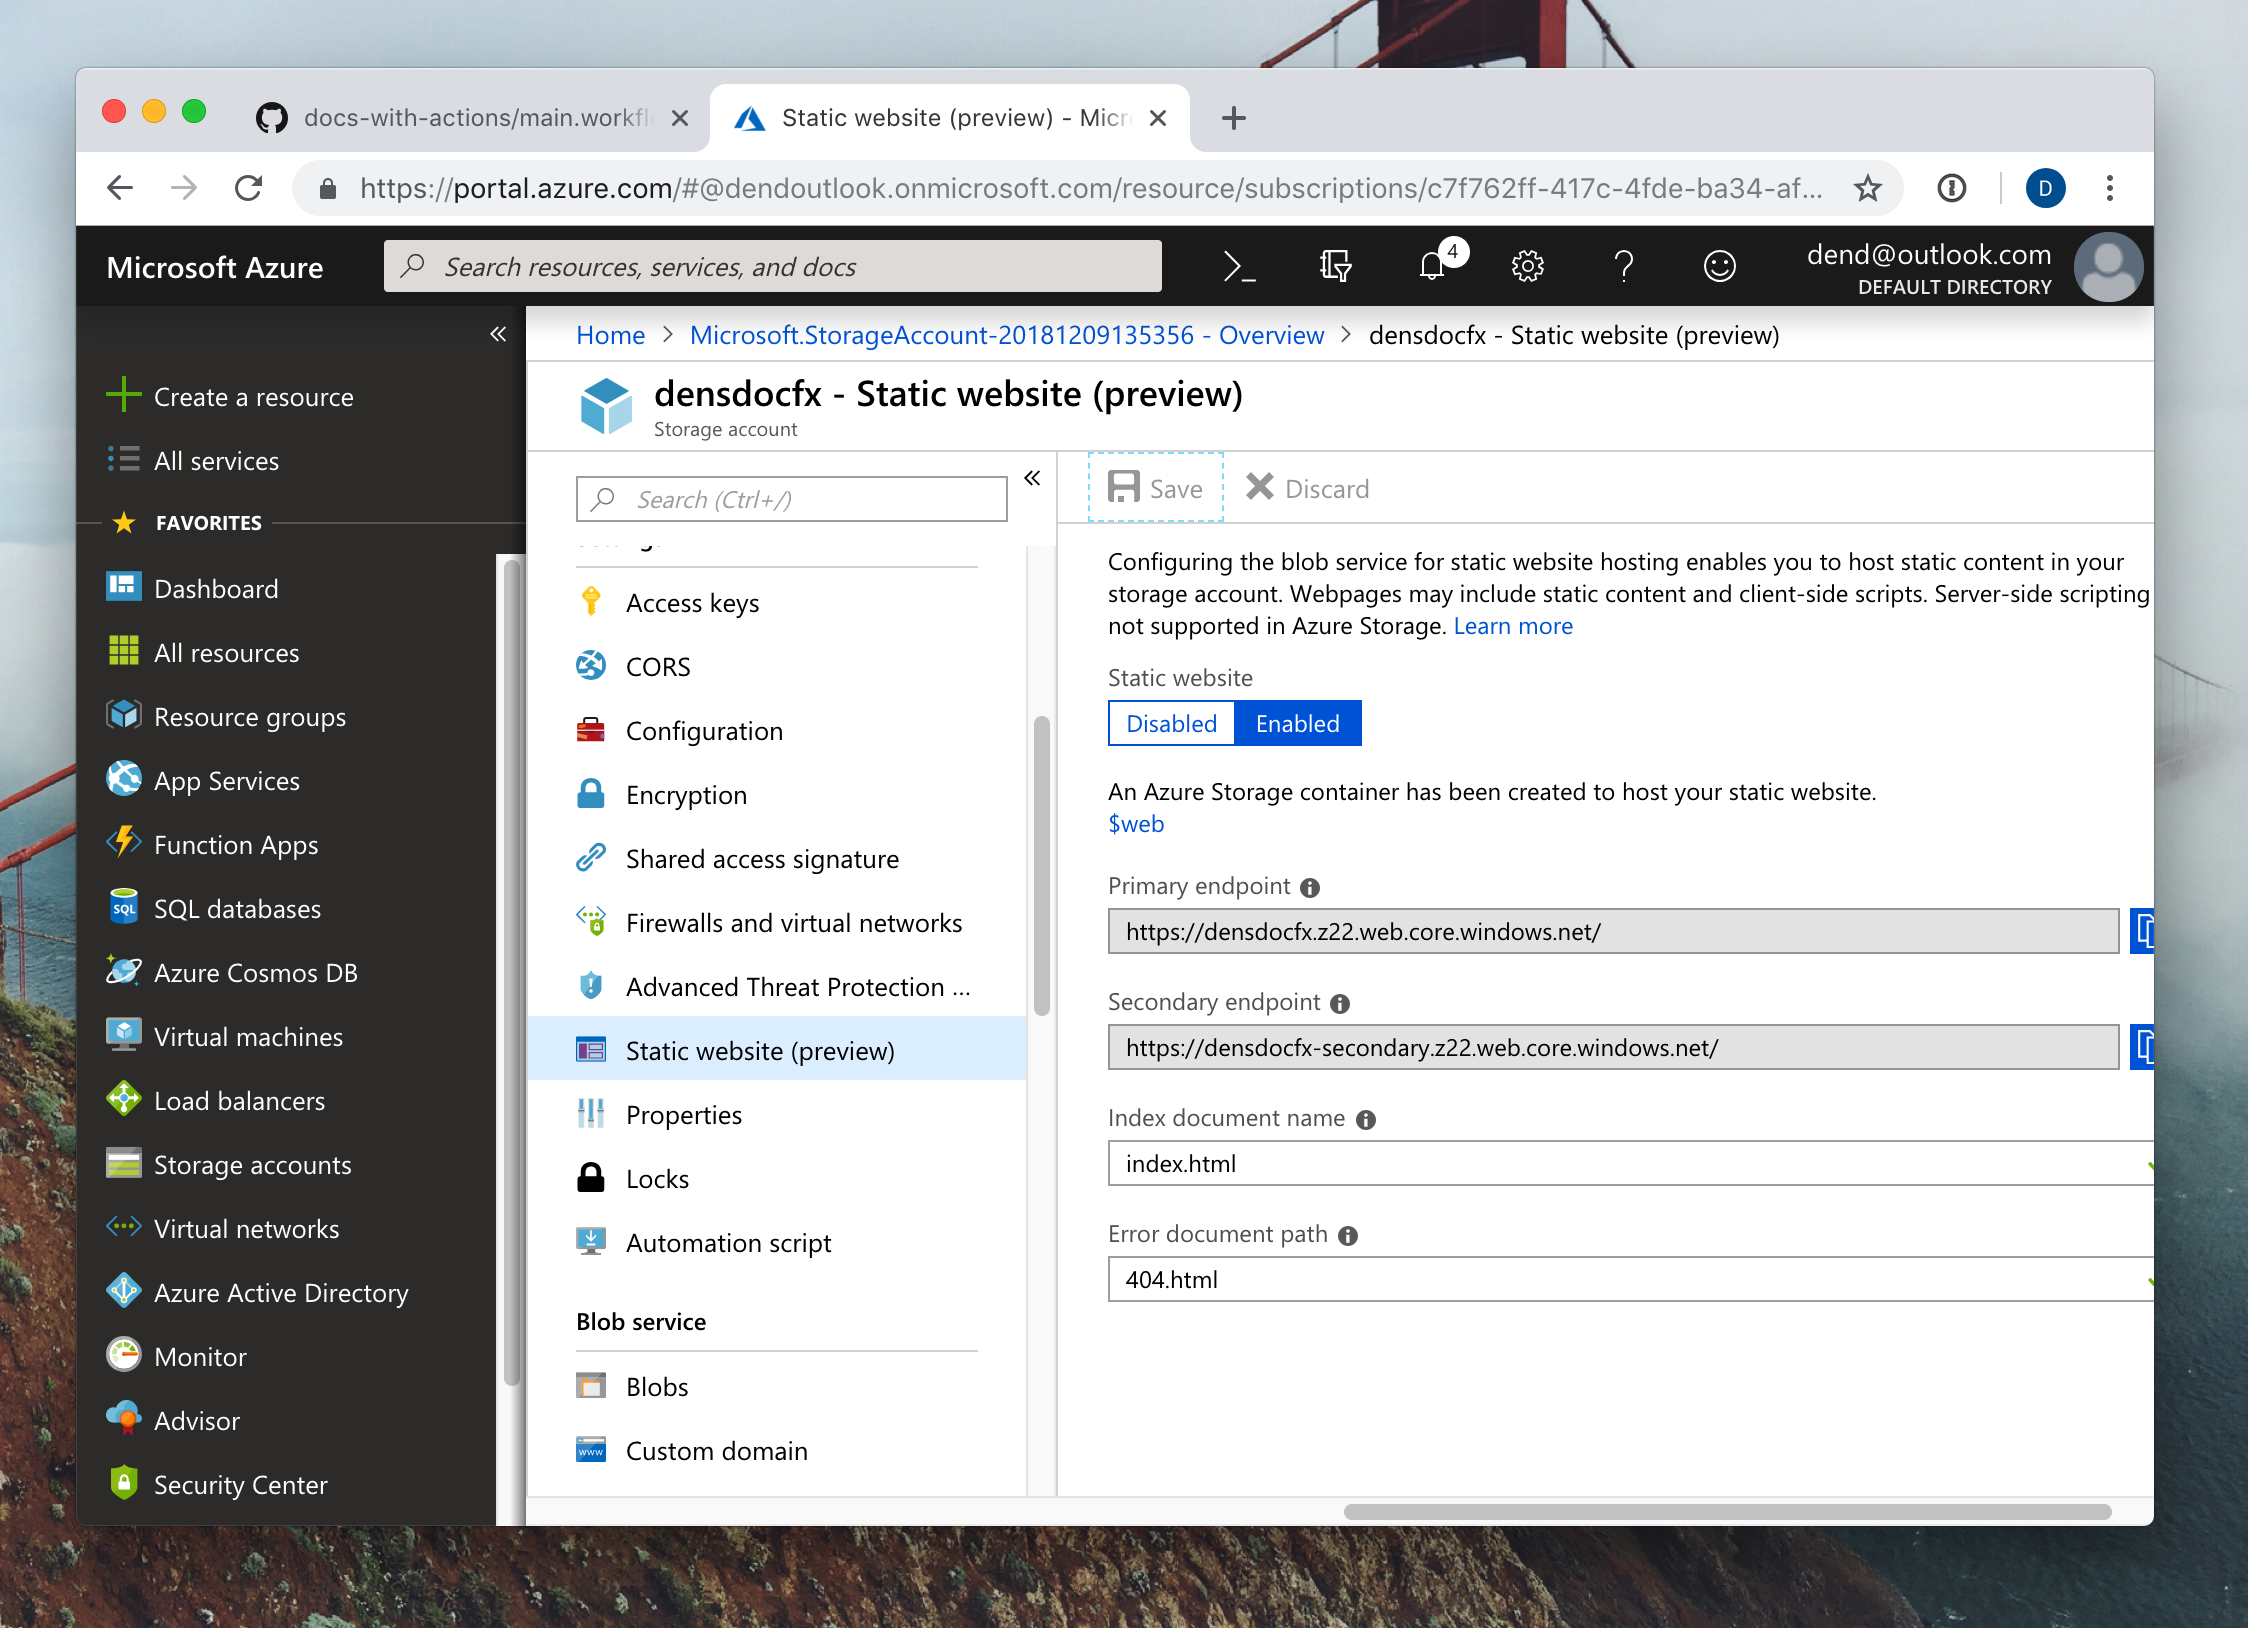
This is where your site can be found later on, so make sure to jot down the URLs.
We will now need to create a service principal - that is what we will use to log in to the storage account from within the container in the action. On your local machine, make sure that you install the Azure CLI. Because I am working on macOS, I can just use Homebrew and trigger:
brew update && brew install azure-cli
Once installed, use:
az login
Once the log in is successful, we can proceed to creating a service principal, with the following command:
az ad sp create-for-rbac --name <worker_url> --password <password>
Once the service principal creation is complete, you should see a JSON blob shown in the terminal, confirming the new identity:
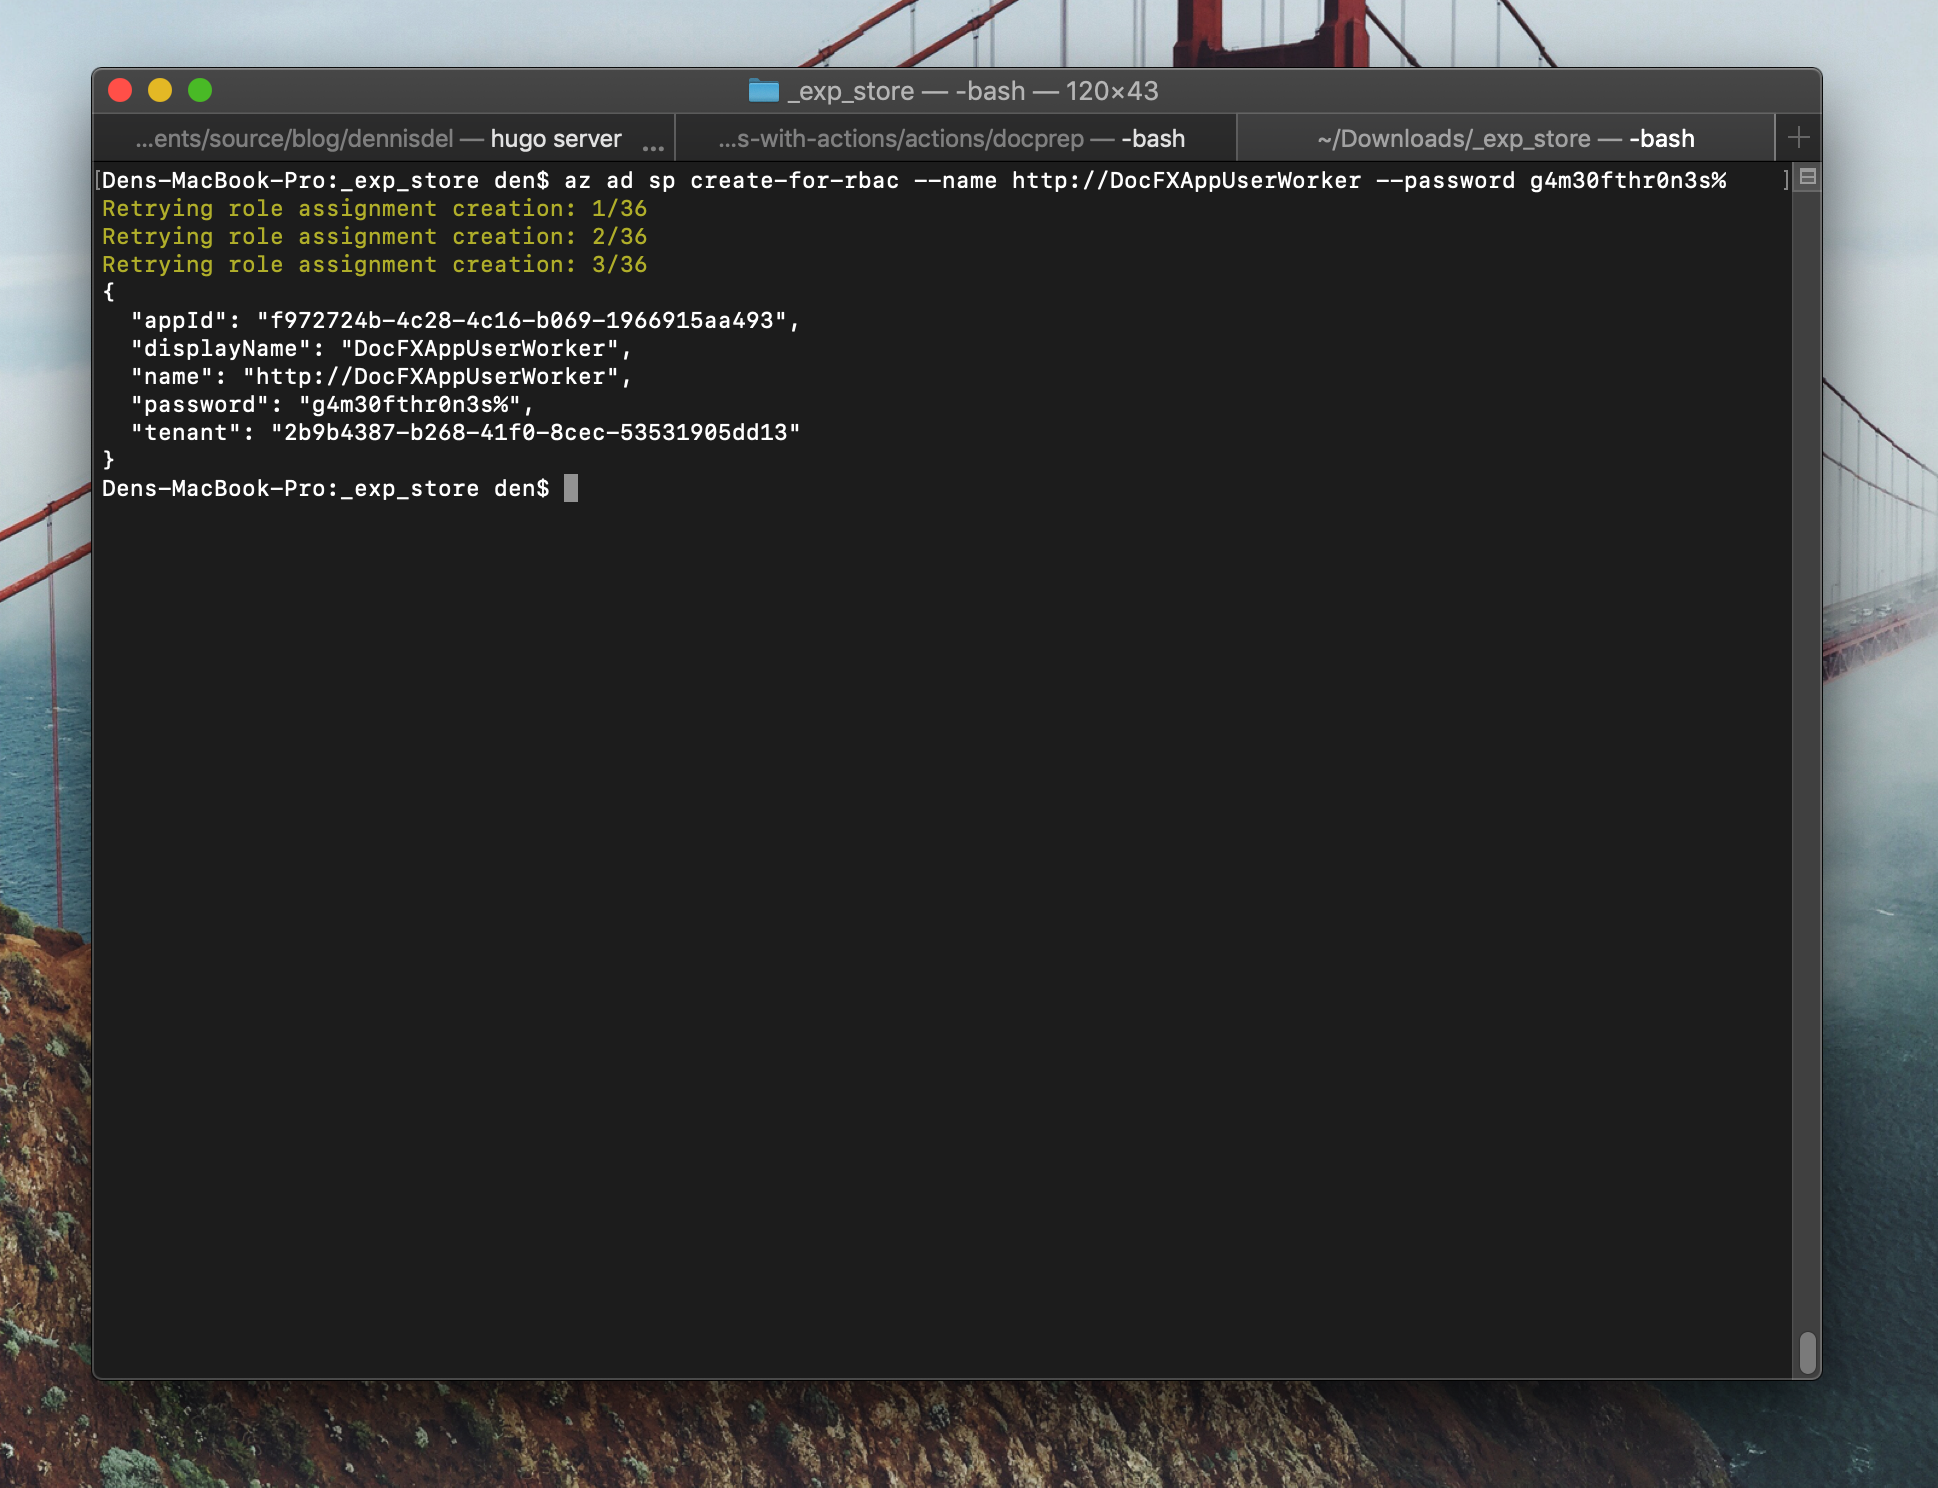
Record this information for future use.
Documentation build and publish #
Now that we have the YAML files generated, it’s time for us to get the static HTML files out of them and publish them to a storage destination, which in our case will be Azure Storage (which now supports static sites 8).
Just like with the previous action, we need to fill out the Dockerfile, and it should look like this:
FROM ubuntu:18.04

LABEL "com.github.actions.name"="DocFX - Build and publish documentation"
LABEL "com.github.actions.description"="Builds and publishes documentation to Azure Storage."
LABEL "com.github.actions.icon"="code"
LABEL "com.github.actions.color"="red"

LABEL "repository"="ACTION_REPOSITORY"
LABEL "homepage"="ACTION_HOMEPAGE"
LABEL "maintainer"="MAINTAINER_EMAIL"

ENV TZ=America/Vancouver

ADD entrypoint.sh /entrypoint.sh
ENTRYPOINT ["/entrypoint.sh"]
Not a lot changed from the previous Dockerfile that we already put together other than the name and description. We are still relying on entrypoint.sh to do the legwork, and the Dockerfile acts as a mere manifest. I’ve also switched the image from debian:9.5-slim to ubuntu:18.04 purely because I have my containerized dev environments configured on Ubuntu - it’s a matter of choice, really, and if you feel more comfortable with another OS, you should be able to easily change it - GitHub Actions support other container images as well, and you don’t need to restrict yourself to the one used in samples.
There is an extra call-out for the environment variable - TZ, that is necessary for tzdata (one of the dependencies for mono-complete). This effectively sets the timezone for one of the tools, but we don’t want to get stuck at an interactive prompt down the line (since actions are non-interactive - like any container, to be fair). I’ve actually ran into this problem only to find a solution on the Ubuntu Stack Exchange site.
Let’s now look at the shell script that we need:
#!/bin/sh -l

echo "Updating..."
apt-get update
apt-get install -y unzip wget gnupg gnupg2 gnupg1
ln -snf /usr/share/zoneinfo/$TZ /etc/localtime
echo $TZ > /etc/timezone

# Install Azure CLI
apt-get install apt-transport-https lsb-release software-properties-common -y
AZ_REPO=$(lsb_release -cs)
echo "deb [arch=amd64] https://packages.microsoft.com/repos/azure-cli/ $AZ_REPO main" | tee /etc/apt/sources.list.d/azure-cli.list
apt-key --keyring /etc/apt/trusted.gpg.d/Microsoft.gpg adv \
     --keyserver packages.microsoft.com \
     --recv-keys BC528686B50D79E339D3721CEB3E94ADBE1229CF

apt-get update
apt-get install -y azure-cli

# Install Mono
apt-key adv --keyserver hkp://keyserver.ubuntu.com:80 --recv-keys 3FA7E0328081BFF6A14DA29AA6A19B38D3D831EF
echo "deb https://download.mono-project.com/repo/ubuntu stable-bionic main" | tee /etc/apt/sources.list.d/mono-official-stable.list
apt update
apt install mono-complete --yes

# Get DocFX
wget https://github.com/dotnet/docfx/releases/download/v2.39.1/docfx.zip
unzip docfx.zip -d _docfx
cd docs

# Build docs
mono ../_docfx/docfx.exe

# Upload static HTML files
az login --service-principal -u $AZ_APPID -p $AZ_APPKEY --tenant $AZ_APPTN
az storage blob upload-batch -s _site/ -d \$web --account-name $AZ_STACCNT
Again, there is a lot to unpack here, however the set of actions is really simple. We install a number of dependencies, set the time zone for configuration purposes, install the Azure CLI, install Mono, download and unpack DocFX, run a DocFX build and upload the content that is generated in the _site folder to Azure Storage. There is a number of pre-defined variables that I using, described below.
| Variable | Description |
|---|---|
AZ_APPID |
The application ID used by the Azure CLI to find the identity. We got this value in a step above, when we created the service principal. |
AZ_APPKEY |
The password for the service principal created earlier. |
AZ_APPTN |
Application tenant, also obtained from the command where we created the service principal. |
AZ_STACCNT |
The name of the storage account created earlier. |
By the time you reach this step, you should already have all that information handy.
You might also wonder - didn’t I skip a variable, specifically the one named web in the upload-batch command? The answer is no - that is the pre-defined folder where we drop web content.
Remember, when you check this file in, you need to make sure you set the execution flag:
chmod +x entrypoint.sh
Not doing so will result in the action erroring out, and you (just like me) will likely have to spend an hour trying to figure out why your action is not firing properly.
Now you can set up the action, by updating your existing main.workflow file to this:
workflow "Documentation Generation Workflow" {
  on = "push"
  resolves = ["DocFX - Build and publish documentation"]
}

action "DocFX - Generate TypeScript Documentation" {
  uses = "./actions/tsdocgen"
  secrets = [
    "GITHUB_TOKEN",
    "GH_USER",
    "GH_EMAIL",
  ]
  env = {
    TARGET_PACKAGE = "@azure/storage-blob"
    TARGET_SOURCE_PATH = "typings/lib"
  }
}

action "DocFX - Build and publish documentation" {
  uses = "./actions/docprep"
  needs = ["DocFX - Generate TypeScript Documentation"]
  secrets = [
    "GITHUB_TOKEN",
    "AZ_APPID",
    "AZ_APPKEY",
    "AZ_APPTN",
    "AZ_STACCNT",
  ]
}
A couple of things changed - we now have secret information included for AZ_ variables (described above in this post). We now also have defined a whole new action, called DocFX - Build and publish documentation. Notice that it includes the needs variable, that determines what action needs to complete before this action will start. In our case, we want to generate the content before we build and publish it.
Once you check-in the changes to the repository, you will need to make sure to actually set up the secrets - you can do so from the workflow editor, shown once you navigate to the main.workflow file:
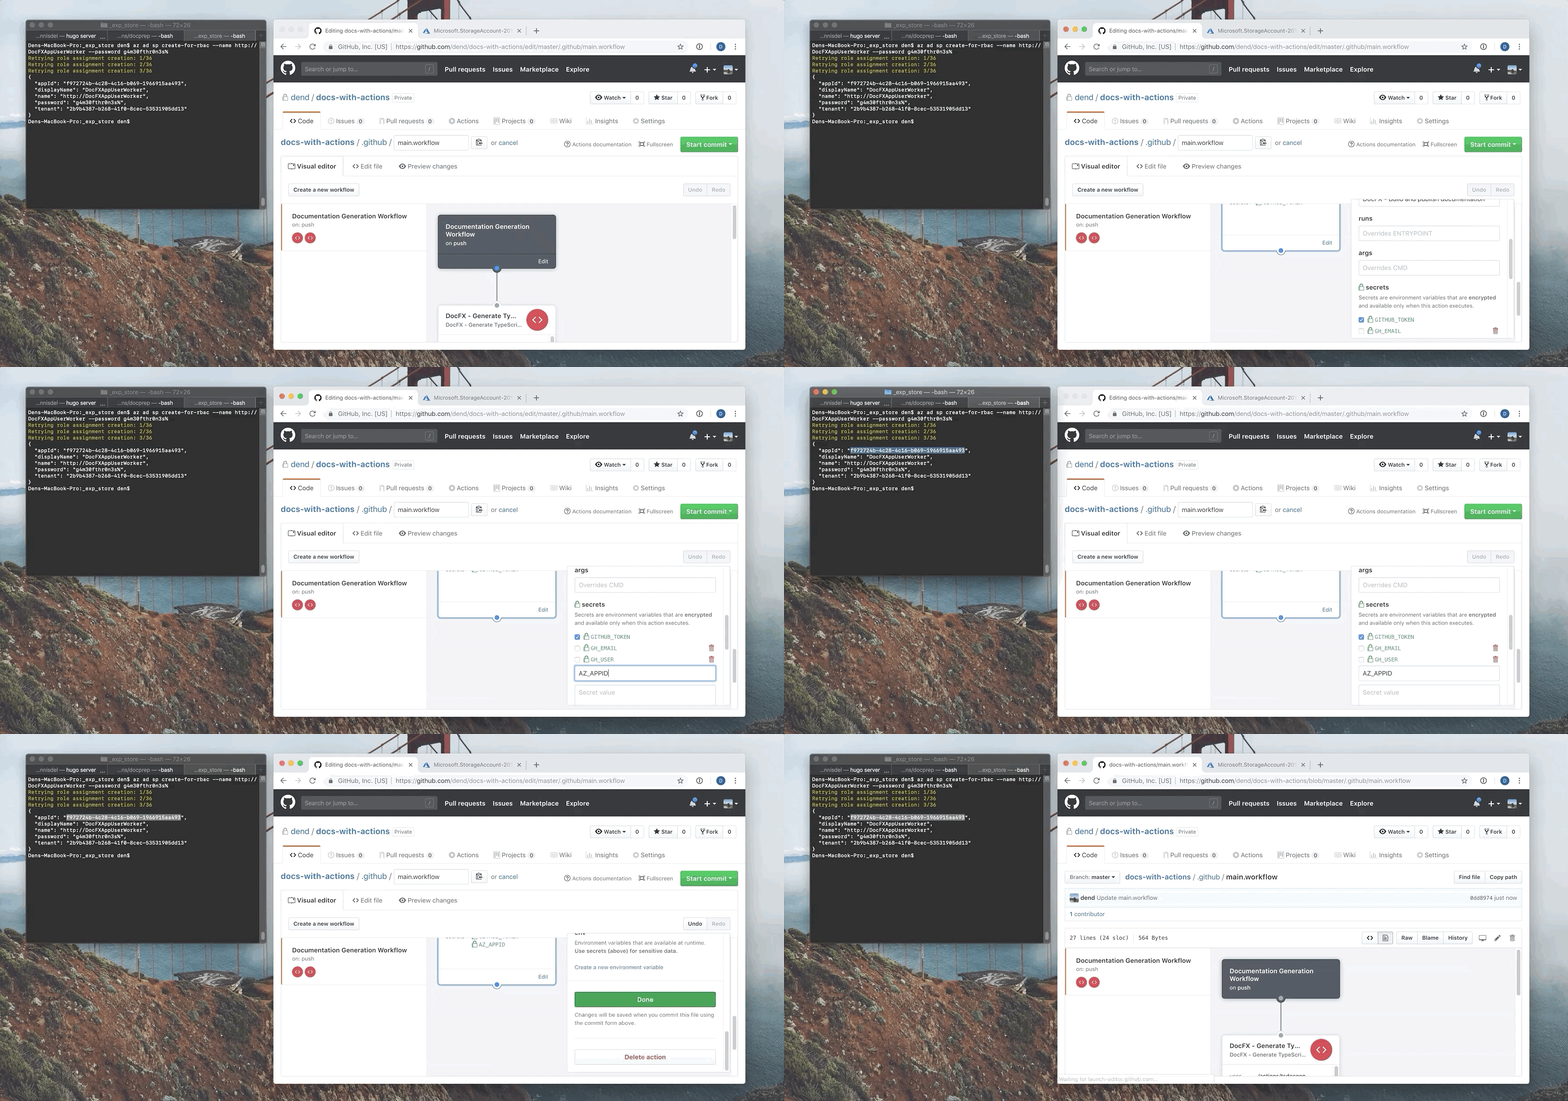
The information is taken directly from the CLI output when we created the service principal. Once you commit the changes, you should see that the two actions are not interconnected and will execute sequentially:
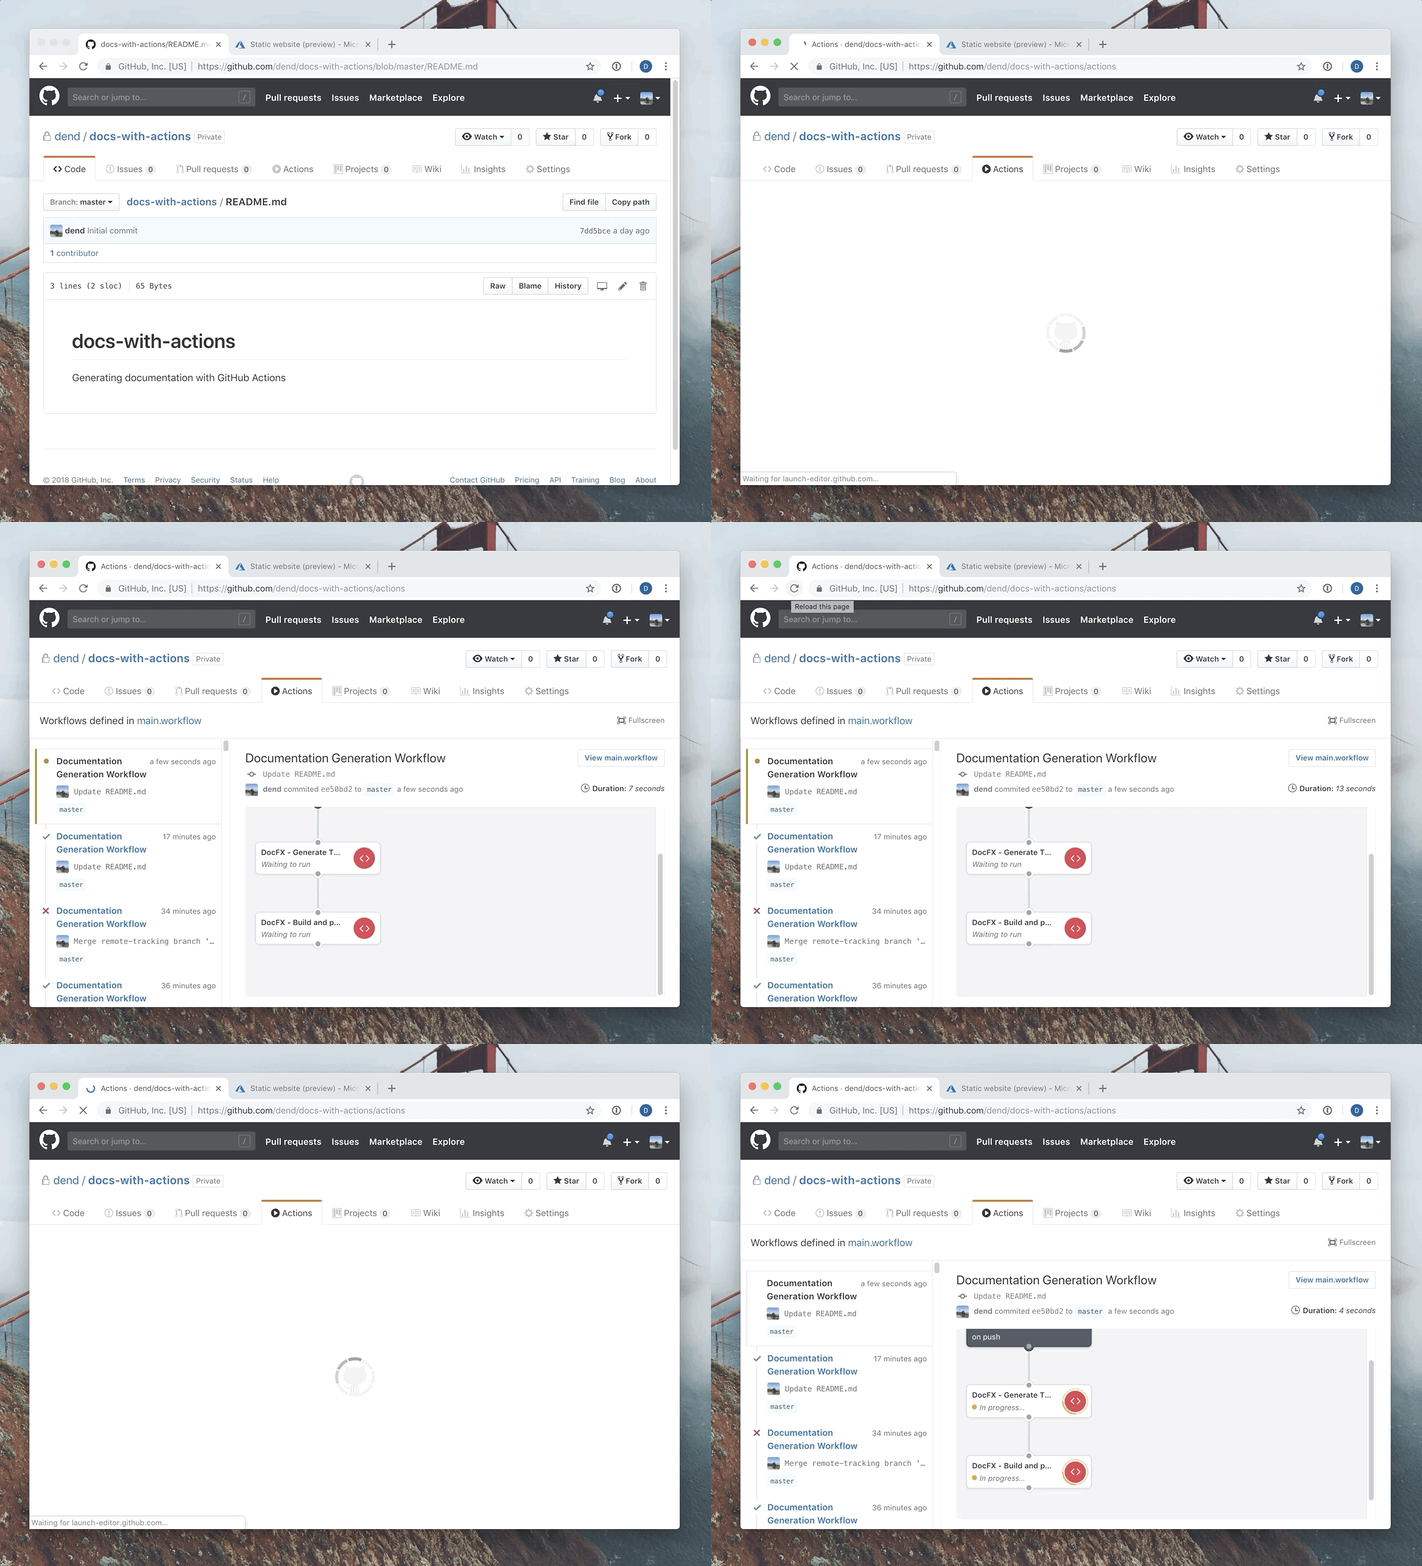
We should be set, as we have now configured everything we needed for successful documentation publish.
Preview documentation #
Actions are set up, the code is checked in and the documentation is generated. You might now be wondering - where is all my documentation, then? Worry not, as we can easily get to it with the help of the URLs that we saw previously in Azure Portal, that pointed us to where the static site is. Simply copy and paste that in your browser!
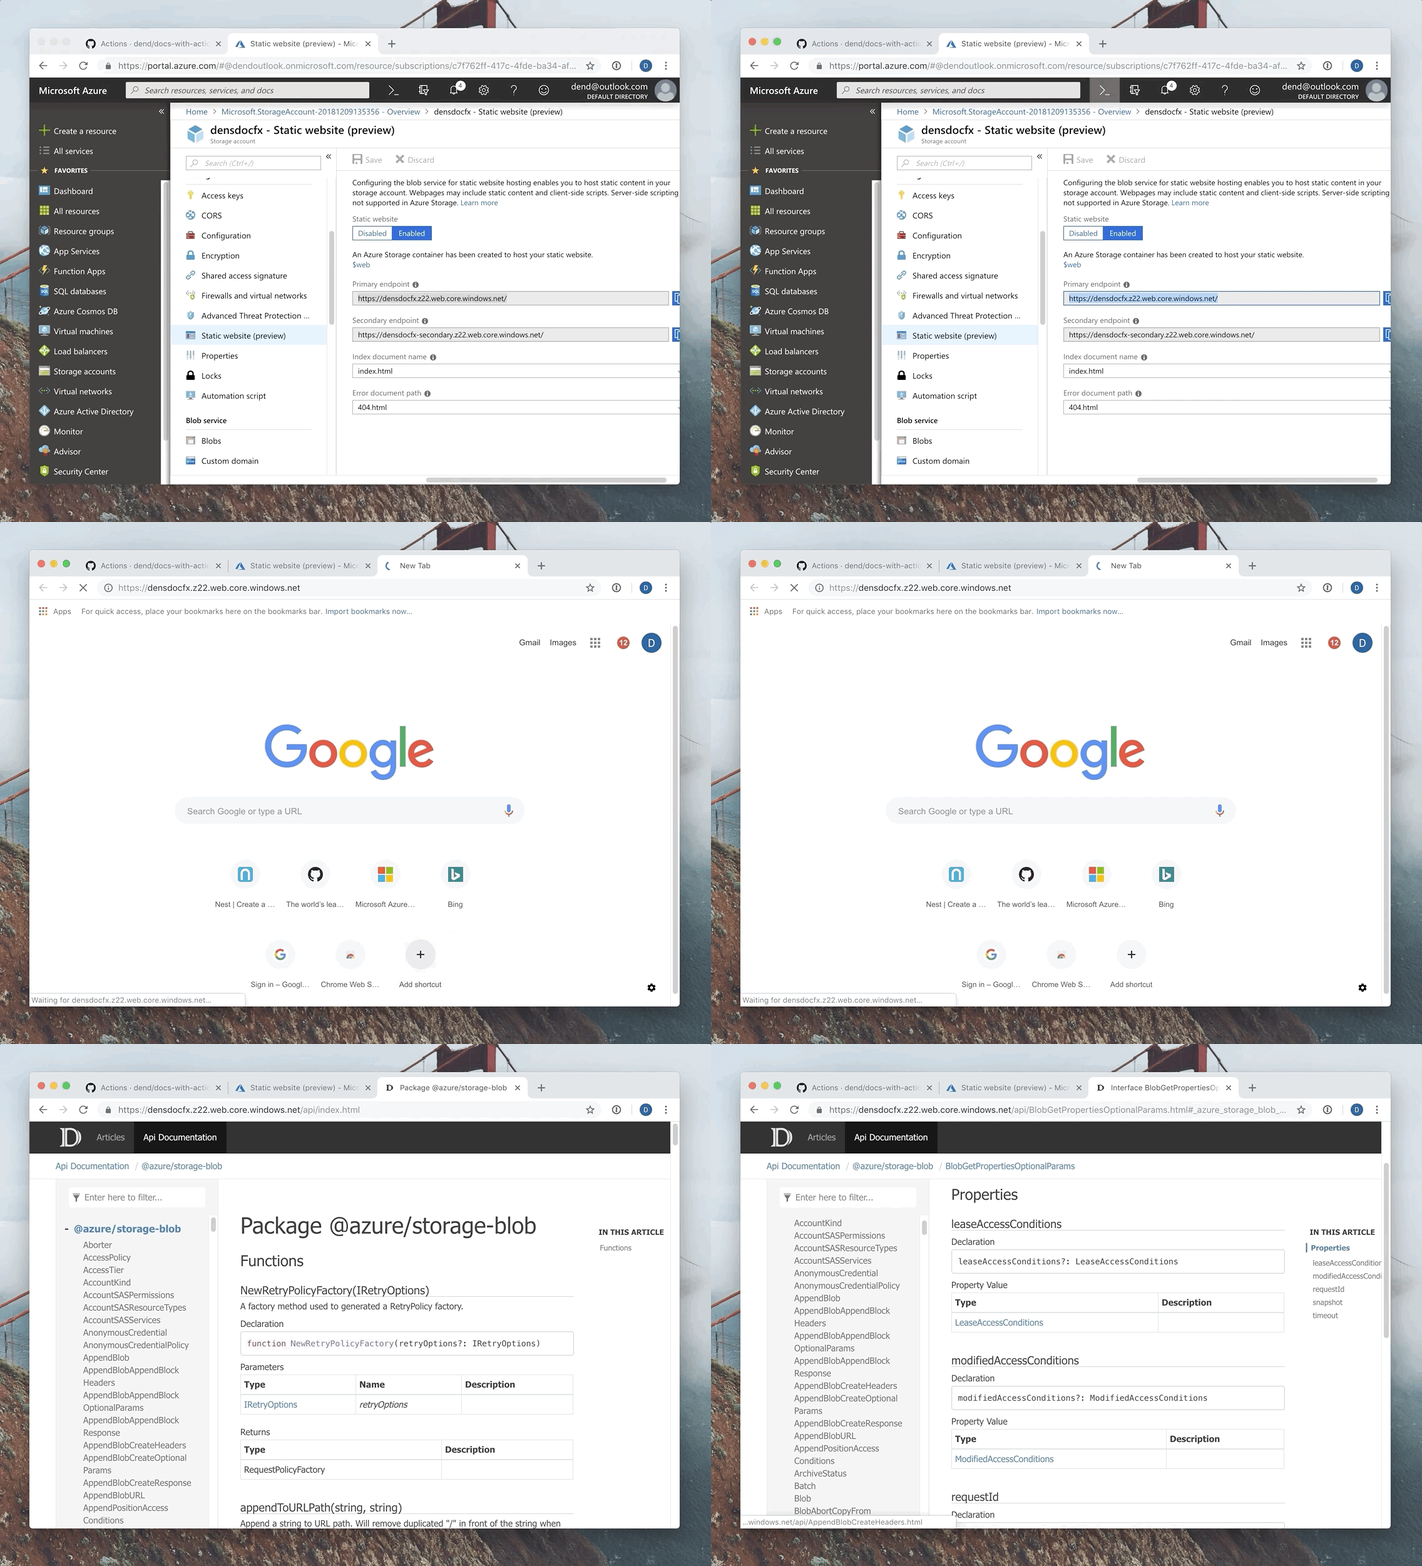
Congratulations, you now know the fundamentals of how to publish documentation with the help of DocFX and GitHub Actions!
One topic that I did not cover in-depth here is the ability to modify and publish hand-written content. That is done through a very similar process to that of API documentation, the difference being that you don’t need any secondary processes or extensions on top of that - simply modify the Markdown file and commit to repo. The changes will be automatically published.
-
There is no better source to see this than GitHub’s official blog. I aspire to get my workflows as structured as the one presented by Jessie Frazelle. ↩︎
-
At this point, I just need to do a write-up on all the tools that you can use for other languages. I’ve added this to the list of things to publish before the end of the year. ↩︎
-
As a matter of fact, we will try to re-use as much as possible from Doctainers in this project, because we are dealing with very similar constraints. ↩︎
-
Don’t use
homebrewfor this particular task. In my experience, it produces a broken Mono setup that I can’t use properly with DocFX. ↩︎ -
Make sure that the package has TypeScript typings integrated within it. ↩︎
-
It’s worth taking a read of the information on environment variables in the official documentation. ↩︎
-
You can read more about this on the official blog. ↩︎