KinectoPhone – Kinect And Windows Phone Working Together
Table of Contents
A while ago we saw a demo from Microsoft that showed how it is possible to use Windows Phone to interact with a Kinect-powered game. During the Kinect Code Camp, right before the official release of the Kinect for Windows SDK beta, Adam Kinney, Rick Barazza, and I decided to work on a proof-of-concept project that would provide the same platform integration in a non-commercial development environment. Because it involved the main character hopping around collecting bonus items, we called the project Bunnyhop (codename KinectoPhone).
Initial Mashup #
The project was divided into three major components:
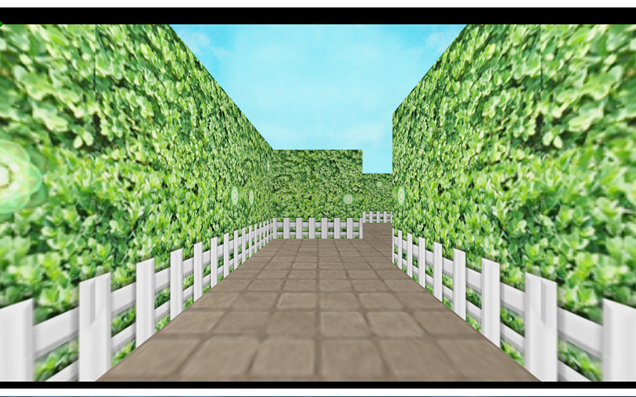
The desktop client – a Kinect-controlled 3D environment. It is only partially controlled by the motion sensor, since other responsibilities are delegate to the phone. Because it is a proof-of-concept and not a full-sized game, WPF is the primary sub-framework.
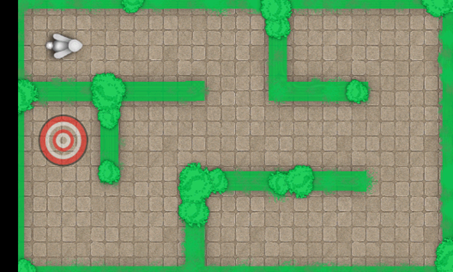
The mobile client – a Windows Phone application that also is in charge of partially controlling the 3D environment on the desktop client. We decided to use Silverlight in favor of XNA because we didn’t want complex graphics and all we needed was the bird’s eye view of the playable area.
The server – one of the most interesting (and issue-generating) components. This was the link between the desktop and the mobile client. Initially we planned on using a WCF service (and we actually did for a while), but then we decided to use sockets for better performance..
Developing the communication layer #
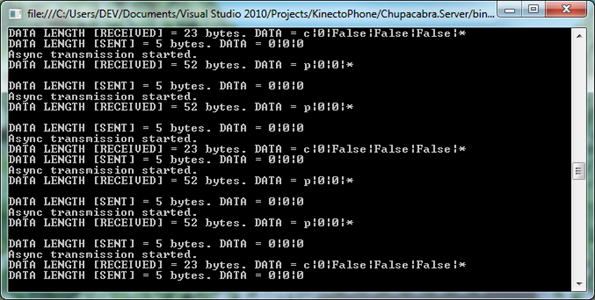
Since we decided to remove support for WCF and focus on sockets, we needed to figure out a way to send appropriate data to both clients. Given the fact that the amounts of data that are being sent across clients are not really big, it seemed a good idea to make the server broadcast a dual data set—a collection of indicators that are used by both the phone and desktop clients. It will be the client’s responsibility to select the required value.
Here is the general structure of a data package broadcasted by the server:

We tried to keep it as simple as possible. The desktop client is going to process the camera direction sent by the phone, and the phone will adjust the character position according to the movement generated by the Kinect-driven desktop client.
When the clients (both desktop and mobile) send data to the server, they identify themselves through a prefix. For example, the desktop client sends the following string to the server:

The c prefix identifies the sender as the desktop client (computer). The phone sends the camera angle, led by the p prefix (phone):

Before going any further, I must mention that socket communications on Windows Phone are fairly generic, so the code we decided to use is close to the Sockets Sample on MSDN. We added a custom string parser that makes sure that the proper data is read between devices.
The server #
Our server is entirely based on socket interactions through the TCP layer. It is a .NET-based console application that is listening to incoming connections (limited to two) and is broadcasting the received content, synchronizing both the desktop and the mobile clients. It is a “dummy” server and so doesn’t perform any data processing—it simply receives the data from one client and then passes it to another.
Here is how the listening process is organized:
public static void StartListening()
{

    byte[] dataBuffer = new Byte[StateObject.BUFFER_SIZE];
    IPEndPoint localEndPoint = new IPEndPoint(IPAddress.Any, PORT_NUMBER);
    Socket listener = new Socket(AddressFamily.InterNetwork, SocketType.Stream, ProtocolType.Tcp);

    try
    {
        listener.Bind(localEndPoint);
        listener.Listen(2);

        while (true)
        {
            completed.Reset();
            Console.WriteLine("Async transmission started.");
            listener.BeginAccept(new AsyncCallback(AcceptCallback),listener);
            completed.WaitOne();
        }

    }
    catch (Exception e)
    {
        Debug.WriteLine(e.ToString());
    }
}
The received byte array is later transformed to a standard string that is parsed according to the pattern described above. The parser detects the prefix and assigns the correct values depending on the sender.
private static void ParseContent(string content)
{
    var values = content.Split('|');
    if (content.StartsWith("c"))
    {
        position = int.Parse(values[1]);
    }
    else if (content.StartsWith("p"))
    {
        angle = int.Parse(values[1]);
    }
}
The difference in received data is present because each client is designed to affect only a part of the gameplay, and character movement cannot be directed by a desktop client or by the mobile application on its own. The mobile client reports the angle of character rotation, and the desktop client controls general movement progress and bonus pickups.
Once all values are read, the server broadcasts them back:
private static void Send(Socket handler)
{
    // The generalized string broadcasted by the server does not contain a platform
    // identifying prefix (p or c)
    string data = string.Format("{0}|{1}", angle, position);

    byte[] byteData = Encoding.UTF8.GetBytes(data);

    Console.WriteLine("DATA LENGTH [SENT] = {0} bytes. DATA = {1}", data.Length, data);

    handler.BeginSend(byteData, 0, byteData.Length, 0, new AsyncCallback(SendCallback), handler);
}
This is pretty much it when it comes to defining the server that handles cross-platform communications. It can be installed on a machine other than the one where the desktop client is running, as long as all of them work on either the same subnet or a network in which the IP addresses are static and have the invoked port open.
The desktop client #
The desktop client was a bit of a graphical “fortress.” Rick was building the entire 3D environment while Adam and I were building the mobile application and the server interoperability layer.
We used the newly launched Kinect SDK to access the connected Kinect and it was initialized the moment the main window is loaded:
void SetupKinect()
{
    nui = new Runtime();

    try
    {
        nui.Initialize(RuntimeOptions.UseSkeletalTracking);
    }
    catch (InvalidOperationException)
    {
        MessageBox.Show("Runtime initialization failed. Please make sure Kinect device is plugged in.");
        return;
    }

    nui.SkeletonFrameReady += new EventHandler<SkeletonFrameReadyEventArgs>(nui_SkeletonFrameReady);
}
Runtime is the standard device class that identifies the Kinect currently connected to the PC. As long as we were using just one sensor, we did not need to provide a numeric index when instantiating the Runtime class itself.
Since we are only using skeletal tracking—the desktop client is responsible for moving the character forward on a detected jump—the Runtime instance is initialized with a RuntimeOptions.UseSkeletalTracking argument. The event handler is invoked once we detect a tracked skeleton:
void nui_SkeletonFrameReady(object sender, SkeletonFrameReadyEventArgs e)
{
    SkeletonFrame skeletonFrame = e.SkeletonFrame;

    foreach (SkeletonData data in skeletonFrame.Skeletons)
    {
        if (SkeletonTrackingState.Tracked == data.TrackingState)
        {

            phL = new Point(data.Joints[JointID.HandLeft].Position.X, data.Joints[JointID.HandLeft].Position.Y);
            phR = new Point(data.Joints[JointID.HandRight].Position.X, data.Joints[JointID.HandRight].Position.Y);
            pCore = new Point(data.Joints[JointID.HipCenter].Position.X, data.Joints[JointID.HipCenter].Position.Y);

            coreDeep = data.Joints[JointID.HipCenter].Position.Z;

            leftDeep = data.Joints[JointID.HandLeft].Position.Z - coreDeep;
            rightDeep = data.Joints[JointID.HandRight].Position.Z - coreDeep;

            handL.x = 640 + 600 * phL.X;
            handL.y = 350 - 300 * phL.Y;
            handR.x = 640 + 600 * phR.X;
            handR.y = 350 - 300 * phR.Y;

            bodyCore.x = 640 + 30 * pCore.X;
            bodyCore.y = 350 - 300 * pCore.Y;

            follow.x = bodyCore.x;
        }
    }
}
The Kinect sensor monitors six skeletons at once, but not all of them are tracked for movement. That’s the reason to check the SkeletonTrackingState before displaying the joint indicators on the screen.
The joint indicators themselves are declared in the XAML layout in the main page:
<Canvas x:Name="touch_screen" Width="1280" Height="720" Background="#00FF0000">
    <local:BodyMarker x:Name="handL"/>
    <local:BodyMarker x:Name="handR"/>
    <local:BodyMarker x:Name="follow" x="0" y="0"/>
    <local:BodyMarker x:Name="bodyCore" x="0" y="0"/>
</Canvas>
The BodyMarker class is in fact a custom UserControl. It is easier to manage and later extend instances of a customizable unit rather than a simple ellipse:
<UserControl x:Class="KinectoPhone.Desktop.BodyMarker"
             xmlns="https://schemas.microsoft.com/winfx/2006/xaml/presentation"
             xmlns:x="https://schemas.microsoft.com/winfx/2006/xaml"
             xmlns:mc="http://schemas.openxmlformats.org/markup-compatibility/2006"
             xmlns:d="https://schemas.microsoft.com/expression/blend/2008" >
    <Canvas>
        <Ellipse x:Name="bkg" Width="10" Height="10" Canvas.Left="-5" Canvas.Top="-5"/>
    </Canvas>
</UserControl>
In the skeleton tracking code above, we are not only tracking the joint position, we’re also adjusting the character position based on the center hip location in space as well as detecting the jump by coordinating joint positions by the Z-axis.
The data is sent via an instance of the same AsynchronousClient I used on the server side, but with small modifications. I implemented a short verification mechanism that ensures the fact that I am using an IPv4 address as the endpoint will be functional with only IPv4 and not IPv6 addresses for the time being:
public AsynchronousClient()
{
    // The worker that is constantly syncing the state of the
    // desktop client with the server.
    backgroundWorker.DoWork += new DoWorkEventHandler(backgroundWorker_DoWork);

    IPHostEntry ipHost = Dns.GetHostEntry("192.168.173.1");

    var ipv4address = (from c in ipHost.AddressList where c.AddressFamily == AddressFamily.InterNetwork select c).First();

    if (ipv4address != null)
    {
        IPAddress ipAddress = (IPAddress)ipv4address;
        remoteEndPoint = new IPEndPoint(ipAddress, port);

        InitializeClient();
    }
}
The BackgroundWorker is managing the constant synchronization building the location and meta string that is being sent with updated character position and activity data from the desktop client:
void backgroundWorker_DoWork(object sender, DoWorkEventArgs e)
{
    if (!client.Connected)
    {
        client.Shutdown(SocketShutdown.Both);
        client.Close();
        InitializeClient();
    }

    DesktopData cd = (DesktopData)e.Argument;
    Send(client, string.Format("c|{0}", cd.Position));
    sendDone.WaitOne();

    // Receive the response from the remote device.
    Receive(client);
    receiveDone.WaitOne();
}
When the desktop client receives data, it only reads information regarding the camera angle. Therefore, that’s the only indicator we needed to set from the outside:
void aClient_ResponseReceived(object sender, ResponseReceivedEventArgs e)
{
    Dispatcher.Invoke(new Action(delegate
    {

        var values = e.Response.Split('|');

        cameraTargetRotation = Convert.ToDouble(values[0]);

    }), DispatcherPriority.Normal);
}
Phone client #
The phone client has only one responsibility—adjust the camera angle as the user tilts the device. We used standard accelerometer-based capabilities to track the movement of the device in space.
The app uses a different implementation of the AsynchronousClient called SocketHandler. It works well to link the phone to the server. For example, take a look at the handler that processes the received input:
private void ProcessReceive(SocketAsyncEventArgs e)
{
    if (e.SocketError == SocketError.Success)
    {
        // Received data from server
        string dataFromServer = Encoding.UTF8.GetString(e.Buffer, 0, e.BytesTransferred);

        Socket sock = e.UserToken as Socket;
        sock.Shutdown(SocketShutdown.Send);
        sock.Close();
        clientDone.Set();

        // Respond to the client in the UI thread to tell him that data was received
        System.Windows.Deployment.Current.Dispatcher.BeginInvoke(() =>
        {
            ResponseReceivedEventArgs args = new ResponseReceivedEventArgs();
            args.response = dataFromServer;
            OnResponseReceived(args);
        });

    }
    else
    {
        clientDone.Set();
        throw new SocketException((int)e.SocketError);
    }
}
Due to threading limitations, we had to use the dispatcher class to notify the UI about the fact that all data from the server was received and that it should be transformed to the position of the character on the map.
In the main page constructor, we are initializing the SocketHandler with the same values for the server as we did in the desktop client. Additionally, we’re wiring an event handler that will handle the received string. Unlike ProcessReceive above, the wired event handler actually parses the string for required values and accordingly takes the appropriate action:
SocketHandler handler = new SocketHandler("192.168.1.6", 13001);
handler.ResponseReceived += new ResponseReceivedEventHandler(handler_ResponseReceived);

void handler_ResponseReceived(object sender, ResponseReceivedEventArgs e)
{
    previousPos = currentPos;

    string[] data = e.response.Split('|');
    int.TryParse(data[1], out currentPos);

    if (currentPos != previousPos)
    {
        targetIndex = currentPos;
    }
}
The data is sent back to the server with the help of a DispatcherTimer instance running every 300 milliseconds:
void timer_Tick(object sender, EventArgs e)
{
    handler.SendData(string.Format("p|{0}", curTriangleAngle.ToString("0")));
}
When the accelerometer detects a change in the current value, we make sure that the object is rotated in the right direction by checking the sign of the reading:
void accel_ReadingChanged(object sender, AccelerometerReadingEventArgs e)
{
    Dispatcher.BeginInvoke(new Action(() =>
    {
        previousY = currentY;
        currentY = e.Y;

        if (e.Y > .7 || e.Y < -.7)
        {
            if (e.Y > .7 && !isTurnDirty)
            {
                isTurnDirty = true;
                Turn(1);
            }
            else if (e.Y < -.7 && !isTurnDirty)
            {
                isTurnDirty = true;
                Turn(-1);
            }
        }
        else
        {
            isTurnDirty = false;
        }

    }));
}

void Turn(double direction)
{
    currentTurnTime = DateTime.Now;
    TimeSpan diffResult = currentTurnTime.Subtract(lastTurnTime);
    if (diffResult.TotalSeconds > 1)
    {
        lastTurnTime = currentTurnTime;
        targetTriangleAngle += direction * 90.0;
    }
}
The turn time is checked so that the character on the device screen doesn’t constantly rotate. Since the accelerometer is very sensitive and without a time limit, a slight tilt will have unexpected consequences on the rotation behavior.
How to test #
Virtual Router is a great way to test the set-up. Virtual Router allows the server computer to become a WiFi hotspot so that any connected device will be automatically registered as a part of the local subnet.
You will need:
- A computer with a WiFi card (most laptops have them anyway)
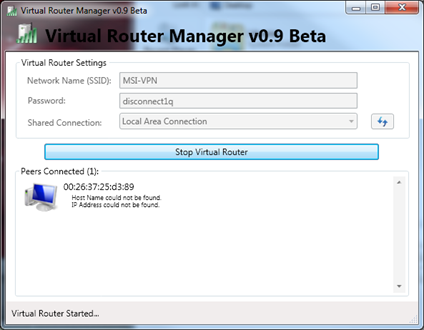
Make sure that you have the WiFi card enabled and launch Virtual Router Manager. Set a new network name, as well as specify a password. It is worth mentioning that this network will act like a standard wireless network, so make sure you secure it with a strong password if you don’t want it accessed from the outside.
Once you enable the hotspot, you can run the desktop client on the same machine. Connect the phone to the newly created wireless network and make sure that the proper IP is set in the code-behind for both the desktop client and the Windows Phone app.
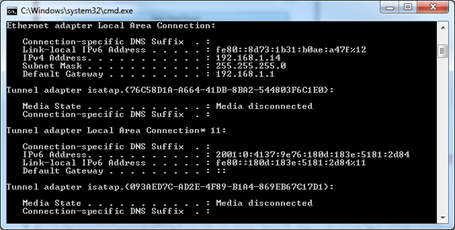
The IP for the server machine can be found by running the ipconfig command in the console.
The IP address for the Windows Phone device that is connected to the hotspot is shown in the main Virtual Router Manager window.
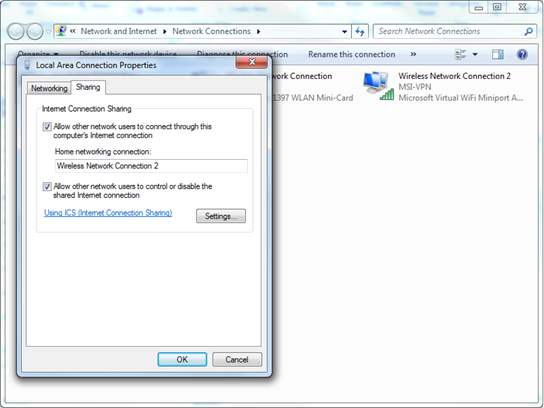
In case the router cannot be started, make sure that connection sharing is enabled for your main connection and that it points to the Miniport interface.
Once the network is correctly set up, I would highly recommend launching the project components in the following order:
- Server
- Desktop client
- Phone client
Conclusion #
With the latest 7.1 SDK update for Windows Phone as well as the 7.5 (Mango) OS, it is fairly easy to set up a Kinect-to-WP communication layer through sockets. With small modifications and performance optimizations we can also send Kinect imagery (captured through the depth and video sensors) directly to the phone without major delays. The field of third-party games that interoperate with Kinect and run on mobile devices is yet to be fully developed, but we already made the first steps in that direction.