Visual Studio Team Services - Pull Request After Build
Table of Contents
I am a big fan of doing a lot of the monotonous automation work through Continuous Integration (CI). Specifically, I work a lot with defining workflows for documenting managed (.NET-based) API reference documentation.
In the process, we leverage several tools, as you can read from one of my previous posts. The reality of software is, however, that it changes. New updates are pushed, new NuGet packages are released, and with that, there is a very high probability that the documentation changed as well. Which means that now we need a workflow that integrates the changes automatically into the content container that we use to render docs on docs.microsoft.com.
Approach #
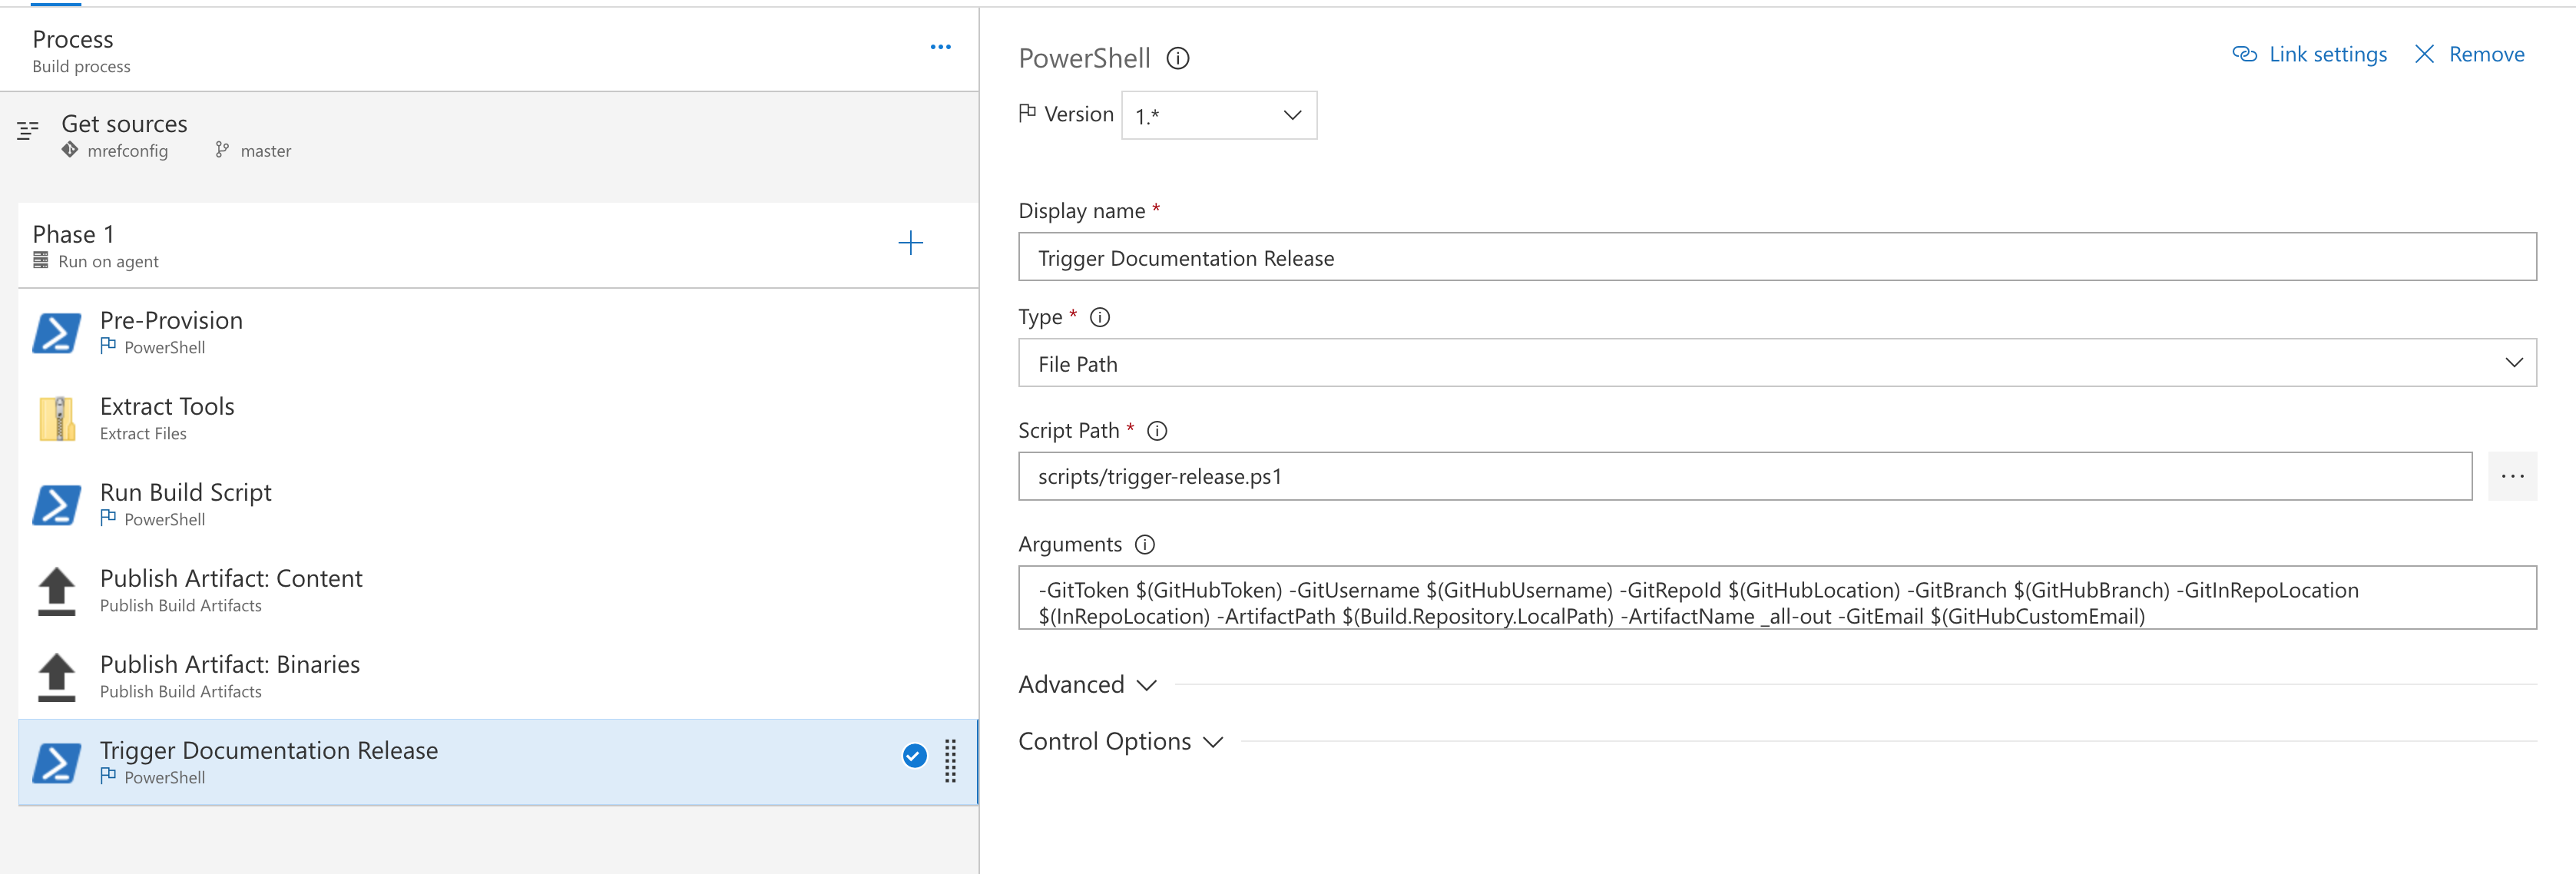
When our builds are happening, we rely on several build scripts, configured to run consecutively in VSTS:

Some pull in the tools, others extract NuGet packages, identify the binaries and the associated XML files and then produce documentaiton. Notice in the set above, there are two publishing steps, that effectively push the artifacts (products) of the build into the build storage - once the build completes, you can take the approach of configuring a release pipeline (e.g. in scenarios where you have different environments), or a human can just download the results, and then push them manually into the repository.
Just like I mentioned above, I am a big fan of automation and making sure that humans do the smallest amount of boring work possible (and let’s face it, sync-ing things across repos is boring work) - so we need to automate how we publish the artifact.
Given that we are not yet certain the artifact is 100% valid, we want to issue a pull request against the target content repository, so that a human can at least partially review this content (boring work, again, but we’ll talk about automating that in another post).
Code #
Out-of-the-box, VSTS does not provide an easy way to issue a pull request to GitHub - and that’s where the majority of our content repositories are located. So we need to put together a custom script that does that for us.
Some requirements that we want to keep in mind:
- The script should be easily integrated in all our CI jobs.
- Content builds on both Linux and Windows should be able to leverage it.
- No values in it should be hard-coded and should instead be consumed from the build definition.
Thinking of all this, the easiest approach would be just writing a Python script, so that’s exactly what I did, and came up with this:
import sys
import shutil
import os
import subprocess
import datetime

from github import Github

def git(*args):
    return subprocess.check_call(['git'] + list(args), stderr=sys.stdout.fileno())

gitHubUsername = str(sys.argv[1])
gitHubToken = str(sys.argv[2])
docRepoId = str(sys.argv[3])
targetBranch = str(sys.argv[4])
targetLocation = str(sys.argv[5])
workingArtifactFolder = str(sys.argv[6])
artifactId = str(sys.argv[7])

now = datetime.datetime.now()

g = Github(gitHubUsername, gitHubToken)

# Step 1: Create a new fork for the documentation repository.
repo = g.get_repo(docRepoId)
github_user = g.get_user()
myfork = github_user.create_fork(repo)

# Clone the fork locally
git("clone", "https://" + gitHubToken + "@github.com/" + myfork.owner.login + "/" + myfork.name + ".git", "-b", targetBranch, "_clonedfork")

# Step 2: Create a new commit
cloneLocation =  os.path.join(os.getcwd(), "_clonedfork")
combinedLocation = os.path.join(cloneLocation ,targetLocation)
print "Destination to clear: " + combinedLocation

# Empty destination folder.
shutil.rmtree(combinedLocation)

combinedArtifactLocation = os.path.join(workingArtifactFolder, artifactId)
print "Artifact location: " + combinedArtifactLocation

shutil.copytree(combinedArtifactLocation, combinedLocation)

git("--git-dir=" + os.path.join(cloneLocation, ".git"), "--work-tree=" + cloneLocation, "add", ".")

git("--git-dir=" + os.path.join(cloneLocation, ".git"), "--work-tree=" + cloneLocation, "commit", "-m", "\"📦 Update from CI\"", "--allow-empty")

git("--git-dir=" + os.path.join(cloneLocation, ".git"), "--work-tree=" + cloneLocation, "push")

# Step 3: Create a pull request against the content repo
repo.create_pull(title="CI job update " + now.strftime("%Y-%m-%d %H:%M"), body="Update from CI", head=myfork.owner.login + ":" + targetBranch, base=targetBranch)
When the build completes, the script will be triggered through a custom build steps, with all parameters passed to it via build variables:
The script is responsible for doing several things:
- Clone the target content repository.
- Fork it to the current user’s GitHub account.
- Commit the changes to the user’s fork.
- Issue a PR from fork to the source repository.
PyGitHub is extremely helpful here, as it implements a lot of the GitHub APIs that I’d otherwise have to deal with manually. And issuing PRs from the command line is not exactly a piece of cake.
Notice that the script that is registered as the build step is, in fact, a PowerShell wrapper that helps trigger the Python script:
param (
    [string]$GitUsername = "NOT_VALID",
    [string]$GitToken = "NOT_VALID",
    [string]$GitRepoId = "NOT_VALID",
    [string]$GitBranch = "NOT_VALID",
    [string]$GitInRepoLocation = "NOT_VALID",
    [string]$ArtifactPath = "NOT_VALID",
    [string]$ArtifactName = "NOT_VALID",
    [string]$GitEmail = "NOT_VALID"
)

$scriptpath = split-path -parent $MyInvocation.MyCommand.Definition

cd $scriptpath

git config --global user.email $GitEmail
git config --global user.name $GitUsername

python -m pip install pygithub

python git-release-documentation.py $GitUsername $GitToken $GitRepoId $GitBranch ($GitInRepoLocation) ($ArtifactPath) ($ArtifactName)
You can place this script in a local VSTS repo, that you then clone from your build job. The same can be done with Linux-based build agents, where you can create a shell script to trigger the exactly the same script.
Now, when you trigger a build, should all your credentials be in order, you should see a brand new PR issued against the repository you have, where changes are present.